
Introduction
Pagination is an important concept in building data-driven applications. When pulling out the records from the database, a large number of records may be fetched. For instance, when running the query for active users or users belonging to some specific location, a large number of users in hundreds or even thousands can be returned. Displaying this huge number of records on a single web page is not a user-friendly solution as it can overwhelm the user as well as ruin the smoothness of the user experience.
Hence, a preferable option is to restrict the number of records. This is the concept of pagination. In other words, we divide the number of records into pages and then display the page. A single page can have ten or even fifteen or any other amount of feasible records that can be displayed on the front end.
While pagination can improve the overall user experience of the application, it can also make the application faster since we can retrieve a reduced number of records. Hence, less data is transferred across the network between client and server, reducing the latency time.
In this tutorial, we will be building a PHP code that connects to the database and implementing pagination using the MySQL database and its LIMIT clause.
Prerequisites
To follow along with this tutorial, you will need:
-
The latest version of Ubuntu, up and running. Follow How to set up your Ubuntu server tutorial if you need assistance.
-
You will also need to have PHP and MySQL installed. To set up PHP and MySQL, we have a tutorial: LAMP Stack setup – Linux Apache MySQL PHP.
Step 1 — Set Up a Database User and a Test Database
In this tutorial, we will establish the database connection with the MySQL database and fetch the records. These records will be displayed on an HTML page with the table element. To establish the connection and display records we will use a PHP script. Once we are ready with the database connection, we will test our application with pagination and without pagination. Testing this way will allow us to understand how pagination works practically.
To connect to the MySQL database we will need a sample MySQL database and authentication information of the user to connect to the MySQL database. In this step, you’ll create a non-root user for your MySQL database, a sample database, and a table to test the PHP script.
First, log into your server. Then, log into the MySQL server using the below command:
|
1 |
mysql> sudo mysql -u root -p |
You will be prompted for the password of the root user. Enter the password and hit Enter to move forward. Next, create a sample database, called test_db, which we will be using in our tutorial. To create a new database, run the below command:
|
1 |
mysql> Create database test_db; |
You will see the output from the MySQL server that one row has been affected. Next, we will need to create a new user for this database. We will grant this user all the privileges. However, when working with practical applications, make sure you limit the privileges. We will call our user test_user. In the below command, replace the PASSWORD with a strong password:
|
1 |
mysql> GRANT ALL PRIVILEGES ON test_db.* TO 'test_user'@'localhost' IDENTIFIED BY 'PASSWORD'; |
Once the user has been created, flush the privileges:
|
1 |
mysql> FLUSH PRIVILEGES; |
Now that both test_user and test_db are ready, use the test_db to make tables. To switch to test_db, run the below command:
|
1 |
mysql> Use test_db; |
Once we see the database changed in the output, we are ready to make our table. We will create a new table called Products to hold the products. For our purposes, we will need only two columns in this table: product_id and product_name. We will set the product_id to AUTO_INCREMENT, so that it will be incremented every time we add a new product. The other column called product_name will be used to store the name of the product. The product_name column will be used to differentiate each product by name:
|
1 |
mysql> Create table products (product_id BIGINT PRIMARY KEY AUTO_INCREMENT, product_name VARCHAR(50) NOT NULL ) Engine = InnoDB; |
Now we will add some products to this newly created table. For this run the below commands:
|
1 2 3 4 5 6 7 8 9 10 |
mysql> Insert into products(product_name) values ('WIRELESS MOUSE'); mysql> Insert into products(product_name) values ('BLUETOOTH SPEAKER'); mysql> Insert into products(product_name) values ('GAMING KEYBOARD'); mysql> Insert into products(product_name) values ('320GB FAST SSD'); mysql> Insert into products(product_name) values ('17 INCHES TFT'); mysql> Insert into products(product_name) values ('SPECIAL HEADPHONES'); mysql> Insert into products(product_name) values ('HD GRAPHIC CARD'); mysql> Insert into products(product_name) values ('80MM THERMAL PRINTER'); mysql> Insert into products(product_name) values ('HDMI TO VGA CONVERTER'); mysql> Insert into products(product_name) values ('FINGERPRINT SCANNER'); |
To verify if these products have been entered in the table, run the below command:
|
1 |
mysql> select * from products; |
If you see the products you had entered above you are all set to move forward. Exit the MySQL database using the below command:
|
1 |
mysql> quit; |
Now that we have set up the MySQL database and we have entered test data, we are ready to code the PHP script to connect to this database and fetch records.
Step 2 – Fetching and Displaying Records Without Pagination
As discussed above, we will first display the records without pagination. We will be building a PHP script that connects with the MySQL database and fetches the records. We will connect to the test_db that we created above using the test_user and fetch the records.
Our products table currently has only ten records. It might not be obvious to many users if the pagination is needed or not needed. However, testing the application without the pagination will elaborate on how it helps in the overall experience of the application. We will also understand how splitting the data helps in creating a better user experience and reduces the burden on the server.
In your PHP server, on the document root of the website folder, run the below command:
sudo nano /var/www/html/pagination_test.php
Now in this file, add the below content. Make sure you replace the PASSWORD with the password value of your test_user:
|
1 2 3 4 5 6 7 8 9 10 11 12 13 14 15 16 17 18 19 20 21 22 |
<?php try { $pdo = new PDO("mysql:host=localhost;dbname=test_db", "test_user", "PASSWORD"); $pdo->setAttribute(PDO::ATTR_ERRMODE, PDO::ERRMODE_EXCEPTION); $pdo->setAttribute(PDO::ATTR_EMULATE_PREPARES,false); $sql = "select * from products"; $stmt = $pdo->prepare($sql); $stmt -> execute(); echo "<table border='1' align='center'>"; while (($row = $stmt -> fetch(PDO::FETCH_ASSOC)) !== false) { echo "<tr>"; echo "<td>".$row['product_id']."</td>"; echo "<td>".$row['product_name']."</td>"; echo "</tr>"; } echo "</table>"; } catch(PDOException $e) { echo $e->getMessage(); } ?> |
Save the file. Before we move forward, we will summarize what we did above:
-
First, we connected to the MySQL database, and for this we used the PHP Data Object (PDO) library. We used the credentials of the MySQL user we had used above to connect to the MySQL database. PDO is an extremely helpful library that is used to connect to the database. It makes the data access layer easy to code and allows connecting to diverse databases without having to refactor the application extensively. PDO uses prepared statements which ensures that the security is not compromised. Hence, queries are executed securely.
-
Next, we used the PDO API to execute the select * from products statement. The $pdo->setAttribute(PDO::ATTR_EMULATE_PREPARES,false) ensures that the data types in PHP are the same as in the database. Hence, product_id and product_name appear as integer and string respectively.
-
The $pdo->setAttribute(PDO::ATTR_ERRMODE, PDO::ERRMODE_EXCEPTION); tells the PDO to throw the exception if there is an error. By doing so, we can easily catch the exception in the try … catch block and handle it as needed.
Now that we have our script ready, we have to run this. For this, open your browser and visit the URL: /var/www/html/pagination_test.php. Make sure you append the URL with your server IP. If you are running locally, your URL will become http://localhost/var/www/html/pagination_test.php.
You will see the below output:
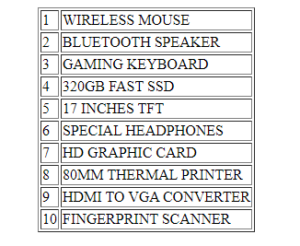
Here, our products are returned and displayed on the page. Now, imagine if we had hundreds of products. It would result in a long loop to fetch the data and display it on the page. This will increase the page loading time.
In the next section, we will modify the PHP script and include the MySQL LIMIT clause. This will fix the problem of displaying a large number of records. We will add the pagination links so that the user can navigate across the pages.
Step 3 – Setting up Pagination using PHP
In this step, we will be setting up pagination using PHP to display the data using multiple tables. To accommodate pagination, we will be modifying the script we had coded in the previous step.
We will be using the LIMIT clause of the MySQL database. Before adding this to the script, let’s see an example of the MySQL LIMIT syntax:
|
1 |
mysql> Select [column1, column2, column n...] from [table name] LIMIT offset, records; |
In the above statement we can see that the LIMIT clause has offset and records arguments. offset tells how many records to skip an records tells the maximum number of records to display per page or fetch from the database.
Now that we know how pagination works, let’s look at how we will be implementing it. We will display three records per page. So, if we have ten records in our database, we shall be having four pages by dividing the total number of records into the number of records per page. Since the result might not be the whole number, we will use the PHP Ceil function to round to the nearest integer to get the whole number result. Below is a simple code snippet to demonstrate the Ceil function:
|
1 |
$total_pages=ceil($total_records/$per_page); |
Now we will add the code for the pagination. To enable pagination and add the navigation links, open the file /var/www/html/pagination_test.php file using the below command:
|
1 |
$ sudo nano /var/www/html/pagination_test.php |
Next, replace the contents of this file with the code below:
|
1 2 3 4 5 6 7 8 9 10 11 12 13 14 15 16 17 18 19 20 21 22 23 24 25 26 27 28 29 30 31 32 33 34 35 36 37 38 39 40 41 42 43 44 45 46 47 48 49 50 51 52 53 54 55 56 57 58 59 |
<?php try { $pdo = new PDO("mysql:host=localhost;dbname=test_db", "test_user", "PASSWORD"); $pdo->setAttribute(PDO::ATTR_ERRMODE, PDO::ERRMODE_EXCEPTION); $pdo->setAttribute(PDO::ATTR_EMULATE_PREPARES,false); /* Begin Paging Info */ $page = 1; if (isset($_GET['page'])) { $page = filter_var($_GET['page'], FILTER_SANITIZE_NUMBER_INT); } $per_page = 3; $sqlcount = "select count(*) as total_records from products"; $stmt = $pdo->prepare($sqlcount); $stmt->execute(); $row = $stmt->fetch(); $total_records = $row['total_records']; $total_pages = ceil($total_records / $per_page); $offset = ($page-1) * $per_page; /* End Paging Info */ $sql = "select * from products limit :offset, :per_page"; $stmt = $pdo->prepare($sql); $stmt->execute(['offset'=>$offset, 'per_page'=>$per_page]); echo "<table border='1' align='center'>"; while ( ($row = $stmt->fetch(PDO::FETCH_ASSOC) ) !== false) { echo "<tr>"; echo "<td>".$row['product_id']."</td>"; echo "<td>".$row['product_name']."</td>"; echo "</tr>"; } echo "</table>"; /* Begin Navigation */ echo "<table border='1' align='center'>"; echo "<tr>"; if ($page-1 >= 1) { echo "<td><a href=".$_SERVER['PHP_SELF']."?page=".($page - 1).">Previous</a></td>"; } if ($page+1 <= $total_pages) { echo "<td><a href=".$_SERVER['PHP_SELF']."?page=".($page + 1).">Next</a></td>"; } echo "</tr>"; echo "</table>"; /* End Navigation */ } catch(PDOException $e) { echo $e->getMessage(); } ?> |
Here is a summary of this code:
-
We have to hold the information about the page we are currently on. For this we are using the $page variable. The $page variable is used to extract the page we are currently on using the $_GET[‘page’] variable.
-
Next, we need to specify how many pages we are displaying on a page. For this we are using the $per_page variable. Here we are displaying only three products per page.
-
As discussed above, we need to have the total number of records that are existing in the database. This is needed so that we can identify the total number of pages. The $total_records variable holds this information.
-
Finally, we need to know how many records to skip. For instance, if we are on the second page, we need to skip the first three records of the database. We are using the $offset variable to hold this information. We calculated this information on every page load using the formula $offset=($page-1)*$per_page. If you need to display any other number of items, you can specify the value in the $per_page variable.
-
To display the navigation buttons, we use the below code:
|
1 2 3 4 5 6 7 8 9 10 |
. . . if( $page-1>=1) { echo "<td><a href=".$_SERVER['PHP_SELF']."?page=".($page-1).">Previous</a></td>"; } if( $page+1<=$total_pages) { echo "<td><a href=".$_SERVER['PHP_SELF']."?page=".($page+1).">Next</a></td>"; } . . . |
The logic is that the $page is used to hold the current page. If we want to display the previous option on the page, the script will minus one from the value of the $page variable. If the result is greater or equal to one, the previous option is displayed on the page.
Similarly, to display the next option, we add one to the $page variable. Here we are ensuring that the result of addition should not exceed the total number of pages in the $total_pages variable.
After that, it is time to check the page. Open the browser and navigate to the page using the URL you used before:
|
1 |
http://your_server_ip/pagination_test.php |
You will see the output as below:

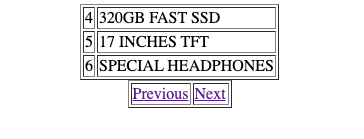

Here you have finally implemented the pagination using the LIMIT clause of MySQL in the PHP script. By implementing the pagination in your application, you will have a better way of navigating across multiple records.
Conclusion
In this tutorial, we looked at how to implement pagination using PHP and MySQL on Ubuntu. Utilizing these steps, you can build applications that can adequately display a large number of records, divided across the pages for effective manipulation.
In addition, we have more helpful tutorials on PHP and MySQL using Ubuntu:
- Installing and Securing phpMyAdmin on Ubuntu 18.04
- How to Reset MariaDB or MySQL Root Password
- CloudSigma Tutorial: How to setup MySQL on a server and MySQL basics
Happy Computing!
- How To Set Up GitHub Continuous Integration Pipelines With Self-Hosted Runners on Ubuntu 22.04. - March 20, 2023
- Managing CSV in Node.js using Node-CSV - March 15, 2023
- Containerize A Python App using Docker - March 7, 2023
- Using GitLab for Managing Projects - September 15, 2022
- Creating Drag and Drop Elements with Pure, Vanilla JavaScript - August 4, 2022