

In this CloudSigma tutorial, you will learn how to setup MySQL on a server, and the MySQL basics.
MySQL is an open-source Relational Database Management System (RDBMS) that helps users store, organize, and manage data. It is very popular and widely used in the IT industry.
Creating the machine
First, you have to create a machine. You can do that easily under CloudSigma WebApp’s Compute Section.
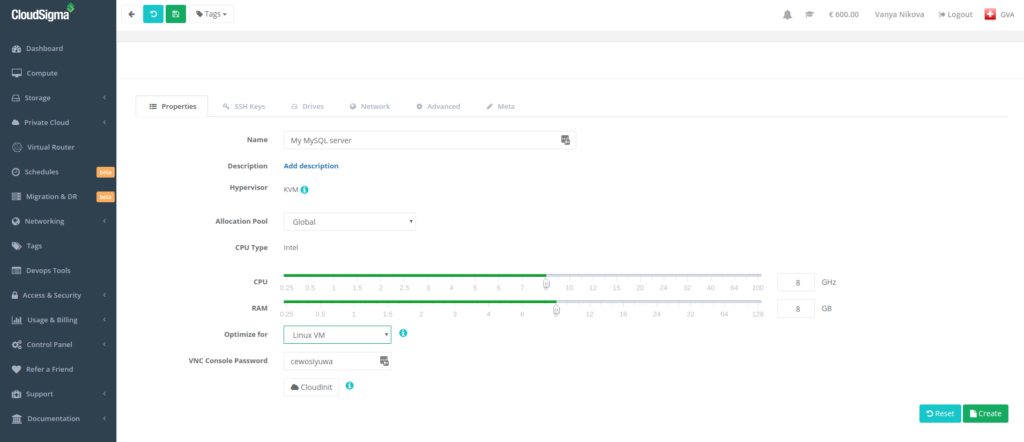
For this tutorial, you can use the following resources:
CPU: 8 GHz
RAM: 8 GB
SSD: 50 GB
You can mount the disk with Ubuntu 18.04 LTS image available in CloudSigma’s library:
Ubuntu 18.04: Pre-installed 64bit with VirtIO drivers, superuser, Python 2.7.17, Pip 20.0.2 OpenSSL 1.1.1d, Cloud-init and latest updates until 2019-03-03.
After starting the machine, you can update all the existing repos and packages on the machine by running the following commands:
|
1 2 |
sudo apt update sudo apt upgrade |
Installing MySQL
Now that your server is ready, you can install the MySQL server by running the following command:
|
1 |
sudo apt install mysql-server -y |
Yes, it’s that simple! In the following sections, we will focus on the MySQL basics.
Accessing MySQL Shell
Once you have installed MySQL Server, you can access the MySQL shell using the command:
|
1 |
sudo mysql -u root -p |
After entering the user password into the prompt, you will be logged in to the shell. In this case, you don’t have to enter a password since we are accessing it using as the root user.
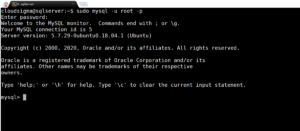
Now that you are logged in, you will be able to run the various SQL commands.
Working with SQL Databases
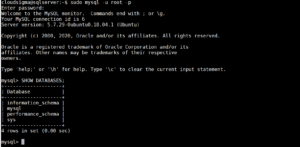
SQL has various databases and each of those databases has one or more tables to store the data in. To check the list of all the existing databases, you can use the following command:
|
1 |
SHOW DATABASES; |
Note:
- As you see, the command is ending with a semi-colon. All SQL commands have to end with “;”, otherwise they won’t be executed.
- Although MySQL is not case-sensitive, the rule of thumb is to write the command in UPPERCASE and the name of users, tables, databases, and text in lowercase.
Create a New Database
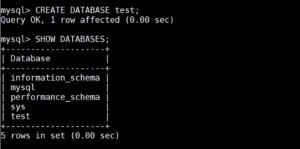
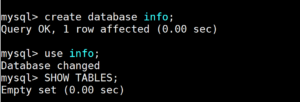
To create a new database, you can simply run the command:
|
1 2 3 4 |
CREATE DATABASE <<databaseName>>; Example, CREATE DATABASE test; |
Delete a Database
You can delete the database as easily as you created it. To do so, you can use the following command:
|
1 2 3 4 |
DROP DATABASE <<databaseName>>; Example, DROP DATABASE test; |
Access a Database
Once you have created the database, you can go ahead and add data to it. To do that, you would need to create a table.
In order to create a table , you’ll have to open the database you want to use with the command:
|
1 2 3 4 |
USE <databaseName>; Example, USE info; |
Now that you have selected the database, you can see the tables that are present in the database.
|
1 |
SHOW TABLES; |
Since you would have just created the database, you won’t see any tables as a result of this command.
Create a Table
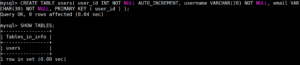
Now that you have selected a database, you can create a table in it. The generic syntax to create a table is the following:
|
1 2 3 4 5 6 7 8 9 10 |
CREATE TABLE <<tableName>>(<<ColumnName>> <<ColumnType>>); <span class="pln">Example: CREATE TABLE users</span><span class="pun">(</span><span class="pln"> user_id INT NOT NULL AUTO_INCREMENT</span><span class="pun">,</span><span class="pln"> username VARCHAR</span><span class="pun">(</span><span class="lit">20</span><span class="pun">)</span><span class="pln"> NOT NULL</span><span class="pun">,</span><span class="pln"> email VARCHAR</span><span class="pun">(</span><span class="lit">30</span><span class="pun">)</span><span class="pln"> NOT NULL</span><span class="pun">,</span> <span class="pln"> PRIMARY KEY </span><span class="pun">(</span><span class="pln"> user_id </span><span class="pun">)</span> <span class="pun">);</span> |
- The command would create a table ‘users’ in the database ‘info’ with 3 columns – user_id, username, and email.
- The user_id column has a command – “INT NOT NULL AUTO_INCREMENT” which increments the numbers automatically in each row.
- The username and email columns are limited to varchar type with a character limit of 20 and 30 respectively.
- With the PRIMARY KEY keyword, you can specify the user_id column to be considered as the primary key of the table.
You can see the tables created in the database using the “SHOW TABLES;” command.
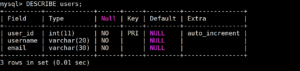
Moreover, you can check the table organization using the keyword “DESCRIBE”.
Insert Rows
Now that you have created a table, you can add new information or rows in the table by using the keyword INSERT. The syntax is:
|
1 2 3 4 |
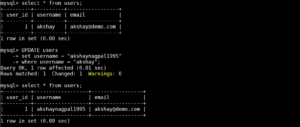
INSERT INTO `tableName` (`columnName1`,`columnName2`) VALUES ('Value1','Value2'); Example, INSERT INTO users (username, email) VALUES ('akshay','akshay@demo.com'); |
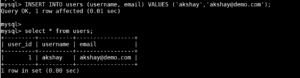
You will be able to see that the information has been added to the table.
Update Rows
There might be instances when you might want to edit/update the information about the user. You can do that using the ‘UPDATE’ keyword.
|
1 2 3 4 5 6 7 8 |
UPDATE "tableName" SET "column" = "value" WHERE "tableName"."columnName" = "oldValue"; Example: UPDATE users set username = "akshaynagpal1995" where username = "akshay"; |
Alter a Column
You can always create a new column or delete an existing one with the ‘ALTER’ Keyword.
|
1 2 3 4 |
ALTER TABLE users ADD 'columnName' 'type'; Example: ALTER TABLE users ADD product varchar(10); |
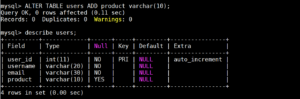
The command adds the column ‘product’ at the end of the table by default, and it limits it to type varchar of length 10. However, you can also insert the column after a particular column by using the keyword ‘After’ in the command.
|
1 2 3 4 |
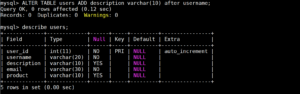
ALTER TABLE users ADD 'columnName' 'type' after 'columnName'; Example: ALTER TABLE users ADD description varchar(10) after username; |
The command inserts a new column after the username column.
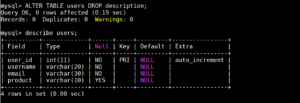
You can also delete a column using the ALTER keyword. For example, if you want to delete the ‘description’ column, you can use the command:
|
1 2 3 4 |
ALTER TABLE 'tableName' DROP 'ColumnName'; Example, ALTER TABLE users DROP description; |
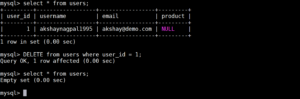
Delete a Row
You can also delete a row from the table using the DELETE command.
|
1 2 3 4 |
DELETE from 'tableName' where 'columnName'='value'; Example: DELETE from users where user_id = 1; |
Now that you know the MySQL basics, you can learn more about user permissions in MySQL in our next post.
Happy Computing!
- Removing Spaces in Python - March 24, 2023
- Is Kubernetes Right for Me? Choosing the Best Deployment Platform for your Business - March 10, 2023
- Cloud Provider of tomorrow - March 6, 2023
- SOLID: The First 5 Principles of Object-Oriented Design? - March 3, 2023
- Setting Up CSS and HTML for Your Website: A Tutorial - October 28, 2022