
MySQL is an open-source RDBMS based on SQL queries. It’s easy to use, secure, free, and open-source (under the GNU license). In addition, it is highly flexible, memory efficient, and high-performance. Because of all these features, MySQL finds its way in even the top-tier industries. When working with MySQL, most of the time, the interactions occur through the MySQL CLI tool. For many, that’s not a comfortable experience. This is where phpMyAdmin comes into play. It’s a front-end for MySQL. phpMyAdmin offers a web GUI for MySQL functions with increased flexibility.
In this guide, we will showcase how to install and secure phpMyAdmin on Ubuntu in a few easy steps.
Prerequisites
To follow this guide you must be familiar with Ubuntu 18.04. You also need to have access to sudo privilege. The system should be configured with the ufw firewall. For the server applications, you need LAMP (Linux, Apache, MySQL, PHP/Perl/Python) installed and configured. You can learn how to install a LAMP stack using our dedicated tutorial.
As for phpMyAdmin, keep the following security points in mind. PhpMyAdmin can:
- Establish direct communication with MySQL
- Manage MySQL credential authentication
- Execute and return SQL queries
Therefore, it’s crucial that you run phpMyAdmin over HTTPS. You need to be aware that PhpMyAdmin is a widely-deployed app. As a result, it can be a lucrative target for attackers. Now we can start!
Install phpMyAdmin
Because it’s a popular software, phpMyAdmin is directly available from the default Ubuntu repos. First, you need to install phpMyAdmin:
|
1 2 |
sudo apt update sudo apt install phpmyadmin php-mbstring php-gettext |
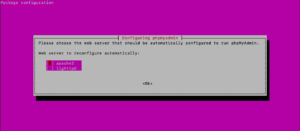
When the prompt asks for your web server of choice, choose apache2 (press spacebar to mark):
The next prompt will ask for the phpMyAdmin database configuration. Hit “Enter” to continue:
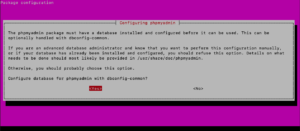
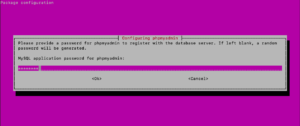
Select “Yes” when the installation asks whether phpMyAdmin should be configured with dbconfig-common. Then, the installation will ask for a MySQL application password for phpMyAdmin. The password will be used to secure phpMyAdmin access:
The installation should finish without any issue. At the end of this step, the phpMyAdmin configuration file is added under the “/etc/apache2/conf-enabled” directory. Next, the mbstring PHP extension has to be enabled. Run the command:
|
1 |
sudo phpenmod mbstring |
You can restart the web server for it to take effect:
|
1 |
sudo systemctl restart apache2 |
Configure user authentication and privileges
When phpMyAdmin is installed, a MySQL user is automatically created. The user “phpmyadmin” is responsible for providing necessary back-end functionalities. Instead of logging in using this user, it’s recommended to use the MySQL root user. Alternatively, it’s possible to have a dedicated user to connect to phpMyAdmin.
MySQL root password access
In the case of MySQL 5.7 (and later versions) running in Ubuntu, the root MySQL user is configured to authenticate using the auth_socket plugin. In many situations, this is a great thing as it offers hardened security and better usability. However, it can also make things complicated. Especially when it comes to granting apps like phpMyAdmin access to the root user. In this method, switch the authentication method from auth_socket to mysql_native_password. Note that if you want to have a dedicated user, then you can ignore this method. Launch the MySQL terminal and run the command:
|
1 |
sudo mysql |
After that, check the authentication method that’s currently in use and run the MySQL command:
|
1 |
SELECT user,authentication_string,plugin,host FROM mysql.user; |
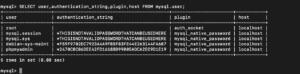
As we can see, the root user is configured to use auth_socket for authentication. Assign the root user a password using the ALTER USER command. As for the password, make sure to use something strong. Run the MySQL command:
|
1 |
ALTER USER 'root'@'localhost' IDENTIFIED WITH mysql_native_password BY 'password'; |
Next, run the FLUSH PRIVILEGES command. The server will reload the grant tables and the changes will come online. Run the MySQL command:
|
1 |
FLUSH PRIVILEGES; |
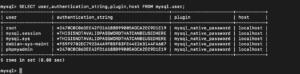
Then, verify the change. The root user should now be using mysql_native_password for authentication. Run the MySQL command:
|
1 |
SELECT user,authentication_string,plugin,host FROM mysql.user; |
Finally, you’re free to exit from the MySQL terminal. Run the MySQL command:
|
1 |
exit |
Dedicated user
In certain workflows, it’s more suitable to have a dedicated user to connect to phpMyAdmin. If you wish to follow this method, then you can ignore the previous one. We’ll be logging in to MySQL as root and we will create a new user. Launch the MySQL terminal:
|
1 |
sudo mysql |
If you’ve switched MySQL root authentication to mysql_native_password, then accessing MySQL root will require a different method. Run the following command instead:
|
1 |
mysql -u root -p |
When prompted, enter the password. From the MySQL terminal, create a new user. We will be creating a new user named “viktor”. The user password should be strong. Run the MySQL command:
|
1 |
CREATE USER 'username'@'localhost' IDENTIFIED BY 'password'; |

Now, we have to make sure that the user has appropriate privileges. The privileges include privilege over all tables, the ability to modify other user privileges, etc. Essentially, the user will act as a pseudo-root user. Run the MySQL command:
|
1 |
GRANT ALL PRIVILEGES ON *.* TO 'user'@'localhost' WITH GRANT OPTION; |

Our work with the MySQL terminal is complete. Exit the terminal:
|
1 |
exit |
Logging in using phpMyAdmin
It’s time to log in using phpMyAdmin. Open the web browser and go to the following URL:
|
1 |
http://server_domain_or_IP/phpmyadmin |
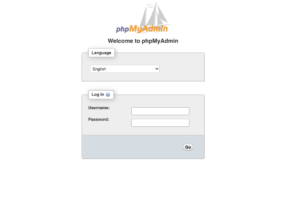
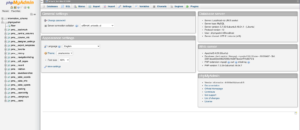
You’ll land on the phpMyAdmin welcome page followed by a login section. Depending on which method you followed, log in as either the root user or the new user just created. When successfully logged in, you’ll land on the phpMyAdmin dashboard:
Harden phpMyAdmin security
Our task is almost complete. All that’s left is strengthening the phpMyAdmin security. Because of all the features phpMyAdmin offers, it makes sense why it’s a valued target for attackers. That’s why it’s strongly recommended to take necessary actions to prevent unauthorized access.
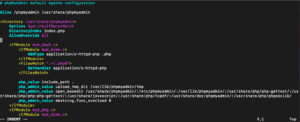
There are multiple ways to secure phpMyAdmin. Оne of the easiest ways to do it is by taking advantage of the .htaccess feature Apache offers. By default, Apache is configured to have .htaccess disabled. To use the .htaccess feature, it has to be enabled from the Apache configuration file. Open the file in a text editor and then, run the command:
|
1 |
sudo nano /etc/apache2/conf-available/phpmyadmin.conf |
Next, add the following entry at the shown location:
|
1 |
AllowOverride All |
Save and close the file. Then, in order for the changes to take into effect, restart Apache:
|
1 |
sudo systemctl restart apache2 |

The .htaccess functionality is enabled. Now, we have to create one for phpMyAdmin. Create the .htaccess file under the application directory. Run the command:
|
1 |
sudo touch /usr/share/phpmyadmin/.htaccess |
After that, open the file using a text editor. Enter the code:
|
1 |
sudo nano /usr/share/phpmyadmin/.htaccess |
Place the following codes in the file:
|
1 2 3 4 |
AuthType Basic AuthName "Restricted Files" AuthUserFile /etc/phpmyadmin/.htpasswd Require valid-user |
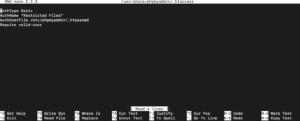
Here are the explanations for each of the lines:
- AuthType Basic: Specifies the authentication type to be implemented. In this case, it’ll be password authentication using a password file.
- AuthName: Sets the message for the authentication dialog box. It should be kept generic so that unauthorized users don’t get any information.
- AuthUserFile: Sets the location of the password file for authentication.
- Require valid-user: Specifies that only authenticated users will have access to the resource. This is what really stops unauthorized access.
Remember the third line? Time to create the password authentication file. For this purpose, the dedicated tool is htpasswd. Run the command:
|
1 |
sudo htpasswd -c /etc/phpmyadmin/.htpasswd username |
The tool will prompt for the password of the specified user. If you wish to add additional users, use the same htpasswd command. However, in this case, don’t use the “-c” flag. After that, run the command:
|
1 |
sudo htpasswd /etc/phpmyadmin/.htpasswd username |
Next, test out the result and try to access phpMyAdmin:
|
1 |
http://server_domain_or_IP/phpmyadmin |
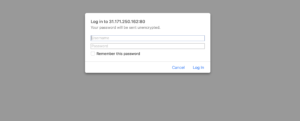
As you can see, without passing this authentication, it’s not possible to get access to phpMyAdmin. Therefore, this additional layer of security can be very assuring. Even if there’s a new vulnerability discovered in phpMyAdmin, this protective layer can make it really hard to exploit.
Final thoughts
Voila! Finally, phpMyAdmin is ready to use on the Ubuntu server! You can say goodbye to the old and boring MySQL terminal. Now you can perform all the MySQL actions like database creation, user management, table, etc. directly from a good-looking UI.
Happy Computing!
- Removing Spaces in Python - March 24, 2023
- Is Kubernetes Right for Me? Choosing the Best Deployment Platform for your Business - March 10, 2023
- Cloud Provider of tomorrow - March 6, 2023
- SOLID: The First 5 Principles of Object-Oriented Design? - March 3, 2023
- Setting Up CSS and HTML for Your Website: A Tutorial - October 28, 2022