

Introduction
Continuous Integration (CI) and Continuous Deployment (CD) are some of the most trending topics in software development currently. To achieve the CI/CD aspect of software architecture, developers make use of containers. Containers are lightweight, virtualized, portable, software-defined environments. In containers, the software can run in isolation of other software running on the physical host machine. The focus of this tutorial is on using the container platform Docker to deploy and run web applications. Docker helps to streamline the setup process of a web server stack. In this tutorial, we will use the LEMP stack to serve a Laravel application.
The LEMP stack combines Linux as the operating system, Nginx as the webserver, MySQL as the database, and PHP language for scripting and dynamic processing. You can follow our tutorial on how to install and configure a LEMP stack on Ubuntu. Laravel is one of the top PHP frameworks for developing web applications.
Docker provides a tool called Docker Compose for defining the setup process of a docker container. Docker Compose allows developers to define the infrastructure of their application, services, volumes, networks, and any dependencies in one file called the docker-compose file. It can manage multiple Docker containers through its commands such as docker container create, docker container run, etc.
In this tutorial, you will learn how to deploy a Laravel web application with Nginx and MySQL inside a Docker container. The configurations for the entire stack will be defined inside a docker-compose file, as well as other configuration files for PHP, MySQL, and Nginx. Let’s start!
First Things First
- As this is a hands-on tutorial, you should have an installation of Ubuntu 20.04 as your initial operating environment. You should also have a non-root user with sudo privileges. Here is a step-by-step tutorial to help you set up your Ubuntu server.
- You need to Install Docker. We have a tutorial on how to install and operate Docker on Ubuntu 18.04.
- You need to Install Docker Compose following the tutorial from the official Docker documentation.
Step 1: Download Laravel and Install the Dependencies
The first step is to get the Laravel code from a repo. In actual scenarios you may have your Laravel code in a repository somewhere, i.e. on either GitHub, Bit Bucket, Gitlab, etc. However, for the sake of this tutorial, we will be cloning the latest version from the official Laravel repo on GitHub. The repo comes with a composer file, an application-level dependency manager for PHP. Since we want everything to run inside the Docker container, we will install the dependencies using the Docker composer image. This will also help us avoid having to install composer globally on the actual host machine. Next, fire up your terminal.
Change into your home directory:
|
1 |
cd ~ |
Enter the following command to clone the repo into a directory called laravel-web. You are free to name it however you like. At the time of writing this repo, when we run this command, it pulls Laravel version 8. When you run the command, you will probably find a new version:
|
1 |
git clone https://github.com/laravel/laravel.git laravel-web |
Then, move into the directory you just cloned the repo into:
|
1 |
cd ~/laravel-web |
Enter the following command to mount the directories needed by your laravel app using Docker’s composer image:
|
1 |
docker run --rm -v $(pwd):/app composer install |
The -v and –rm flags in the docker run command create an ephemeral container that will be bind-mounted to the current directory before being removed. The command copies the contents of ~/laravel-web into the container and ensures the vendor folder created by the composer is copied back into the current directory.
Now, you need to change the ownership of the laravel-web directory to the non-root user. This will allow working with your application code as a non-root user and running processes inside the container in the subsequent steps. Enter the following command to change the ownership:
|
1 |
sudo chown -R $USER:$USER ~/laravel-web |
Your application code is now in place. The directory is owned by a non-root user, so you can proceed with defining the application services in the docker-composer file.
Step 2: Create the Docker Compose File
Docker Compose simplifies the process of building and deploying an application. Once you have defined the configurations and services, you can easily deploy your application in any host machine that has Docker and Docker Compose installed without worrying about the application dependencies. Most importantly you can do this with just one Docker Compose command, as we will see in Step 9.
In this step, you will be defining a Docker Compose file with configurations for the webserver, database, and application services necessary to deploy a Laravel app.
Docker Compose files are YAML files saved with the .yml extension. Please note that proper indentation is necessary for a valid Docker Compose file. Enter the following command to create and open the file with nano for editing:
|
1 |
nano ~/laravel-web/docker-compose.yml |
Next, you will define three services in this file: app, webserver, and db. The db section defines the database credentials for your application, so be sure to choose a strong mysql_root_password and replace it in that section. Copy and paste the following code:
|
1 2 3 4 5 6 7 8 9 10 11 12 13 14 15 16 17 18 19 20 21 22 23 24 25 26 27 28 29 30 31 32 33 34 35 36 37 38 39 40 41 42 43 44 45 46 47 48 49 50 51 |
version: '2.0' services: #PHP Service app: build: context: . dockerfile: Dockerfile image: cloudsigma.com/php container_name: app restart: unless-stopped tty: true environment: SERVICE_NAME: app SERVICE_TAGS: dev working_dir: /var/www/html/ networks: - app-network #Nginx Service webserver: image: nginx:alpine container_name: webserver restart: unless-stopped tty: true ports: - "80:80" - "443:443" networks: - app-network #MySQL Service db: image: mysql:5.7.32 container_name: db restart: unless-stopped tty: true ports: - "3306:3306" environment: MYSQL_DATABASE: laravel_web MYSQL_ROOT_PASSWORD: replace_mysql_root_password SERVICE_TAGS: dev SERVICE_NAME: mysql networks: - app-network #Docker Networks networks: app-network: driver: bridge |
Below, follow explanations of the services definitions from the above code:
- app: Defines the Laravel application and runs a custom Docker image, cloudsigma.com/php, that we will define in Step 4. It also sets the working_dir in the container to /var/www/html.
- webserver: It pulls the nginx:alpine image from Docker and exposes ports 80 and 443.
- db: It pulls the mysql:5.7.32 image from Docker and defines a few environmental variables. These include a database called laravel_web for the application and the root password for the database. You may rename the database with a name of your choice. Remember to replace the MYSQL_ROOT_PASSWORD property with a strong password. This service also maps port 3306 on the host to port 3306 on the container.
The container_name property in each service defines a name for the container corresponding to the service. If you do not define the property, Docker chooses a random name for each container.
The networks property defines a bridge network called app-network which facilitates communication between containers. A bridge network is controlled by a software bridge that only allows communication between containers on the same network bridge. The bridge software controller installs drivers that prevent containers on different bridge networks from communicating directly with each other. This ensures a high level of security since only related services can communicate directly. You may choose to define multiple services and networks connecting to related functions.
Step 3: How to Persist Data
Your web application will be handling and serving data to your users. In this step, we will guide you through defining volumes and bind mounts for your service definitions to persist the application’s data. Docker offers incredible features such as bind mounts and volumes for persisting data and saving application configuration files. We will use them in setting up our Laravel app with Docker.
Volumes are preferred for various reasons including offering backups and persisting data beyond a container’s life cycle. Bind Mounts usually reference an actual directory on the host machine. When you create a volume, a new directory is created inside the Docker’s storage directory which is managed by Docker. When you create a bind mount, a file or directory inside the host machine is mounted into a container (referenced by its absolute path). This is crucial to our web application because when you make changes to the code on the host machine, it will immediately be made available to the container.
Be careful when using bind mounts. Processes running inside the Docker container can make changes to the host file system and affect non-Docker processes running on the host system. While Docker mounts are a powerful feature be aware of these security implications.
Having said that, let’s see how we can use these two features in our setup. First, we will define a volume for persisting the MySQL database. In the Docker Compose file that we had created, under db service, add a volumes property as highlighted below:
|
1 2 3 4 5 6 7 8 |
#MySQL Service db: ... volumes: - dbdata:/var/lib/mysql/ networks: - app-network ... |
As defined, the volume dbdata will persist the contents of /var/lib/mysql. It facilitates backups and allows for service restarts without losing the data. Next, you should add the volumes definition at the end of the Docker Compose file to make it available across services. Enter the following code snippet at the bottom of the file:
|
1 2 3 4 |
#Volumes volumes: dbdata: driver: local |
To connect to a MySQL database, you must provide credentials. To do so, define a bind mount by adding the following highlighted code snippet to the db service under volumes property:
|
1 2 3 4 5 6 7 |
#MySQL Service db: ... volumes: - dbdata:/var/lib/mysql/ - ./mysql/my.cnf:/etc/mysql/my.cnf ... |
The code binds ~/laravel-web/mysql/my.cnf to /etc/mysql/my.cnf in the container. The bound file is the MySQL configuration files that we will create in Step 7.
The container needs to use the Nginx server to serve your application code. Therefore, we will define two bind mounts (one for the Nginx configuration file, and one for the application code), under the webserver service for this purpose. Add the following code snippet for volumes definition under the webserver service:
|
1 2 3 4 5 6 7 8 |
#Nginx Service webserver: ... volumes: - ./:/var/www/html/ - ./nginx/conf.d/:/etc/nginx/conf.d/ networks: - app-network |
This line – ./:/var/www/html binds the application code in the ~/laravel-web directory to the /var/www/html directory inside the container. For the second bind mount, a configuration file for Nginx will be created at ~/laravel-web/nginx/conf.d/. It will be mounted to /etc/nginx/conf.d/ inside the container. Hence, you can update the configuration file on the host machine as needed. We will create the Nginx conf file in Step 6.
For changes in the code to reflect automatically in the container, we bind mount the application code to the container. This speeds up the deployment process. Thus, add the following highlighted code snippet to the app service:
|
1 2 3 4 5 6 7 8 |
#PHP Service app: ... volumes: - ./:/var/www/html/ - ./php/laravel.ini:/usr/local/etc/php/conf.d/laravel.ini networks: - app-network |
The second line binds a php configuration file, which we will create in Step 5 inside the ~/laravel-web/php/laravel.ini file to /usr/local/etc/php/conf.d/laravel.ini inside the container.
Your complete Docker Compose file should now look like this:
|
1 2 3 4 5 6 7 8 9 10 11 12 13 14 15 16 17 18 19 20 21 22 23 24 25 26 27 28 29 30 31 32 33 34 35 36 37 38 39 40 41 42 43 44 45 46 47 48 49 50 51 52 53 54 55 56 57 58 59 60 61 62 63 64 |
version: '2.0' services: #PHP Service app: build: context: . dockerfile: Dockerfile image: cloudsigma.com/php container_name: app restart: unless-stopped tty: true environment: SERVICE_NAME: app SERVICE_TAGS: dev working_dir: /var/www/html/ volumes: - ./:/var/www/html/ - ./php/laravel.ini:/usr/local/etc/php/conf.d/laravel.ini networks: - app-network #Nginx Service webserver: image: nginx:alpine container_name: webserver restart: unless-stopped tty: true ports: - "80:80" - "443:443" volumes: - ./:/var/www/html/ - ./nginx/conf.d/:/etc/nginx/conf.d/ networks: - app-network #MySQL Service db: image: mysql:5.7.32 container_name: db restart: unless-stopped tty: true ports: - "3306:3306" environment: MYSQL_DATABASE: laravel_web MYSQL_ROOT_PASSWORD: replace_mysql_root_password SERVICE_TAGS: dev SERVICE_NAME: mysql volumes: - dbdata:/var/lib/mysql/ - ./mysql/my.cnf:/etc/mysql/my.cnf networks: - app-network #Docker Networks networks: app-network: driver: bridge #Volumes volumes: dbdata: driver: local |
If everything looks fine, press Ctrl + O to save the file. Then, press Ctrl + X to exit the editor. At this point, you should be able to build a custom Docker image for your application with the Docker Compose file.
Step 4: Create the Dockerfile
Dockerfile includes instructions that Docker can use to build custom Docker images. It can also install the software required and configure the necessary settings for your application. They specify the environment inside a container that will host your application code. You may push the images you create to docker hub for sharing or place them on other private registries.
We will create a Dockerfile that will specify the instructions to build the Laravel application image. Use nano to create the Dockerfile in ~/laravel-web directory:
|
1 |
nano ~/laravel-web/Dockerfile |
In the opened editor, add the following code:
|
1 2 3 4 5 6 7 8 9 10 11 12 13 14 15 16 17 18 19 20 21 22 23 24 25 26 27 28 29 30 31 32 33 34 35 36 37 38 39 40 41 42 43 44 45 46 |
FROM php:7.4-fpm # Copy composer.lock and composer.json into the working directory COPY composer.lock composer.json /var/www/html/ # Set working directory WORKDIR /var/www/html/ # Install dependencies for the operating system software RUN apt-get update && apt-get install -y \ build-essential \ libpng-dev \ libjpeg62-turbo-dev \ libfreetype6-dev \ locales \ zip \ jpegoptim optipng pngquant gifsicle \ vim \ libzip-dev \ unzip \ git \ libonig-dev \ curl # Clear cache RUN apt-get clean && rm -rf /var/lib/apt/lists/* # Install extensions for php RUN docker-php-ext-install pdo_mysql mbstring zip exif pcntl RUN docker-php-ext-configure gd --with-freetype --with-jpeg RUN docker-php-ext-install gd # Install composer (php package manager) RUN curl -sS https://getcomposer.org/installer | php -- --install-dir=/usr/local/bin --filename=composer # Copy existing application directory contents to the working directory COPY . /var/www/html # Assign permissions of the working directory to the www-data user RUN chown -R www-data:www-data \ /var/www/html/storage \ /var/www/html/bootstrap/cache # Expose port 9000 and start php-fpm server (for FastCGI Process Manager) EXPOSE 9000 CMD ["php-fpm"] |
The Dockerfile first creates an image based on the php:7.4-fpm Docker image. This is a Debian-based image with PHP FastCGI implementation (PHP-FPM installed. For Laravel to run properly, it requires other php extensions like mcrypt, pdo_mysql, mbstring, and imagick to be available, which the script installs. It then installs the composer php package manager. The container will use it to install the Laravel php dependencies.
You can use the RUN directive to define commands such as install, update, and configure settings inside the container. It also assigns user permissions. WORKDIR directive specifies the working directory, /var/www/html in this case. The script runs the CHOWN command to assign the /var/www/html directory permissions to the www-data user.
Before finally building the image, a port must be exposed to allow access to the application running inside the container. The EXPOSE command exposes a port, 9000, for the php-fpm server. The final command to run is the CMD directive. It runs php-fpm to start the server.
You can now press Ctrl + O to save the file. Then, press Ctrl + X to exit the editor.
Step 5: Configure PHP
In this step, we will configure the php service to process incoming requests from Nginx. You will create a laravel.ini file inside the php directory. This file will hold the PHP configurations. This is the file you had bind-mounted to /usr/local/etc/php/conf.d/laravel.ini in the container in Step 3. The configurations in this file override the default php.ini file usually read by PHP when it starts. Enter the following command to create the php directory:
|
1 |
mkdir ~/laravel-web/php |
Create and open the laravel.ini file inside the php directory by entering the following command:
|
1 |
nano ~/laravel-web/php/laravel.ini |
The default php.ini file has an upload limit set to 2M. As an example, we will show you to adjust and set php configurations by changing the value of the allowed upload limit, in case you want to upload larger files. Enter the following lines of code inside the file:
|
1 2 |
upload_max_filesize=80M post_max_size=80M |
This sets the upload limit and you can upload files with a total size of not more than 80MB. You may add other php configurations inside the laravel.ini file to override default php configurations. Now, save and close the file.
Step 6: Configure Nginx
In this step, we will configure Nginx to use the php service we defined earlier. It will use PHP-FPM as the FastCGI server to serve dynamic content. FastCGI server is a software that enables interactive programs to interface with a web server.
As we had defined in the docker-compose file in Step 3, we will create the Nginx configuration file app.conf inside the ~/laravel-web/nginx/conf.d/ directory. First, enter the following command to create the directory:
|
1 |
mkdir -p ~/laravel-web/nginx/conf.d |
Next, create and open the app.conf file using nano by entering the following command:
|
1 |
nano ~/laravel-web/nginx/conf.d/app.conf |
Add the following Nginx configuration code to the file:
|
1 2 3 4 5 6 7 8 9 10 11 12 13 14 15 16 17 18 19 20 |
server { listen 80; index index.php index.html; error_log /var/log/nginx/error.log; access_log /var/log/nginx/access.log; root /var/www/html/public; location ~ \.php$ { try_files $uri =404; fastcgi_split_path_info ^(.+\.php)(/.+)$; fastcgi_pass app:9000; fastcgi_index index.php; include fastcgi_params; fastcgi_param SCRIPT_FILENAME $document_root$fastcgi_script_name; fastcgi_param PATH_INFO $fastcgi_path_info; } location / { try_files $uri $uri/ /index.php?$query_string; gzip_static on; } } |
Nginx reads configuration files called server blocks to know what directory should be served to a website visitor based on the URL. To learn more, read about setting up server blocks in our tutorial on installing Nginx on Ubuntu 18.04. The directives defined serve the following purposes:
- listen – Defines the port on which the server will listen for incoming requests, which is usually port 80.
- error_log & access_log – Defines the files for writing application logs.
- root – Defines the webroot path, the directory that will serve any request made to the server from the internet.
In the location block for php, the fastcgi_pass directive specifies that the app service is listening on a TCP socket on port 9000 (which was defined in the Dockerfile). This directs the PHP-FPM server to listen over the network and not on a Unix socket. While a Unix socket may have a slight advantage in speed over a TCP socket, it lacks a network protocol hence skipping the network stack.
A Unix socket would be more appropriate for scenarios where hosts are located on one machine. However, if you have services running on different hosts, a TCP socket has the advantage of connecting services that are distributed. In our case, the app container is running on a different host from our web server container. Thus, a TCP socket is the most appropriate for our configuration.
You can now press Ctrl + O to save the file, then press Ctrl + X to exit the editor. The changes made in the nginx/conf.d/ directory will automatically reflect in the web server container thanks to the bind mount you added in the Docker Compose file in Step 3.
Step 7: Configure MySQL
After we have configured Nginx to work with PHP, we can now configure MySQL to store and serve dynamic data to PHP. We had already set the Docker Compose file to install the necessary extensions for PHP and MySQL communication. We will be creating the MySQL configuration file my.cnf inside the mysql folder, which will be bind-mounted to /etc/mysql/my.cnf as we had defined in the db service section of Docker Compose in Step 3.
The MySQL configuration settings and changes can be made to the my.cnf file whenever you want. They should reflect inside the container immediately. First, create the directory by entering the following command:
|
1 |
mkdir ~/laravel-web/mysql |
Next, create and open the nano by entering the following command:
|
1 |
nano ~/laravel-web/mysql/my.cnf |
Enter the following code snippet to enable query log and specify the query log file location:
|
1 2 3 |
[mysqld] general_log = 1 general_log_file = /var/lib/mysql/general.log |
By defining the general_log property as 1, you allow general logs. The general_log_file property specifies the location of the logs file. Press Ctrl + O to save the file, then press Ctrl + X to exit the editor.
Step 8: Set Laravel Environment Variables
Up to this point, all services and configuration settings are complete. Thus, we could be able to deploy our containers. However, there’s an important step that has to be accomplished before our web application is actually usable – environment variables. The Laravel framework expects a file called .env which it uses to define its environment. By default, Laravel comes with the .env.example that you can copy to .env, then modify the variables with your actual details. Enter the following command to copy the file:
|
1 |
cp .env.example .env |
Once it’s copied, open the file using nano to modify:
|
1 |
nano .env |
Here is a screenshot of what the file may look like:
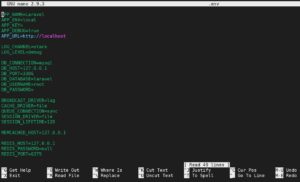
In the file, the next step is to modify the variables under DB_CONNECTION block as you had set in the earlier configurations we have done so far. Update as follows:
- DB_HOST is the db database container.
- DB_DATABASE is the laravel_web.
- DB_USERNAME is the username for the database. Pick a name of your choice, but for the sake of this tutorial, let’s go with laraveldocker.
- DB_PASSWORD is a strong password your user above will use to login to the database, so choose a strong password. In Step 10, we will create this user with the password you choose here.
With the values updated, your DB_CONNECTION should now look like this:

Save and close the file.
Step 9: Run the Docker Containers
At this stage, all your services and configurations are defined in the Docker Compose file. Only one command is required to start all the containers, create the volumes, connect the networks, and set up and build your application. Enter the following command in your terminal:
|
1 |
docker-compose up -d |
When you run the docker-compose up command for the first time, it downloads all the necessary Docker images. If you are setting up the infrastructure on your local computer, it may take some time to complete. Once the images have been downloaded, Compose creates the containers. The -d flag instructs Docker to run the containers in the background. If the process completes successfully, you should be able to see something like this in your terminal:

Enter the following command in your terminal to list all the running containers:
|
1 |
docker ps |
It should display something like the screenshot below, with details about the app, webserver, and db containers:

- CONTAINER ID – A unique identifier for each container.
- NAMES – The service name associated with each container, as defined in the Docker Compose file. (You may use either the container id or name to access a container).
- IMAGE – The image name for each container.
- STATUS – It displays information about the container’s state (it could be stopped, running, or restarting).
- PORTS – It shows the ports a container is exposing.
Docker Compose provides a command called exec which you can use to run terminal commands or access the command line inside a container. We first want to run some commands inside the app container, which is the container running the Laravel app.
Docker provides a command to access the command line of a container. Its syntax is as follows: docker-compose exec container_name bash. To access the command line of the app container, enter the following command:
|
1 |
docker-compose exec app bash |
Once on the container’s command line, you can run some Laravel Artisan configuration commands. Enter the following command to generate the laravel key and save it to the .env file:
|
1 |
php artisan key:generate |
With the environment key set, you can run the following command to cache the configuration settings:
|
1 |
php artisan config:cache |
The configurations are stored on the file /var/www/html/bootstrap/cache/config.php inside the container. You can press Ctrl + D to exit the container terminal.
To confirm that the Laravel app has been deployed and is running, visit your server’s public IP inside your browser (http://your_server_public_ip). You should see the welcome page for a new Laravel installation:
Step 10: Configure a MySQL user
In this step, we will be creating a database user for the MySQL database laravel_web we specified in the docker-compose file. When you ran the container building command in Step 9, MySQL was installed, but only created a default root administrative account, which happens to have unlimited privileges on the database. To avoid using the root user, we will create a dedicated user, laraveldocker, to use for the application. This is the user you specified in the environment variables in Step 8. Access the command line inside the terminal by entering the following command:
|
1 |
docker-compose exec db bash |
Once inside the container, log into MySQL by entering the following command:
|
1 |
mysql -u root -p |
In the prompt for the password, enter the password you set in the db service in the docker-compose file in Step 2.
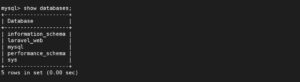
Once you have logged into the MySQL prompt, check if you can see the database you specified in the docker-compose file by entering the following SQL command:
|
1 |
show databases; |
You should see the laravel_web database, or whatever name you specified for your setup:
Next, we create a user and password for the laravel_web database. This must be the same details you specified in the .env file in Step 8. Enter the following command to create user and password, and grant all privileges to this user:
|
1 |
GRANT ALL ON laravel_web.* TO 'laraveldocker'@'%' IDENTIFIED BY 'your_strong_laravel_docker_password'; |
For the changes to take effect immediately, enter the following command to flush the privileges:
|
1 |
FLUSH PRIVILEGES; |
That completes the MySQL user configuration. Exit the MySQL prompt by typing exit and pressing enter. Finally, exit the db container by pressing Ctrl + D.
Step 11: Test the Communication between Laravel Application Code and the MySQL Database
Up to this step, everything has worked well. However, we want to confirm that the Laravel Code in the app container can communicate with the MySQL database in the db container. First, access the app container terminal by entering the following command:
|
1 |
docker-compose exec app bash |
Next is to run the laravel migration command that creates the tables:
|
1 |
php artisan migrate |
You should see the migration process in your terminal as Laravel creates the default tables:

Next, we will test if we can access the database from Laravel. Laravel comes with Tinker by default, which allows you to interact with the entire application from the command line, including accessing the database, running jobs, eloquent ORM, and more. We can use Tinker to view the data in the migrations table. Enter the following command to access Tinker:
|
1 |
php artisan tinker |
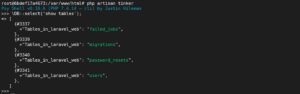
Once on the Tinker prompt, you can list the tables created by the migrate command by entering the following:
|
1 |
\DB::select('show tables'); |
The screenshot below shows the output, which are tables currently in the laravel_web database:
You can retrieve the data in a table by specifying the table name. For example, you can retrieve the data in the migrations table by entering the following command:
|
1 |
\DB::table('migrations')->get(); |
The command outputs the following:
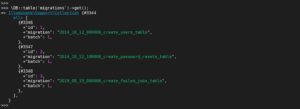
From the output above, your Laravel application is well configured and can communicate with the database. You can experiment with more commands like creating models, running jobs, and more. You can exit the Tinker prompt by pressing Ctrl + D.
Conclusion
In this tutorial, you deployed a LEMP stack Laravel application inside a Docker container. You tested the application by accessing the web interface as well as connecting to the database through Laravel Tinker. You were able to experience the power of Docker Compose. It allows you to create a group of Docker containers defined in one file, which can then be run with just a single command.
If you want to further familiarize yourself with containers, take a look at our tutorial that shows you how to clean up Docker resources – images, containers, and volumes and our detailed overview of the Kubernetes tool.
You may further visit our blog for more about Docker and Continuous Integration and Continuous Deployment.
Happy Computing!
- How to Deploy WordPress with Persistent Volume on Kubernetes Cluster - March 17, 2023
- Deploying Applications on Kubernetes Using Argo CD and GitOps - October 26, 2022
- Using Node.js Modules with npm and package.json: A Tutorial - October 6, 2022
- Using Ansible to Install and Configure WordPress with LAMP on Ubuntu - September 23, 2022
- Creating Views in the Django Web Application Framework - September 22, 2022