
Introduction
In the world of the internet, several technologies come together to form a solution that enables internet users to access dynamic content on the world wide web. LEMP stack is one of those solutions. It brings together four technologies that make a complete server solution for high-performance and dynamic websites. LEMP is an acronym for Linux, Nginx, MySQL, and PHP. Linux is the server operating system. Nginx (which is pronounced as Engine-X, hence the letter E in the acronym) is the web-server software. Next, MySQL is the database system that holds website and users’ data. PHP is the server-side scripting language for dynamic processing.
In this tutorial, we will guide you on how to install and configure a LEMP stack, and check that everything is running as expected. Let’s begin!
Step 1: Configuring your server with Ubuntu 20.04
Ubuntu 20.04 is a Linux-based Operating System. There exist several Linux based server operating systems out there, including free and premium. The focus of this guide is on Ubuntu 20.04, which is free and open-source. This step takes care of the first requirement in the LEMP stack acronym, the L. You should have an actual Ubuntu 20.04 installation on your VPS to proceed with the subsequent steps. You may follow our guide on setting up your Ubuntu Server. Optionally, if you want to follow this guide on your local computer, you may download the Ubuntu 20.04 server installation image directly from the Ubuntu website. You should configure a regular non-root user with sudo privileges because we will be running a few commands that require sudo permissions.
Step 2: Installing and Configuring Nginx Server
Web Servers enable us to serve content such as web pages to website visitors. Nginx is a popular web server, appearing among the top five open source web servers preferred by developers. This step takes care of the second requirement in the LEMP stack, E for Nginx. Ubuntu has a default package repository where we will be getting packages for use in this guide. Ubuntu is based on Debian, which utilizes apt or dpkg to manage its packages. For packages from the default repository, we will be using apt.
As a rule of thumb, you should run the update command before you start any installation on a Linux system. Start by entering the following command on the terminal:
|
1 |
sudo apt update |
Once you have updated, now you can install Nginx with the following command:
|
1 |
sudo apt install nginx |
Once the installation is complete, Nginx starts running automatically. The next step is to configure the firewall to allow traffic through. Ubuntu uses the ufw (Uncomplicated Firewall) package for the configuration of firewalls. After installation, Nginx registers itself as a service with ufw. Ubuntu starts the Firewall service automatically on system boot, but to be sure, type the following command to enable it:
|
1 |
sudo ufw enable |
To list the application configuration that ufw allows, enter the following command:
|
1 |
sudo ufw app list |
Below is a screenshot the shows the output of the command above:
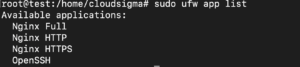
As you can see, Nginx is already registered with ufw, and has three profiles as explained below:
- Nginx Full – it opens both port 80 and 443. Port 80 is for normal/unencrypted traffic, i.e. HTTP. Port 443 is for TLS/SSL encrypted traffic. i.e. https.
- Nginx HTTP – it opens port 80 only – unencrypted traffic.
- Nginx HTTPS – it opens port 443 only – TLS/SSL encrypted traffic.
While Nginx auto registers with ufw, no traffic is allowed to your server until you do so yourself. You may choose to allow all or any of the profiles, however, it’s better that you allow the most restrictive profile that will still allow the traffic you’ve configured for your webserver. Since we haven’t configured SSL in this tutorial, we will only allow HTTP traffic on port 80. If you are curious, we have a guide on configuring SSL on the Nginx server from Let’s Encrypt by using Certbot.
Let’s enable traffic on port 80 by entering the following command:
|
1 |
sudo ufw allow 'Nginx HTTP' |
To verify the change was successful type the following command:
|
1 |
sudo ufw status |
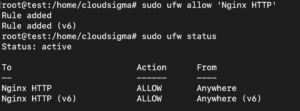
The output above from running the command shows that HTTP traffic is now allowed. You may check if the server is running by accessing your domain or server’s public IP in the browser. If you had not configured a domain name and are not sure about your server’s public IP address, you can find it using curl by running the following command:
|
1 |
curl -4 icanhazip.com |
Copy the output of the above command, which is your public IP address, into your browser’s address bar. When you load the page, you will see the default Nginx landing page:
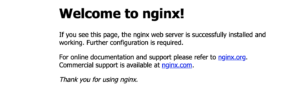
The above page indicates that you have successfully installed Nginx.
Step 3: Installing MySQL Database Management System
Data management is a crucial part of any dynamic website. MySQL is a database management system that stores and manages a website’s data. This step takes care of the third requirement in the LEMP stack, M. Enter the following command to install MySQL:
|
1 |
sudo apt install mysql-server |
After MySQL installation completes, you must configure it before it is ready for use. Part of the configuration includes securing the database server. MySQL comes with script to guide you in securing and setting up passwords. The following command starts the script:
|
1 |
sudo mysql_secure_installation |
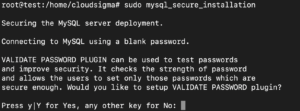
The script asks if you would like to set up the VALIDATE PASSWORD component or press any letter to proceed without enabling the component.
The VALIDATE PASSWORD component is a feature that is used to check whether the password you entered for a particular user on your database server matches a specific criterion. You may configure it to check things like length, numeric characters, availability of uppercase or lowercase letters, etc. If it’s not enabled, then you can configure any password of your choice. However, if enabled, you must use a password that matches the criteria you specified. Enabling it may cause issues with packages that automatically configure MySQL user credentials such as the phpMyAdmin package for Ubuntu. Whether to enable it or not is a personal choice. Your database is still safe if you do not enable it, just ensure that you use strong and unique passwords.
If you pressed Y for enabling the component, then the script will ask you to select a level of password validation:
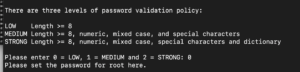
The script provides 3 levels of password validation. The LOW level requires your password to only include 8 or more characters. The MEDIUM level requires your password to include 8 or more characters, which must be a mix of upper case letters, lower case letters, and special characters. The STRONG level requires a complex password having 8 or more characters, which must be a mix of upper case letters, lower case letters, special characters, and words, must not be based on common dictionary words, otherwise, you will receive errors. Let’s go with Low level, type 0, and press enter.
The script prompts you to enter and re-enter the password:
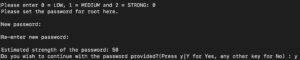
Type y and enter to accept the password you typed as your root password. Subsequent prompts are for improving the security of the MySQL server. Starting by removing default anonymous users that every MySQL installation comes with, disabling root login from a remote connection, and removing test databases. The final prompt asks you to reload the privileges table for the commands to take effect. Type y and hit enter for all the prompts:
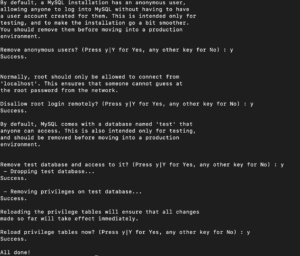
The initial security configuration is completed.
You can check the version of MySQL that you installed by running the command:
|
1 |
sudo mysql –V |
Here is the version we are using for this tutorial:
![]()
For Ubuntu systems running MySQL versions from 5.7 and later, the root user is set configured to authenticate using the auth_socket plugin and not with the password. This ensures greater security, however, it may be an issue with external packages such as the phpMyAdmin package. If you prefer to proceed with using the auth_socket plugin, then move to Step 4.
If you want to connect using a password instead, then you must configure the authentication method to use mysql_native_password.
Start the MySQL prompt by entering the following command:
|
1 |
sudo mysql |
MySQL comes with several default databases. You can view a list of default databases by entering the following query on your terminal:
|
1 |
show databases; |
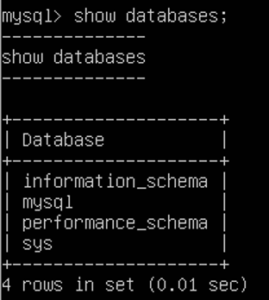
The database called mysql stores several MySQL related configurations. This database has a table called users which contains the user details and the method of authentication for each. We can use SQL queries to retrieve, alter, and delete information from a table. Enter the following query on your terminal to get details on which authentication method each user uses:
|
1 |
SELECT user, authentication_string, plugin, host FROM mysql.user; |
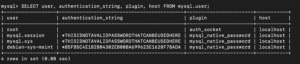
The output above shows that the root user actually authenticates using the auth_socket plugin. To change the authentication method for the root user, enter the following statement in your terminal. Remember to change to match the password strength for the medium level that we had set in a prior step, else it will cause an error:
|
1 |
ALTER USER 'root'@'localhost' IDENTIFIED WITH mysql_native_password BY 'mypassword'; |
Once the query executes successfully, run the flush privileges command for the changes to take effect immediately:
|
1 |
FLUSH PRIVILEGES; |
Again run the select statement below to check if the changes have taken effect:
|
1 |
SELECT user,authentication_string,plugin,host FROM mysql.user; |
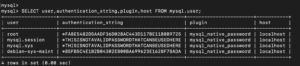
From the output, the root user will now authenticate using the mysql_native_password. You can exit the mysql prompt by typing exit and hitting enter.
You can try to login with the password you set by entering the following command:
|
1 |
mysql -u root –p |
The prompt will ask you for your password. If it matches, you will see the MySQL prompt. You have successfully set up your server with MySQL. Next, exit the MySQL prompt.
Step 4: Installing PHP and Setting up Nginx to Use the PHP Processor
PHP is an acronym for PHP: Hypertext Preprocessor. It’s a widely-used open-source server-side scripting language for websites and web applications. PHP takes care of the fourth requirement in the LEMP stack. PHP helps in generating dynamic content on a website. It can be used as an intermediary between your webpages and the database system. It reads data from the database and presents it to your website visitors. Furthermore, it can insert, update, and delete data from the database.
Nginx lacks the native PHP processing plugins like other web servers, so you must install the php-fpm to pass requests from Nginx to PHP for processing. Firstly, add the Ubuntu universe repository which has free and open-source software maintained by Ubuntu’s community. Enter the following command in your terminal:
|
1 |
sudo add-apt-repository universe |
Then, install the php-fpm package together with php-msql helper package to enable PHP to communicate with MySQL, using the following command:
|
1 |
sudo apt install php-fpm php-mysql |
At the time of writing this guide, the PHP version installed from the above command is 7.2.24. Hence, it installs the php-fpm7.2 package. Keep this in mind when updating the server blocks, and ensure you enter the correct version, else your page won’t load.
You can check the PHP version by entering the following command:
|
1 |
php -v |

At this point, all the LEMP stack components have been installed. What you need to do next is configure Nginx to direct requests to the PHP processor. In Nginx, the configuration is done within server blocks. Server blocks are equivalent to Apache’s virtual hosts. For more information, you may have a look at our tutorial on Nginx server blocks.
For this tutorial, let’s create a server block for a test.com domain with the same name, you are free to choose the name of your choice. Server blocks are in the /etc/nginx/sites-available/ directory. Use nano to create the server block file by entering the following command:
|
1 |
sudo nano /etc/nginx/sites-available/test.com |
Type the following script in the file:
|
1 2 3 4 5 6 7 8 9 10 11 12 13 14 15 16 17 18 19 |
server { listen 80; root /var/www/html; index index.php index.html index.htm index.nginx-debian.html; server_name test.com; location / { try_files $uri $uri/ =404; } location ~ \.php$ { include snippets/fastcgi-php.conf; fastcgi_pass unix:/var/run/php/php7.2-fpm.sock; } location ~ /\.ht { deny all; } } |
Here is a brief description of what each directive does:
- listen – defines the port Nginx will listen on. Port 80 is the default port however, if you had set up SSL, you would put 443.
- root – contains the directory in which the site’s directory will be stored.
- index – instructs Nginx to prioritize serving index.php files, if they are available upon request.
- server_name – defines the name of the server block, it holds the public IP address or domain name of your server.
- location/ – first location block has the try_files directive. It checks for the existence of files matching a URI request, if not found, a 404 error is returned.
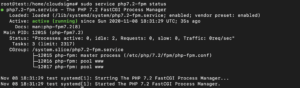
- location ~ \.php$ – this directive handles the PHP processing by directing Nginx requests through fastcgi-php.conf file and the php7.2-fpm.sock file which defines what socket to associate with php-fpm. This command checks the status of php-fpm, we specify the version as 7.2, which is what we have. Ensure that you check with whatever version you have:
|
1 |
sudo service php7.2-fpm status |
- location ~ /\.ht – this directive handles the .htaccess files, which are not processed by Nginx. The deny all directive ensures no htaccess file is served to the visitors.
After adding the script to your test.com file, type Ctrl + O, then press Enter to save the file. Type Ctrl + X to close the editor.
Then, you must enable the server block by entering the following command to create a symbolic link to the /etc/nginx/sites-enabled:
|
1 |
sudo ln -s /etc/nginx/sites-available/test.com /etc/nginx/sites-enabled/ |
Then, unlink the default server block from sites-enabled by entering the following command:
|
1 |
sudo unlink /etc/nginx/sites-enabled/default |
Test your new configuration by entering the following command:
|
1 |
sudo nginx -t |
If the syntax is okay, reload Nginx with the following command:
|
1 |
sudo systemctl reload nginx |
At this step, your LEMP stack has been installed and configured. In the next step, we create a test file just to be sure the various components connect well.
Step 5: Creating a PHP File to Test your LEMP stack
In this step, we create a .php file and run it on the Nginx server to check whether it runs properly. We will use the global phpinfo() function to check the php packages available. Enter the following command to open a .php file in nano:
|
1 |
sudo nano /var/www/html/test.php |
In the nano editor, type the following code snippet:
|
1 |
<?php phpinfo(); |
Save and close the file. To visit the page you just created in your browser, find your domain or IP address and navigate to it as follows:
|
1 |
http://your_server_domain_or_IP/test.php |
You should be able to see the PHP info page:
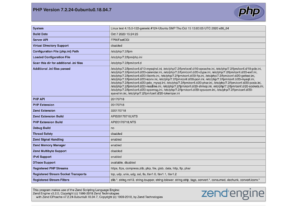
The above page shows that you have set up Nginx successfully. Since the file you created for testing contains finer details about your server, you should remember to remove it. Enter the following command to remove the file:
|
1 |
sudo rm /var/www/html/test.php |
If you ever need to test your configurations in the future, you can always recreate the file.
Conclusion
In this tutorial, you configured a LEMP stack on your Ubuntu 20.04, which is one of the most powerful web application development stacks available. From here, you should be able to host about any website, web apps, or server-side logic for your mobile application. To ensure that your website serves content over a secure SSL connection, we have a tutorial on configuring SSL certificates on the Nginx server that we recommend you have a look at.
Happy Computing!
- Removing Spaces in Python - March 24, 2023
- Is Kubernetes Right for Me? Choosing the Best Deployment Platform for your Business - March 10, 2023
- Cloud Provider of tomorrow - March 6, 2023
- SOLID: The First 5 Principles of Object-Oriented Design? - March 3, 2023
- Setting Up CSS and HTML for Your Website: A Tutorial - October 28, 2022