

When you are done writing code for your website or web app, you will need it placed in some location where it can run and deliver content to your users. This is where web server software comes in. A simple Google search of web server software will bring you quite a list of solutions to choose from.
In this tutorial, our focus is on Nginx; and specifically how you can have it running on Ubuntu 18.04. Nginx is one of the most popular web server softwares in the world. In fact, it takes up a spot in the top five on Opensource.com rankings. It is responsible for ensuring the availability and scalability of the highest-traffic sites on the internet. It guarantees security and you can use it as a reverse proxy. So, how can you install Nginx on Ubuntu 18.04?
Prerequisites
Of course, you already have a computer that is running Ubuntu 18.0.4; and you have a non-root user with sudo privileges. If not, head over to this link to download Ubuntu 18.0.4, then follow the guides on initial server setup with Ubuntu to create a non-root account. Once you have an account, you need to log in as a non-root user, and then we can proceed with the next steps.
Step 1 – Install Nginx
Ubuntu is based on Debian. In order to install deb packages from the command line, you can either use apt or dpkg commands. We will use the apt command since it’s more popular. Apt command allows users to install packages that are available from the default repositories of the specific Linux distribution they are running. In this case, we have Nginx available on the default repositories of Ubuntu 18.04, so we can proceed. As a rule of thumb, now and when installing any package on a Linux distribution, you must first update; enter the following command in the terminal to update:
|
1 |
sudo apt update |
Then to install Nginx, enter the following command:
|
1 |
sudo apt install nginx |
Follow the instructions, and Nginx will be installed on your server together with the necessary dependencies.
Step 2 – Adjust the Firewall
The default firewall configuration tool for Ubuntu is UFW. UFW stands for uncomplicated Firewall and it’s developed to ease Firewall configuration. By default, Nginx registers itself as a service with UFW after installation, making it easier for Nginx access configuration. First, enable the UFW by entering the following command:
|
1 |
sudo ufw enable |
The following command lists the application configuration that UFW allows:
|
1 |
sudo ufw app list |
Here is a screengrab of what your terminal might look like:

It shows 3 profiles available for Nginx. They are described below:
- Nginx Full – it opens both port 80 and 443. Port 80 is for normal/unencrypted traffic, i.e. http. Port 443 is for TLS/SSL encrypted traffic. i.e. https.
- Nginx HTTP – it opens port 80 only.
- Nginx HTTPS – it opens port 443 only.
As a recommendation, you should only enable the profile that will allow the traffic you’ve configured for your web application. In this case, we will go with Nginx HTTP (port 80) since we have not configured SSL. The following command enables this:
|
1 2 |
sudo ufw allow 'Nginx HTTP' sudo ufw allow 'OpenSSH' |
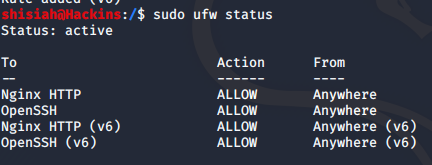
To verify the change, enter the following command:
|
1 |
sudo ufw status |
Your terminal should show something similar to the screengrab below. Notice that the HTTP traffic is allowed everywhere:
Step 3 – Checking Your Web Server
After installing Nginx on Ubuntu 18.04, the service starts automatically. You can test this by entering the following command in your terminal:
|
1 |
systemctl status nginx |
Your terminal should display something like this:
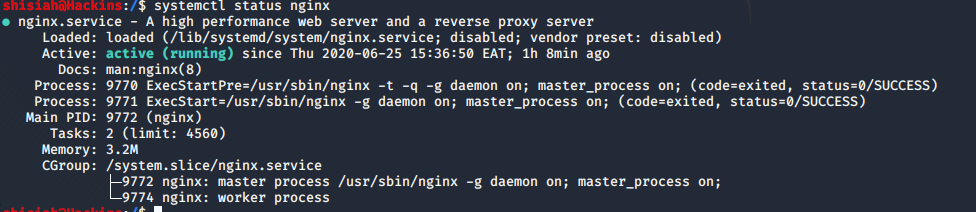
This shows that the service was started automatically and that it’s running. As you already know, the main purpose of server software is to serve content. In order to test this purpose you will need to request a page. You can do this by accessing your server’s IP address from the browser, which should display the default Nginx landing page. If you do not know your server’s IP address, below are some commands to help you get it:
|
1 |
ip addr show ens3 | grep inet | awk '{ print $2; }' | sed 's/\/.*$//' |
Below is another command that you can use. It gives you the public IP address as seen from locations on the internet:
|
1 |
curl -4 icanhazip.com |
The first command gets you an address as shown in the terminal below. Next, copy and test it in your browser:
Your browser loads the default Nginx page that looks like the following screenshot. It shows that your Nginx server is actually running:

Step 4 – Basic Nginx Management Commands
You have already seen the command that checks the status of Nginx:
|
1 |
systemctl status nginx |
Now that we have the server up and running, here are some more commands you should keep at hand for managing the Nginx service. These commands work not only on Ubuntu 18.04 but on all Linux distributions as well.
To stop the server, enter the following command:
|
1 |
sudo systemctl stop nginx |
To start the server, enter the following command:
|
1 |
sudo systemctl start nginx |
Whenever you make significant modifications like changing ports or interfaces, you must restart the web server. The command below restarts the server:
|
1 |
sudo systemctl restart nginx |
Whenever you make minor configuration changes like editing server blocks, Nginx can reload without dropping connections. Here is the command to reload:
|
1 |
sudo systemctl reload nginx |
Nginx automatically starts the server when your Ubuntu OS boots up. However, if you wish to change this setting, you can disable the service by entering the command below:
|
1 |
sudo systemctl disable nginx |
And you can re-enable the service to automatically start when you boot your machine next time by entering:
|
1 |
sudo systemctl enable nginx |
Step 5 – Setting up Server Blocks
You may wish to host multiple websites (domains) on one web server. Server blocks would help you achieve this. If you have used Apache before, server blocks in Nginx can be compared to Apache Vhosts. Out of the box, Nginx comes with one server block configured to run from the directory /var/www/html, the one that loaded the default Nginx page in a section above. This server block is fine when running a single site. However, running many sites will be a problem.
We want to create another site on the same server and call it samplesite.com (this is just an example, you should replace it with your own domain name).
Inside the /var/www/ directory, create another directory for samplesite.com. Leave the default /var/www/html to serve requests that don’t match any other site. The command below creates the directory for samplesite.com as we have described. The –p flag is to ensure the command creates any necessary parent directories:
|
1 |
sudo mkdir -p /var/www/samplesite.com/html |
To allow access to the directory, you must assign ownership with the $USER environment variable:
|
1 |
sudo chown -R $USER:$USER /var/www/samplesite.com/html |
To check that the permissions for your web roots are correct, enter the following command:
|
1 |
sudo chmod -R 755 /var/www/samplesite.com |
Next, let’s try to create a simple index.html in the samplesite.com directory. You can open the nano editor as:
|
1 |
nano /var/www/samplesite.com/html/index.html |
The command opens an editor in your terminal, add in the following code:
|
1 2 3 4 5 6 7 8 |
<html> <head> <title>Welcome to samplesite.com!</title> </head> <body> <h1>Success! The samplesite.com server block is running fine!</h1> </body> </html> |
Type Ctrl + O, then press Enter to save the file. Type Ctrl + X to close the editor.
After that, you can create the server block. Rather than editing and cluttering the default configuration file, it’s recommended you make a new one at /etc/nginx/sites-available/samplesite.com. Enter the following command to open the nano editor:
|
1 |
sudo nano /etc/nginx/sites-available/<b>samplesite.com</b> |
In the editor, enter the following code, modified for the directory you created. Note the root name and server_name matches our directory and the domain we want to serve:
|
1 2 3 4 5 6 7 8 9 10 11 12 13 14 15 16 17 18 19 20 21 22 23 24 25 |
server { listen IP_ADDRESS:80; listen [::]:80; root /var/www/samplesite.com/html; index index.html index.htm index.nginx-debian.html; server_name samplesite.com samplesite.com; location / { try_files $uri $uri/ =404; } } |
Next, save and close the file.
Nginx reads configuration files from sites-enabled directory, so you need to create a symlink from your new server block to the sites-enabled directory. The following command will do that:
|
1 |
sudo ln -s /etc/nginx/sites-available/samplesite.com /etc/nginx/sites-enabled/ |
You now have two server blocks that can serve two websites on one Nginx server.
The following command responds to requests on the domains samplesite.com and www.samplesite.com.
|
1 |
curl samplesite.com |
And the default one will respond to any requests hitting port 80 that fail to match any of the two server blocks:Your Nginx server may likely experience a hash bucket memory problem when adding additional server blocks. In order to avoid this, you should adjust a single file in the nginx.conf file. Next, open the file with the nano editor:
|
1 |
sudo nano /etc/nginx/nginx.conf |
Then, find the directive: server_names_hash_bucket_size and remove the # symbol to uncomment it, so it looks like this:
|
1 2 3 |
http { server_names_hash_bucket_size 64; } |
Next, save and close the file.
To test that all your Nginx files have no errors, you should enter the following command:
|
1 |
sudo nginx -t |
If everything is fine, you should see something like this:

For the configuration changes to take effect, you must first start the Nginx server using the command below:
|
1 |
sudo systemctl restart nginx |
Now, enter the domain and you should see the html page we created.
Step 6 – Important Nginx Files and Directories that you should Know
- Main content directory
–/var/www/html: The default nginx page is stored in this directory. It’s the actual content you see when you access your server IP address. You can change this behavior by altering the Nginx configuration files.
- Nginx configuration directories
– /etc/nginx: The main directory containing all the Nginx configuration files.
– /etc/nginx/nginx.conf: The main Nginx configuration file that can be altered to make global changes on the Nginx server.
– /etc/nginx/sites-available/: It’s the directory where you store per-site server blocks. All server blocks are in this folder. A symlink will link them to the sites-enabled directory. If we list the contents of this director, we should see the server block we created as well the default Nginx server block.

– /etc/nginx/sites-enabled/: The enable per-site server blocks exist in this directory. They are linked to the actual configuration files in the sites-available directory.
– /etc/nginx/snippets/: The directory where you store configuration snippets that can be included in other configurations – e.g. repetitive configuration snippets.
- Server Logs
– /var/log/nginx/access.log: This file records every request that hits your server, unless you’ve configured Nginx to store in another file or do something else.
– /var/log/nginx/error.log: This file records all Nginx errors. This is where you will come to troubleshoot when your server is not running as expected.
Conclusion
We have come to the end of the journey. You have installed Nginx on Ubuntu 18.04, configured firewalls, configured server blocks and ensured the sites are accessible in your browser. Congratulations! Now it’s up to you to figure out what content you want to serve to your users.
Happy Computing!
- Removing Spaces in Python - March 24, 2023
- Is Kubernetes Right for Me? Choosing the Best Deployment Platform for your Business - March 10, 2023
- Cloud Provider of tomorrow - March 6, 2023
- SOLID: The First 5 Principles of Object-Oriented Design? - March 3, 2023
- Setting Up CSS and HTML for Your Website: A Tutorial - October 28, 2022