
MySQL replication is an interesting feature that allows users to manage multiple copies of one or more MySQL databases. The data is copied automatically from source to replica databases. It can be useful in numerous situations, such as working with the data without compromising the main database, data backup, or scaling the database access, etc.
In this guide, we will go over the steps of setting up a MySQL instance on one server as a source database, then configuring a MySQL instance on another server to function as its replica.
Prerequisites
This guide will demonstrate a very simple example of MySQL replication. It involves one source and one replica database. The source database is the primary copy of the database whereas the replica database will be the replica of the source database. For our demonstration, two servers are configured with the following IP addresses:
- Source server: 31.171.240.179
- Replica server: 31.171.250.139
Each server is configured with the latest Ubuntu 20.04 server configuration. First, follow the steps of the tutorial that show how to set up your Ubuntu server. Note that the number of replica databases can be more. This guide assumes that you already have MySQL installed and configured. Need help with the MySQL installation? This guide demonstrates in-depth the steps of MySQL installation and basic usage.
In short, here are the packages that you need:
|
1 |
$ sudo apt install mysql-server mysql-client |
Firewalls on both systems should be configured to allow traffic from both systems on port 3306. It’s the default port for MySQL. You can learn more about UFW basics with a demonstration from our blog post.
Source Database Configuration
-
Tweaking MySQL configuration
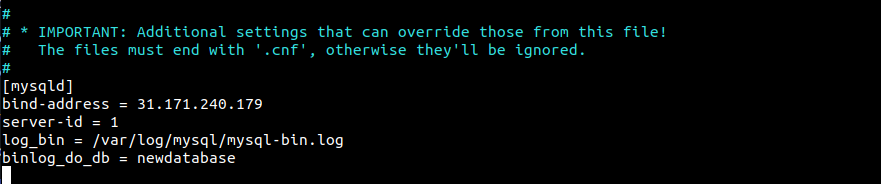
MySQL uses my.cnf as the primary configuration file. We will update my.cnf to designate the server as the source. First, open up the configuration file with a text editor:
|
1 |
$ sudo nano /etc/mysql/my.cnf |
Then, add the following lines under the mysqld section:
|
1 2 3 4 |
bind-address = 31.171.240.179 server-id = 1 log_bin = /var/log/mysql/mysql-bin.log binlog_do_db = newdatabase |
What do these lines mean?
bind-address: This is the entry that defines the association between a service and an IP address. By default, the value may be127.0.0.1(localhost). The new value will be the IP address of the server.server-id: In MySQL replication, each server must have a unique server ID. It can be any number. For the sake of simplicity, it’s set to1.log_bin: It stores the real details of the replication. The replica database is going to copy everything registered in the log.binlog_do_db: This entry designates the database that will be the subject of replication on the replica server. There can be more than one database. Here, the sample database isnewdatabase.
After making the changes, save the configuration file. MySQL requires to restart to load changes to the my.cnf:
|
1 |
$ sudo service mysql restart |
-
Granting permission to the replica user
The next step is to create a replica user and grant appropriate privileges. It needs to be done from the MySQL shell. First, launch the MySQL shell:
|
1 |
$ sudo mysql -u root -p |
Next, create a dedicated user for the replica database. Change the username and password appropriately:
|
1 |
$ CREATE USER 'cloudsigma_s'@'31.171.240.179' IDENTIFIED BY 'password_123'; |
Now, grant the appropriate privileges to the user:
|
1 |
$ GRANT REPLICATION SLAVE ON *.* TO 'cloudsigma_s'@'31.171.240.179'; |
You can learn more about the MySQL user and permissions from our blog post. Next, reload the grant table to take the changes into effect:
|
1 |
$ FLUSH PRIVILEGES; |

-
Tweaking the database
We need a copy of the source database on the replica. It’s possible to manually build the structure. However, in most cases, that’s quite inconvenient. That’s why exporting the database directly is the most optimal solution. In this example, the source database is newdatabase. Change the current database:
|
1 |
$ USE newdatabase; |
The following command will lock the database, preventing any new changes:
|
1 |
$ FLUSH TABLES WITH READ LOCK; |
Then, check the database status:
|
1 |
$ SHOW MASTER STATUS; |
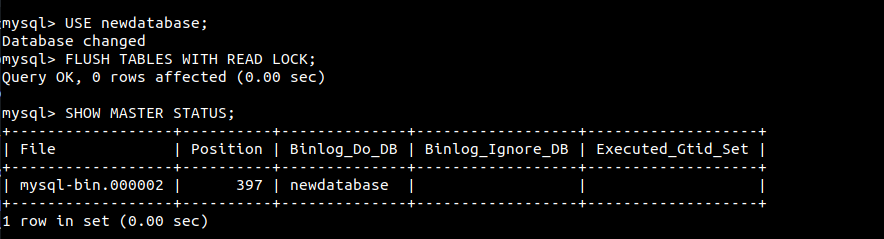
From this position, the replica database will start replicating from the source. These numbers will be useful later, so keep a record of them. If any changes are made from the same window, MySQL will automatically unlock the database. So, it is recommended to perform the following steps on a different terminal tab or window. The database is still locked. Export it to a portable SQL file:
|
1 |
$ mysqldump -u root -p --opt newdatabase > newdatabase.sql |
The task is now done. Next, unlock the database:
|
1 |
$ UNLOCK TABLES; |
Finally, exit the shell:
|
1 |
$ QUIT; |
Replica Configuration
It’s now time to configure the replica database.
-
Importing the source database
We need a copy of the source database on the replica server. We will be using the SQL file we exported earlier to do so. Launch the MySQL shell:
|
1 |
$ sudo mysql -u root -p |
After that, create a blank database using the same database name:
|
1 |
$ CREATE DATABASE newdatabase; |
Next, exit the shell:
|
1 |
$ EXIT; |
Now, import the SQL file to the database:
|
1 |
$ sudo mysql -u root -p newdatabase < newdatabase.sql |
![]()
-
Tweaking the MySQL configuration
There are a few things required to declare in the MySQL configuration file. Open the configuration file in a text editor:
|
1 |
$ sudo nano /etc/mysql/my.cnf |
The following entries will go under the mysqld section. Otherwise, it won’t work. The first is the server ID. As mentioned earlier, it has to be unique for all the servers in the source-replica replication configuration. For demonstration, it’s set to 2:
|
1 |
$ server-id = 2 |
Next, add the following lines:
|
1 2 3 |
$ relay-log = /var/log/mysql/mysql-relay-bin.log $ log_bin = /var/log/mysql/mysql-bin.log $ binlog_do_db = newdatabase |

Here, only relay-log is a new entry. It’s the log that the replica server creates during replication. The log format is the same as the binary log. Save the configuration file, and restart MySQL:
|
1 |
$ sudo service mysql restart |
-
Enabling the replication
Finally, we are ready to enable the replication from within MySQL. Launch the MySQL shell:
|
1 |
$ sudo mysql -u root -p |
Run the following command. First, change the IP address, username, and passwords accordingly:
|
1 |
$ CHANGE MASTER TO MASTER_HOST='31.171.240.179',MASTER_USER='cloudsigma_master', MASTER_PASSWORD='password_123', MASTER_LOG_FILE='mysql-bin.000001', MASTER_LOG_POS= 107; |

The command accomplishes the following:
- The current server is marked as the replica of the source server.
- The replica server has proper login credentials.
- The replica server knows from where to start replicating from. Remember the database status we checked on the source server? The source log file and log position come from there.
Finally, activate the replica server:
|
1 |
$ START REPLICA; |

-
Miscellaneous
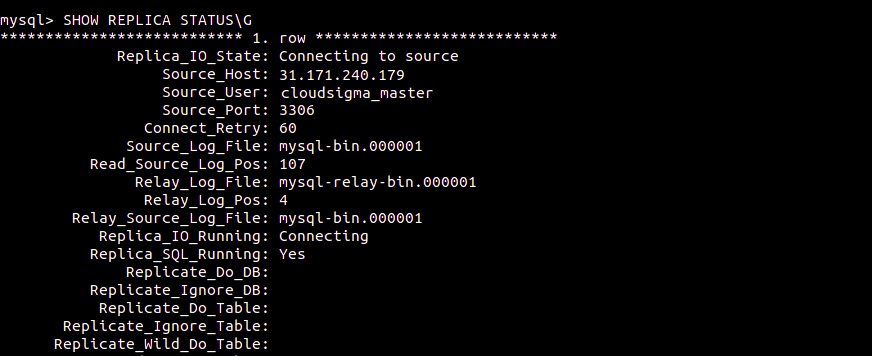
Need to check the details of the replica’s current state? Run the following command in MySQL shell. The \G at the end is to rearrange the texts to make them more readable:
|
1 |
$ SHOW REPLICA STATUS\G |
If there’s a connection issue, try starting the replica server to skip over it:
|
1 |
$ SET GLOBAL SQL_REPLICA_SKIP_COUNTER = 1; REPLICA START; |
Conclusion
MySQL replication has lots of implications. It’s only a brief demonstration of its basic form. However, it can easily extend to multiple source-replica configurations. The same steps will also apply to any higher-level complex configurations. It’s always a good idea to test any configuration afterward. Try performing some insert, delete or update commands on the source database. If the setup is working, then the replica database should pick up everything properly.
Furthermore, you can take a look at more resource from our blog covering what you can do with MySQL:
- SQLite vs MySQL vs. PostgreSQL: Relational Database Management Systems Compared
- How to Reset MariaDB or MySQL Root Password
- How to Install the LEMP stack (Linux, Nginx, MySQL PHP) on Ubuntu 20.04
Happy Computing!
- How To Enable, Create and Use the .htaccess File: A Tutorial - March 8, 2023
- An Overview of Queries in MySQL - October 28, 2022
- Introduction to Cookies: Understanding and Working with JavaScript Cookies - October 25, 2022
- An Overview of Data Types in Ruby - October 24, 2022
- The Architecture of Iptables and Netfilter - October 10, 2022