
In this CloudSigma tutorial, you will learn how to create a MySQL user, grant various permissions and privileges, and delete it.
MySQL is an open-source Relational Database Management System (RDBMS) that helps users to store, organize, and manage the data. It is very popular and widely used in the IT industry. Learn how to setup MySQL on a server, and the MySQL basics here.
In an organization, employees need various data tables or data views that are specific for their work. Almost no employee requires access to the entire data. Therefore, for each employee, you can create an individual MySQL user. MySQL provides features with which you can restrict the access of data to a specific user. Likewise, you can provide permission for specific users to access specific data tables.
Creating a New User
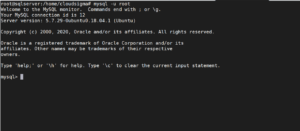
First, in order to create a new user, you need to access the MySQL shell by running the command:
|
1 2 3 4 5 6 |
sudo mysql -u <username> -p<password> Example: If the username is 'root' and password is 'pass', you can type in sudo mysql -u root -ppass Note: There's no space between -p and your password. |
Output:
Then, you can use the following command to create a new MySQL user:
|
1 2 3 4 |
mysql> CREATE USER 'username'@'localhost' IDENTIFIED BY 'password'; Example: mysql> CREATE USER 'akshay'@'localhost' IDENTIFIED BY 'StrongPassword'; |
Here the user’s host is specified as ‘localhost’ and not the server IP. ‘localhost’ is a special keyword used to point to “this computer/server”. When a user logs in with ‘localhost’, MySQL will attempt to connect to the local server by using a Unix Socket file. Thus, ‘localhost’ is preferable when you plan to ssh to the server and run the commands.
At this point, your new MySQL user only has the default permissions. You can grant more permissions to it in order to make it more useful. For example:
|
1 |
mysql> GRANT ALL PRIVILEGES ON * . * TO 'akshay'@'localhost'; |
The first asterisk refers to the database, while the second refers to the table. In this command, you would provide access to all databases and tables to the user. Your user can now read, edit, execute and perform all tasks across these databases and tables. In the above example, all the permissions have been granted. This user has permissions equivalent to root user’s permissions. If the user is not the admin, it is not advisable to do so as it puts the data at risk.
Granting Different User Permissions
There are various types of privileges that can be granted to the MySQL user. Some of the most commonly used ones are:
- CREATE: Allows you to create tables and databases
- DROP: Allows you to drop tables and databases
- INSERT: Allows you to insert rows into the specified table
- DELETE: Allows you to delete rows from a specified table
- SELECT: Allows you to read data
- UPDATE: Allows you to update existing data
- ALL PRIVILEGES: Provides all access
To read about more such privileges, you can check out the MySQL Documentation.
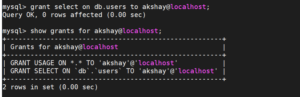
To grant the user any of these privileges, you can use the following command:
|
1 2 3 4 |
mysql> GRANT <PRIVILEGE> ON <DATABASE>.<TABLE> TO 'username'@'localhost'; Example: mysql> GRANT SELECT ON DB.USERS to 'akshay'@'localhost'; |
You can also replace the database or the table name with an asterisk (*) to provide permission for all databases or tables respectively.
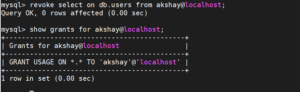
Now that you have given a user some privileges, you might want to revoke it under some circumstances. You can do that using the ‘REVOKE’ command.
|
1 2 3 4 |
mysql> REVOKE <PRIVILEGE> ON <DATABASE>.<TABLE> FROM 'username'@'localhost'; Example: mysql> REVOKE SELECT ON DB.USERS FROM 'akshay'@'localhost'; |
Keep in mind that the commands for ‘grant’ and ‘revoke’ are almost similar. In ‘grant’, the keyword ‘TO’ is used before the username whereas in ‘revoke’, the keyword ‘FROM’ is used.
In MySQL, you can see the permissions you have granted to the user using the following command:
|
1 |
mysql> SHOW GRANTS FOR <<username>>; |
Deleting a User Account
When required, you can delete a MySQL user account using the keyword Drop. In order to do that, you can use the following command:
|
1 |
mysql> DROP USER 'username'@'localhost'; |
To exit the terminal, use this command:
|
1 |
mysql> quit |
Now you know how to manage MySQL Users. In addition, note that you can create users for each of your users and provide the required privileges to the specific tables and databases they need.
Happy Computing!
- Removing Spaces in Python - March 24, 2023
- Is Kubernetes Right for Me? Choosing the Best Deployment Platform for your Business - March 10, 2023
- Cloud Provider of tomorrow - March 6, 2023
- SOLID: The First 5 Principles of Object-Oriented Design? - March 3, 2023
- Setting Up CSS and HTML for Your Website: A Tutorial - October 28, 2022