

A web server stores, processes and delivers web pages to website visitors. There are quite a few Open Source web server software options, but the Apache HTTP server is deemed as the most widely used web server in the world. This is because, apart from being open-source, its modular architecture allows extending its capabilities through adding modules to serve different purposes. As a result, the web server is extremely robust.
If you are looking to install Apache on a CentOS 7 system, this tutorial is for you. Additionally, you will learn how to create virtual hosts so you can serve multiple websites on one Apache HTTP server running on CentOS.
This is a detailed tutorial focusing on the Apache installation only. If you were looking for the point-form tutorial on the LAMP stack, we have this guide on How to Install Linux, Apache, MySQL, PHP (LAMP) on CentOS 7 that you can check out. Now, let’s start!
Prerequisites
As this is a hands-on tutorial, you should have the following:
- A server running CentOS 7, you can create one on CloudSigma in a few simple steps following this link.
- Configure a non-root user with sudo privileges on your server. Then, log in with this user.
- Configure a basic firewall by following the steps on our tutorial about Setting Up a Firewall with FirewallD on CentOS 7.
Step 1: Installing Apache HTTP Server
You can find Apache within CentOS default repositories. Hence, the installation is straightforward using the yum package manager. From the prerequisites section, you need to be logged in with the non-root user. Run the following command in your terminal to update the local Apache httpd package index:
|
1 |
sudo yum update httpd |
Once the packages are updated, enter the following command to install Apache:
|
1 |
sudo yum install httpd |
Confirm the installation and wait for yum to install Apache and its required dependencies.
If you followed the steps in the tutorial about Setting Up a Firewall with FirewallD on CentOS 7 and enabled the firewall for port 80, then you are good to go. Firewalld is the firewall manager for CentOS. Otherwise, you can enable firewalld’s http (port 80) service by entering the following command:
|
1 |
sudo firewall-cmd --permanent --add-service=http |
If you plan to serve traffic over secure HTTPS, then you can enable the firewalld’s https (port 443) service by entering the following command:
|
1 |
sudo firewall-cmd --permanent --add-service=https |
Finally, you must reload firewalld for the changes to take effect. Here is the command to reload:
|
1 |
sudo firewall-cmd –reload |
At this point, you have installed and configured Apache to serve traffic over HTTP, or HTTPS depending on if you run the commands above.
Step 2: Confirming that Apache Web Server is Running
In CentOS, the Apache process does not start automatically after installation. To manually start Apache, enter the following command:
|
1 |
sudo systemctl start httpd |
To verify that the service started successfully, check the status by entering the following command:
|
1 |
sudo systemctl status httpd |
If the service is running, you should see an output similar to the screenshot below. Note the active status:
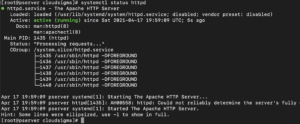
The output indicates that the service was started successfully and it’s running. Next, we must also test that Apache can serve a page to internet users. Apache comes with a default page that you can use to test if your server can be accessed over the internet.
You will need to find your server’s public IP address if you do not already have it. This IP address is what you will use in your browser’s address bar to request the default Apache web page. You can display the host’s network addresses by entering the following command:
|
1 |
hostname –I |
From the list of addresses that you get, you can try each in your browser to confirm that they work. Optionally, you can use curl to get your IP address from icanhazip.com. The command below outputs your public IP address as seen from a computer on another internet location:
|
1 |
curl -4 icanhazip.com |
Once you have your server’s public IP address, copy and paste it into your browser’s address bar:
|
1 |
http://your_server_public_ip |
Your browser should load the default CentOS 7 Apache web page:

If you were able to load the default Apache web page, then it means your server is working correctly. If you scroll down, you can see some basic information about Apache files and directory locations. With the service installed and operating properly, you should be able to use the various systemctl commands to manage the service.
Step 3: Managing the Apache Service
In this section, we will show you some basic Apache Management commands. Here is the command that stops the web server:
|
1 |
sudo systemctl stop httpd |
Here is the command to start the web server:
|
1 |
sudo systemctl start httpd |
Next, this is the command to restart the webserver (stop and start):
|
1 |
sudo systemctl restart httpd |
After this, we will show you the command to reload the Apache service. This command is necessary when you are simply making configuration changes. By reloading, the Apache process will pick up the configuration changes without dropping connections as it would have been the case if you had restarted:
|
1 |
sudo systemctl reload httpd |
As per the default configurations, Apache starts automatically when the server boots. If you want to change this behavior, here is the command to disable the service to start on boot:
|
1 |
sudo systemctl disable httpd |
To re-enable the service to start at boot, enter the following command:
|
1 |
sudo systemctl enable httpd |
Step 4: Setting Up Apache Virtual Hosts
By default, Apache is configured to host and serve a single website. In most cases, you will want your web server to serve and host multiple websites. For example, you may have sub-domains or you may want to set up a blogging page for your main company/organization website. Here is where Apache virtual hosts come in to play. Apache virtual hosts enable you to configure your web server to serve multiple websites. Apache virtual hosts are the equivalent of server blocks in the Nginx server.
For this tutorial, we will show you how to create a virtual host by using example.com as our domain. Of course, the example.com domain won’t work on the internet, so you should replace it with your actual domain – the steps are the same.
When you install Apache on CentOS, it installs one virtual host that is configured to serve content from the /var/www/html directory. This design works well if you are hosting a single site. However, we want to be able to host multiple sites. We will leave the default /var/www/html directory and instead create another directory for the example.com domain within the /var/www location. The reason behind leaving the default directory is so that it gets served when client requests do not match any other sites you configured with virtual hosts. Moreover, if you would like to disable your created virtual hosts, the default remains to serve traffic.
First, create a directory inside the /var/www for your domain name. You are free to choose a name of your choice. However, it’s recommended to choose a name similar to your domain for easy remembrance when you create the virtual host conf file. Enter the following command to create the example directory:
|
1 |
sudo mkdir -p /var/www/example |
Enter the following command to create an additional folder that will hold the log files for the site:
|
1 |
sudo mkdir -p /var/www/example/log |
With your website directories in place, assign ownership of the directory with the $USER environmental variable using the following command:
|
1 |
sudo chown -R $USER:$USER /var/www/example |
Run the following command to ensure that your web root has the default permissions:
|
1 |
sudo chmod -R 755 /var/www |
Now, create a simple index.html page using nano inside the example directory by entering the following command:
|
1 |
sudo nano /var/www/example/index.html |
In the nano editor, add the following HTML code snippet:
|
1 2 3 4 5 6 7 8 |
<html> <head> <title>Welcome to Example.com!</title> </head> <body> <h1>If you can see this message, it means <em>example.com</em> virtual host is working!</h1> </body> </html> |
Once done, save the file by pressing Ctrl O and press ENTER. You can now close the editor by pressing Ctrl X.
So far, we have your site directory and basic web page to test the virtual host. Next, we want to create the virtual host configuration files. Virtual host files specify the configurations of the various sites you want to host on a single Apache server. They direct the set domain name requests to its specific directory.
Virtual host files are stored in the directory /etc/httpd/sites-available. The activated virtual host files are symlinked from the /etc/httpd/sites-available directory to the /etc/httpd/sites-enabled directory. These two directories are not created by default in CentOS, so you have to create them yourself. Enter the following command to create the directories:
|
1 |
sudo mkdir /etc/httpd/sites-available /etc/httpd/sites-enabled |
With the directories in place, instruct Apache to look for virtual hosts in the sites-enabled directory. You will do this by modifying the main configuration file for Apache. Enter the following command to open the file in the nano editor:
|
1 |
sudo nano /etc/httpd/conf/httpd.conf |
We want to add a line that will instruct Apache to look for additional configuration files in an optional directory. Scroll to the bottom of the file and add the following line at the end:
|
1 |
IncludeOptional sites-enabled/*.conf |
Save the file by pressing Ctrl O and press ENTER. You can now close the editor by hitting Ctrl X. The next step is to create the virtual host file inside the sites-available directory. Enter the following command to create and open the new file with the nano editor:
|
1 |
sudo nano /etc/httpd/sites-available/example.conf |
In the opened file, add the following configuration block. Remember to replace our example.com with your actual domain name, and if you used a different directory name in the /var/www/example, also update that appropriately:
|
1 2 3 4 5 6 7 |
<VirtualHost *:80> ServerName www.example.com ServerAlias example.com DocumentRoot /var/www/example ErrorLog /var/www/example/log/error.log CustomLog /var/www/example/log/requests.log combined </VirtualHost> |
As you can see, we have specified the domain name and the document root where files to be served for this domain will be found. We have also specified the error log location – this will help you during server troubleshooting.
Once we have our virtual host file inside the sites-available directory, the next step is to enable the file by creating a symbolic link to the sites-enabled directory. Enter the following command to create the symbolic link:
|
1 |
sudo ln -s /etc/httpd/sites-available/example.conf /etc/httpd/sites-enabled/example.conf |
If you have followed the steps up to this point, your virtual host should now be ready to serve your website content. However, there is one more check you have to configure before the virtual hosts start working. We will cover that next.
Step 5: Adjust SELinux Permissions to Allow Virtual Hosts
Linux distributions including Fedora, RHEL, and CentOS come with SELinux by default. SELinux (Security Enhanced Linux) is a security architecture for Linux systems that restricts and defines how a server should process requests, and how users should interact with sockets, network ports, and essential directories.
Out of the box, SELinux will work with the default Apache configuration. However, with the custom virtual host that you created, including a custom log directory, a service error will be thrown when you try to restart the Apache service. The solution is to modify the SELinux policies to allow the Apache service to write to necessary files.
SELinux makes CentOS a highly secure server. Thus, we do not recommend disabling it completely. Given that SELinux allows you to customize your security level in various ways, it’s recommended that you only update or set policies based on the needs of your environment.
You have two options of updating Apache policies: either Universally or per Specific Directory. Updating policies specific to a directory is more secure. Hence, it is the recommended option.
-
Updating Apache Policies Universally
You can modify the Apache policy universally which will instruct SELinux to treat all Apache processes identically by using the httpd_unified Boolean. Keep in mind that modifying Apache policies universally will not give you the same level of control as doing each directory in a specific way. However, it is more convenient when it comes to maintenance. Run the following command to update the Apache policies universally:
|
1 |
sudo setsebool -P httpd_unified 1 |
Let’s define what the values in this command are doing:
- setsebool – updates SELinux boolean values.
- -P tag – updates the boot-time value so this change will persist across reboots.
- httpd_unified – the boolean value that will instruct SELinux to treat all Apache processes as the same type. Using the value 1 enables it.
-
Adjusting Apache Policies on a Directory
If you want more control over directories, then adjusting Apache policies per directory is the right way to go. However, it comes with the overhead of requiring more maintenance. This is because the policy is not global. Hence, you will need to manually set the context type for any new log directories that you specify in your virtual host conf files.
Before updating the policy, first check the context type that SELinux assigned the /var/www/example/log directory using the following command:
|
1 |
sudo ls -dZ /var/www/example/log/ |
The command will output something like the following, which is basically the SELinux context of the directory:
|
1 |
drwxr-xr-x. root root unconfined_u:object_r:httpd_sys_content_t:s0 /var/www/example/log/ |
httpd_sys_content_t is the current context, telling SELinux that the Apache process is only allowed to read files created in this directory. Since from our virtual host configurations, we want Apache to write to log files in the /var/www/example/log directory, we will modify this policy to allow Apache to generate and append to web application log files. The context that allows this is the httpd_log_t. Here is the command to update the context:
|
1 |
sudo semanage fcontext -a -t httpd_log_t "/var/www/example/log(/.*)?" |
To apply the changes from the above command and have them persist across boots, execute the following command:
|
1 |
sudo restorecon -R -v /var/www/example/log |
Let’s define what the command does:
- restorecon – applies the changes and ensures they persist across reboots.
- -R flag – will run the command recursively, updating any existing files to use the new context.
- -v flag – prints the context changes after the command has run. It will output something like this:
|
1 2 |
Output: restorecon reset /var/www/example/log context unconfined_u:object_r:httpd_sys_content_t:s0->unconfined_u:object_r:httpd_log_t:s0 |
|
1 |
sudo ls -dZ /var/www/example/log/ |
|
1 |
drwxr-xr-x. root root unconfined_u:object_r:httpd_log_t:s0 /var/www/example.com/log |
Step 6: Test the Virtual Host Configuration
Before we can test the virtual host, you will need to restart the Apache services. Here is the command for that:
|
1 |
sudo systemctl restart httpd |
Next, list the contents of the log directory using the following command:
|
1 |
ls -lZ /var/www/example/log |
It should display something like this, showing that Apache has created the log files:

If you have been following the steps up to this point, Apache should now be able to serve the sample HTML page when you visit your domain name as defined in your virtual host file. If you wish, you may repeat steps 4 and 5 to set up additional domains and update their SELinux permissions appropriately.
Conclusion
In this tutorial, we installed Apache, learned how to update SELinux policies to allow Apache to write to custom log files, and finally tested our configuration to confirm that it is working correctly. Using this background, you should be able to build on it and serve better applications with richer experiences.
If you’d like to explore a complete web stack, check out our tutorial on how to install the LAMP stack on CentOS 7.
Happy Computing!
- Removing Spaces in Python - March 24, 2023
- Is Kubernetes Right for Me? Choosing the Best Deployment Platform for your Business - March 10, 2023
- Cloud Provider of tomorrow - March 6, 2023
- SOLID: The First 5 Principles of Object-Oriented Design? - March 3, 2023
- Setting Up CSS and HTML for Your Website: A Tutorial - October 28, 2022