
Containerization technology has greatly advanced in the software development tech space as the most accepted method of packaging and deploying applications in cloud environments. This has been necessitated by the need for continuous integration (CI) and continuous deployment (CD) which are defining aspects of DevOps. Software developers and engineers make use of containers to achieve the CI/CD aspect of software architecture. A container is essentially a fully packaged portable and self-dependent computing platform. While there are several container platforms around the web, Docker happens to be the most common.
Docker is an open-source container platform that makes development efficient and predictable. Docker offers a public Docker image repository available at Docker Hub. It contains many open-source Docker images for the most common implementations you can pull and use. Since it’s a public repository, you are also free to add your own Docker images to share with the public. If however, you have private/proprietary code, you may have to pay for a private image repository or build your own image repository service. This is where GitLab comes into the picture.
GitLab is a web-based Git repository that’s more than just a version control tool. It provides DevOps tools for continuous integration and deployment, issue-tracking, Docker image registries, and more. It offers three options: GitLab Community Edition (CE), GitLab Enterprise Edition (EE), and Gitlab SaaS. GitLab CE and GitLab EE are self-managed solutions that allow you to download, install and manage the GitLab instance yourself. GitLab SaaS is hosted by GitLab inc, and you don’t have to worry about installing anything to use it.
In a previous tutorial, we showed you how to set up a GitLab instance on a CloudSigma server and host your own Git Repository. We also showed you how to implement continuous integration pipelines with GitLab runner to automatically build and run your tests whenever there’s a new commit. If you haven’t gone through the mentioned tutorials, please do so as they are building blocks to this tutorial.
In this tutorial, we will be demonstrating how to build a simple Docker image and host it with a GitLab self-hosted instance (whether you are using the Community Edition or the Enterprise Edition – the flow of steps is the same).
Prerequisites
To follow along with every step of this tutorial, please ensure you have a GitLab CI runner and a self-hosted GitLab server as explained below.
1. A Secure GitLab Server
We will use this to store the source code, run CI/CD tasks and host the Docker image registry. You should have a server with at least 2 CPU cores and 4GB of RAM as recommended by GitLab to install a self-managed GitLab instance. You will also need a registered domain name to point to the server as we will be using it to get an SSL certificate from Let’s Encrypt to secure the server. Below are some links you can follow to set up a GitLab self-hosted instance.
- Register a domain name with any domain name registrar of your choice and point it to CloudSigma.
- Follow this tutorial for the initial Ubuntu server setup, add a non-root user, and enable Ubuntu’s UFW firewall.
- Finally, follow this tutorial to install and configure a self-hosted GitLab instance.
2. A GitLab CI runner
A GitLab CI runner is necessary to run automated jobs against your test cases. The tutorial on how to set up GitLab Continuous Integration pipelines on Ubuntu 20.04 gives you an overview of the GitLab CI server and shows you how to trigger jobs. Follow the steps in the tutorial to set up the GitLab CI runner service if you haven’t. The tutorial has a Node.js demo app with test cases – we will be using it in this tutorial.
Now, let’s start!
Step 1: Configuring a Privileged GitLab CI Runner
In the tutorial on how to set up a GitLab CI Runner, we configured a GitLab runner using the sudo gitlab-runner register command which allowed us to interactively add the required parameters. While this worked for our previous use case, which was running builds and tests in isolated Docker containers, it may not handle building Docker images. Building Docker images requires the runner to have full access to the Docker service. You can achieve this configuration by using the official docker-in-docker image to run the jobs. Such a configuration involves granting the runner a privileged execution mode.
While granting the privileged mode of execution is necessary for building Docker images, it comes with security issues. That’s because it involves doing away with the security merits of containers. You may think the other Docker runners are safe but they happen to have the same issues as explained in the official Docker documentation.
We will create another runner with the privileged mode of execution. This will be a project-specific runner because of the security implications mentioned above. It will accept jobs from the Node Pipeline project we created in the tutorial on how to set up continuous CI pipelines with GitLab.
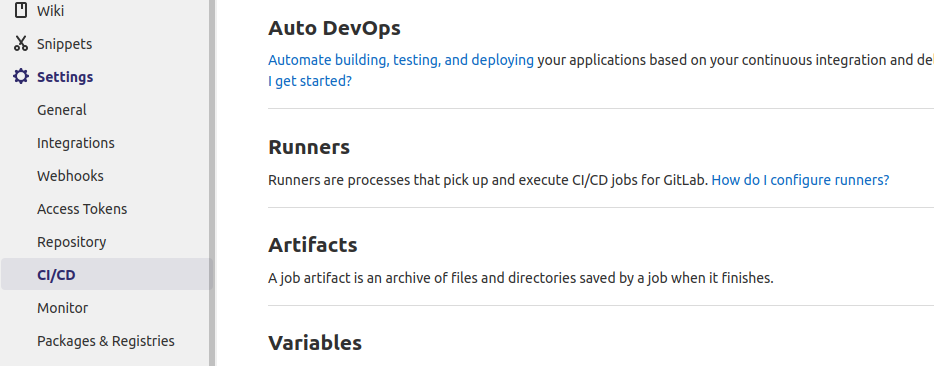
The first thing you should do is to check that Shared Runners are disabled on the project. From the project page of the Node Pipeline project, click on Settings in the bottom left menu and select CI/CD in the submenu:
Find the Expand button at the Runners section and click it to reveal details about the available runners:
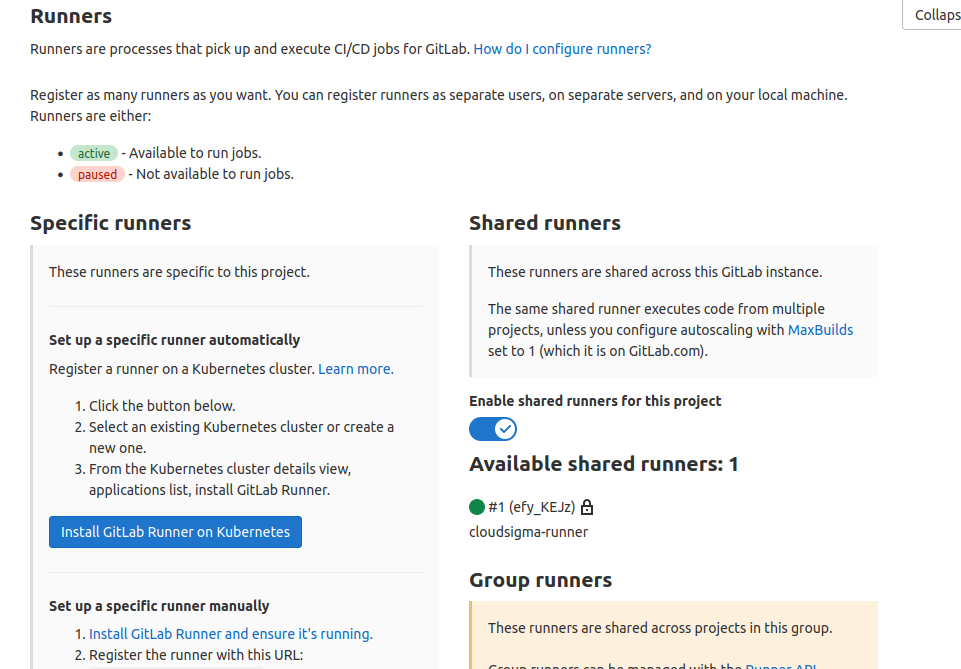
Click the switch to Disable Shared Runners for this project. If you had added a project-specific runner in the previous section, also disable it. We will be adding a privileged project-specific runner to run jobs for this project. This guarantees that we don’t end with build errors in case GitLab randomly assigns jobs to runners that were not registered with a privileged mode of execution. In the above screenshot, under the Specific runners tab, you should see your project’s registration token. Take note of it as you will use it below.
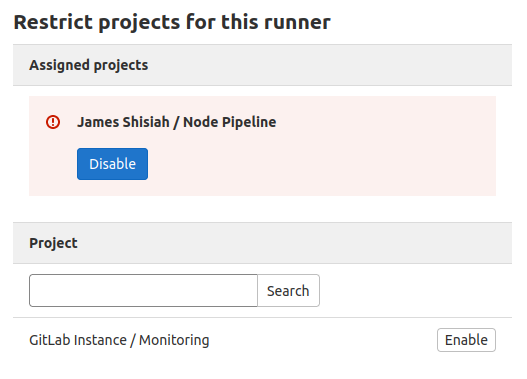
| Note: A project-specific runner can as well be assigned to other projects from the Admin panel > Runners section. When you select a runner from the list of runners, you get to the runner configuration page. Scroll down to view the section Restrict projects for this runner: |
It’s time to get your terminal up. If you haven’t done the steps in the tutorial on how to set up GitLab Continuous Integration Pipelines on Ubuntu 20.04, take a break from this tutorial and follow through the steps so that you can have a server with GitLab CI runner service. Otherwise, SSH into the GitLab CI runner server with your sudo user for the next steps.
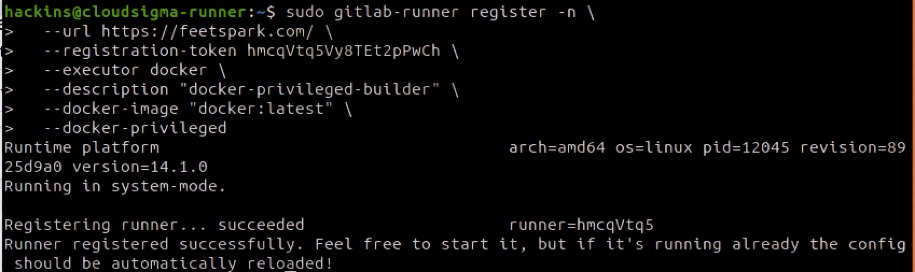
To set up the privileged project-specific runner, enter the following command on your terminal, replacing your domain name and registration token copied above:
|
1 2 3 4 5 6 7 |
sudo gitlab-runner register -n \ --url https://your-gitlab-instance-domain.com/ \ --registration-token your-project-specifc-registration-token \ --executor docker \ --description "docker-privileged-builder" \ --docker-image "docker:latest" \ --docker-privilegedh |
This output shows a successful registration:
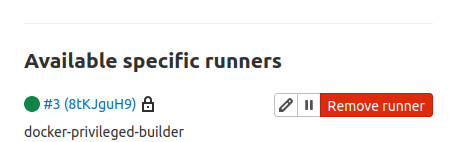
To verify that your GitLab instance picked up the runner, go back to the browser, and refresh the Settings > CI/CD page. Expand the Runners section and you should see your runner under Specific Runners:
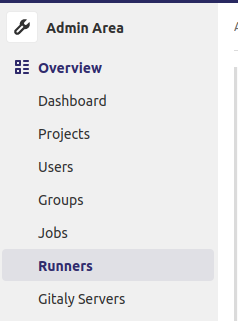
Optionally, if you go to the Admin Panel (by clicking the Menu button in the top bar and selecting Admin), then select Runners in the menu options:
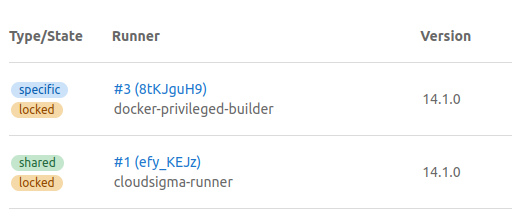
You should land on this page showing all the available runners connected to your GitLab instance, both shared and project-specific runners:
Up to this point, you have successfully set up a runner that can build Docker images.
Step 2: Configuring GitLab’s Docker Registry
Some crucial workflows require independence from outside services. That’s where GitLab’s self-managed Docker Registry comes in. It’s not only secure but ensures that you have the flexibility to adapt your jobs and pipelines according to your needs. To set up the Docker Registry, you will be modifying GitLab’s config file. First, SSH into the GitLab instance then open the file with the following command:
|
1 |
sudo nano /etc/gitlab/gitlab.rb |
Scroll down until you see the Container Registry Settings:

Uncomment the line with the registry_external_url and set it to your GitLab’s instance domain name, specifying port 8888 at the end:
|
1 |
registry_external_url 'https://your-gitlab-domain.com:8888' |
Next, we need to specify where the registry will find the Let’s Encrypt certificates by adding the following lines. Remember to edit with your actual GitLab instance domain name:
|
1 2 |
registry_nginx['ssl_certificate'] = "/etc/letsencrypt/live/your-gitlab-domain.com/fullchain.pem" registry_nginx['ssl_certificate_key'] = "/etc/letsencrypt/live/your-gitlab-domain.com/privkey.pem" |
Once you are done, save and close the file. Enter the following command in your terminal to reconfigure GitLab:
|
1 |
sudo gitlab-ctl reconfigure |
Next, wait for a few seconds for the command to finish executing. You should see the following output if successful:
![]()
Next, we need to ensure that the firewall (ufw) allows traffic to the registry port we assigned using the command:
|
1 |
sudo ufw allow 8888 |
Then, you need to test that the Docker Registry is running by logging into it from another machine that has Docker installed using the docker login command. If you had not set up Docker on your local environment, you can SSH into the GitLab CI runner server as it already has Docker installed. Next, execute the following command, of course specifying your GitLab instance domain name:
|
1 |
docker login your-gitlab-domain.com:8888 |
Your output will show the Login Succeeded message like this:
![]()
This means the registry has been configured successfully and it’s working. When you create images, they will be stored locally in the GitLab server’s filesystem. This is okay for a private company registry. However, if you plan to leave your registry open to the public, you may need larger storage. Fortunately, GitLab offers options to connect to storage buckets. You can read more from the official GitLab container registry docs to see how you can configure a storage bucket for your GitLab instance.
Step 3: Modify the gitlab-ci.yml file and Build a Docker Image
To proceed with this step, you should have the Node Pipeline project on your GitLab instance. Here is the view of the project on GitLab:
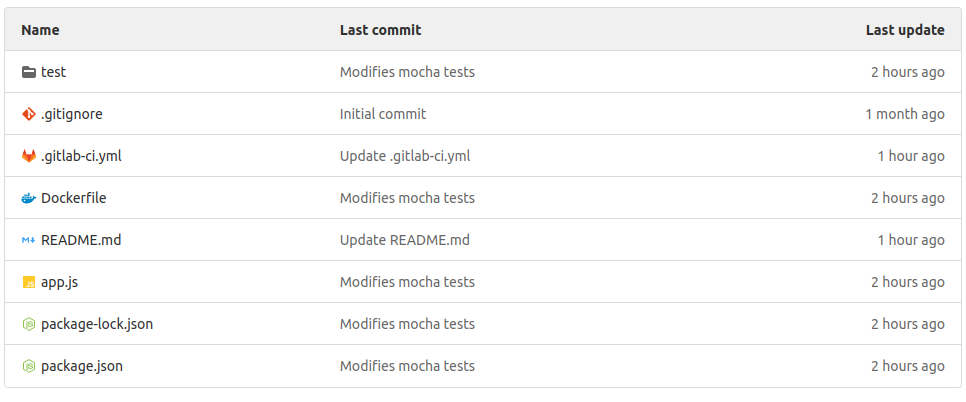
We talked about gitlab-ci.yml as the file that GitLab CI runner reads when triggered to know how to build your application and perform automated tests. We need to modify this file to add instructions for building Docker images. You may choose to edit this file right within the GitLab interface. You can also clone it onto your local machine and edit with your favorite editor, then do a commit and git push back to GitLab. For brevity, we will use the GitLab instance.
Click on the file to open it, then click on the Edit button:

This opens the file ready for editing. Delete everything from the file and add the following code:
|
1 2 3 4 5 6 7 8 9 10 11 12 13 14 15 16 17 18 19 20 21 22 23 24 25 26 27 28 29 30 31 32 33 34 35 36 37 38 39 40 41 42 43 44 45 46 47 |
image: docker:20-dind services: - name: docker:20-dind alias: docker command: ["--tls=false"] stages: - build - test - release variables: TEST_IMAGE: gitlab-domain.com:8888/hackins/node_pipeline:$CI_COMMIT_REF_NAME RELEASE_IMAGE: gitlab-domain.com:8888/hackins/node_pipeline:latest DOCKER_HOST: tcp://docker:2375 DOCKER_DRIVER: overlay2 DOCKER_TLS_CERTDIR: "" before_script: - docker login -u gitlab-ci-token -p $CI_JOB_TOKEN gitlab-domain.com:8888 build: stage: build script: - docker build --pull -t $TEST_IMAGE . - docker push $TEST_IMAGE test: stage: test script: - docker pull $TEST_IMAGE - docker run $TEST_IMAGE npm test release: stage: release script: - docker pull $TEST_IMAGE - docker tag $TEST_IMAGE $RELEASE_IMAGE - docker push $RELEASE_IMAGE only: - master |
While you are adding the code snippet above, remember to update the highlighted part with your actual details. When you are done, save the changes by pressing the Commit changes button. If you have been working outside of GitLab, commit and push your changes.
Let’s understand what the code we have added to the .gitlab-ci.yml file is doing. The first line tells GitLab to use the official Docker-in-Docker image and attaches it to the docker-in-docker service (docker:dind).We then define the stages for build, test, and release. The build stage builds the image using the instructions in the Dockerfile and then uploads it to the Docker Registry which we set up in a previous step.
When the build stage succeeds, the test stage downloads the image, runs it as a container, and executes the npm test command to perform automated tests inside it. If the test stage succeeds, the release stage takes over. In the release stage, the image is downloaded and tagged as node_pipeline:latest. It’s then pushed back to the registry.
This is only a basic configuration for a demo project. For your real-world projects, you could have other stages, for example staging, production, etc. When you save the file after editing, a pipeline is triggered. It then starts running the jobs. Return to the Node Pipeline page. You should see that the job is currently running:

Click on the CI indicator icon to view the various stages of the job:
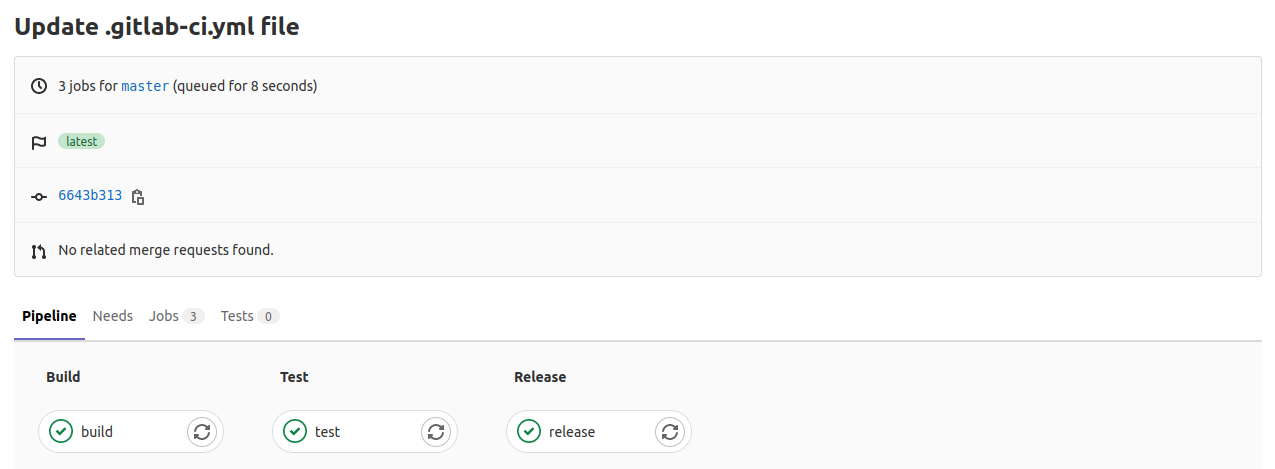
As you can see by the screenshot above, all stages were successful as per the green checkmark icons. You can click on each stage to view the job output:
On the left-hand menu, click on Packages & Registries and Select Container Registry:

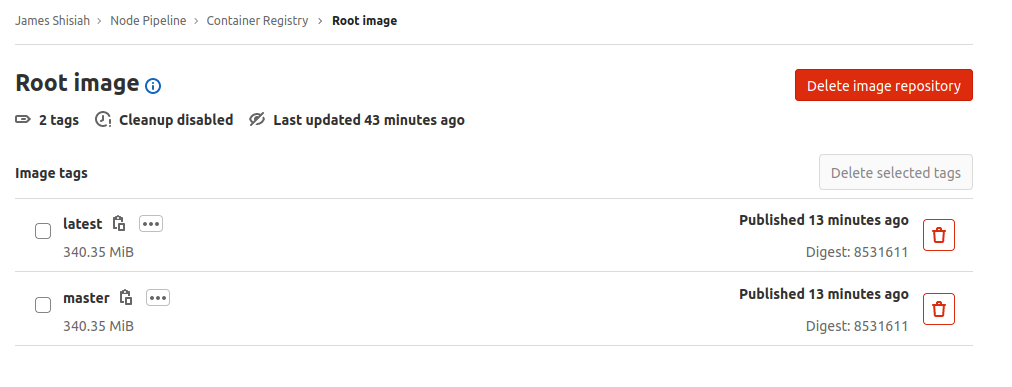
This brings up a page listing the available Docker images for the selected project. The image we built and released should appear in the list with the tag assigned:
 Click to reveal the various tags for the image:
If you have Docker installed in your local environment, you can pull the image and test that it runs as expected. Click on the Copy icon next to the image tag name. It will copy to your clipboard the full image name you can use with the docker pull command:
|
1 2 |
docker pull feetspark.com:8888/hackins/node_pipeline:latest docker run -it --rm -p 8090:8090 feetspark.com:8888/hackins/node_pipeline:latest |
The above commands will pull the image and run it inside a container:

The app is now being served on port 8090. If you open your browser and navigate to your-IP-address:8090 you should see the page displayed:
If you can see such a page in your browser, then you have successfully built a Docker image and shared it on a private Docker Registry. In the future, if you make any changes to the master branch, the stages defined in the .gitlab-ci.yml file will run, and if they succeed a new Docker image with the tag latest will be rebuilt and pushed to the registry.
Conclusion
In this project, you learned how to add a privileged GitLab runner to your GitLab self-managed instance so that you can build Docker Images. You also configured a private Docker image registry to host your images. Using the Node pipeline project, you were able to test every component of the setup and ensure that they connected and communicated as expected. Once your image was available in the registry, you were able to pull it and confirm that it ran inside a container.
This is an introductory tutorial, giving you the basics to build on. Please follow the official GitLab docs to learn more about GitLab. This link can provide information about GitLab Container Registry.
For further resources on utilizing Docker, you may want to check out more tutorials on our blog:
- Sharing Data between Docker Containers
- Setting Up a Private Docker Registry on Ubuntu 18.04
- How To Share Data Between a Docker Container and a Host
- Clean Up Docker Resources – Images, Containers, and Volumes
Happy Computing!
- How To Enable, Create and Use the .htaccess File: A Tutorial - March 8, 2023
- An Overview of Queries in MySQL - October 28, 2022
- Introduction to Cookies: Understanding and Working with JavaScript Cookies - October 25, 2022
- An Overview of Data Types in Ruby - October 24, 2022
- The Architecture of Iptables and Netfilter - October 10, 2022