

Introduction
Apache is currently the most widely used web server in the world. It is an open-source software developed over twenty years ago and maintained by the Apache Software Foundation. As of September 2020, it is estimated to be serving 35% of all website traffic in the world.
Developers prefer Apache for its speed, security, reliability, robustness, and ease of customization. In addition, Apache is able to meet the needs of many environments as it allows the installation of various extensions and modules. This is possible because of a set of configurations that developers and server administrators can modify to serve different purposes. In this tutorial, we will guide you through the general configuration files and options that can affect different results on Ubuntu and Debian servers.
Debian and Ubuntu are among the top server operating systems of choice. The two have many similarities. For example, they both use the APT package manager and DEB packages for manual installation. They handle Apache settings and directory structure similarly. Hence, you should be able to follow this tutorial with either of the operating systems. First, you can follow this tutorial to set up an Ubuntu server in a few steps.
Next, log in as a non-root user with sudo privileges, and let’s start!
How to Install Apache on Ubuntu and Debian
If your server doesn’t already have Apache, you can easily install it using one command. First, run the update command:
|
1 |
sudo apt-get update |
Then, you can install Apache by issuing the following command:
|
1 |
sudo apt-get install apache2 |
When the installation completes, you can check the version installed using the command:
|
1 |
apache2 -v |
At the time of writing this tutorial, the version was:

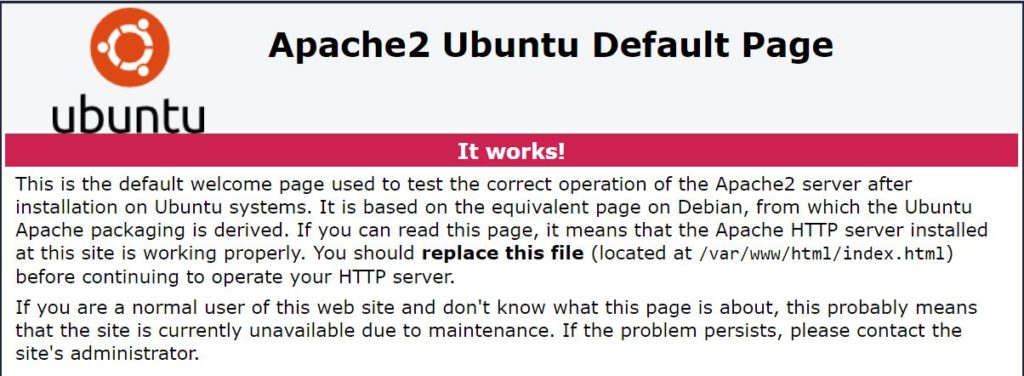
After that, visit your server’s IP address or domain name. You should be able to see the default Apache index page:
The Apache File Hierarchy in Ubuntu and Debian Distributions
Both Ubuntu and Debian distributions use the apt package manager. Similarly, when you install a package, it creates similar file hierarchies. In our case, for both Ubuntu and Debian, Apache keeps its configuration files within the “/etc/apache2” directory. Go into the directory using the following command and list the contents of the directory:
|
1 2 |
cd /etc/apache2 ls -F |
You can see the output of the command in the screenshot below:

You can see a number of files and sub-directories which you should be familiar with when configuring an Apache server setup. Here is their description:
- apache2.conf – It is the main configuration file for an Apache server. Also, it contains all default configurations. While almost all configurations can be done from within this file, it’s always recommended to use separate designated files for simplicity and to protect this default file from corruption.
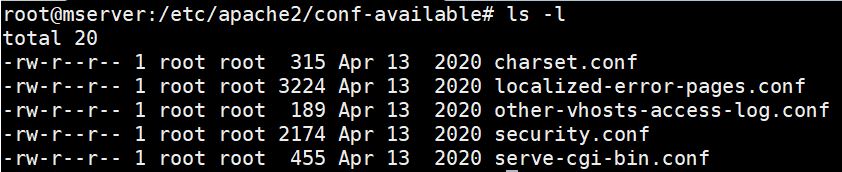
- conf-available – It is the directory containing additional local configuration files and files of other applications that are not yet associated with any modules. The configurations in this directory are not active unless you enable them. The command a2enconf can enable a configuration file. Here are the contents of this directory:
- conf-enabled – It is the directory containing additional local configurations and configuration files of other applications associated with their corresponding modules. The configuration files in this directory are active and affect the behavior of Apache. You can disable a configuration file using the command a2disconf. Here are the contents of this directory:

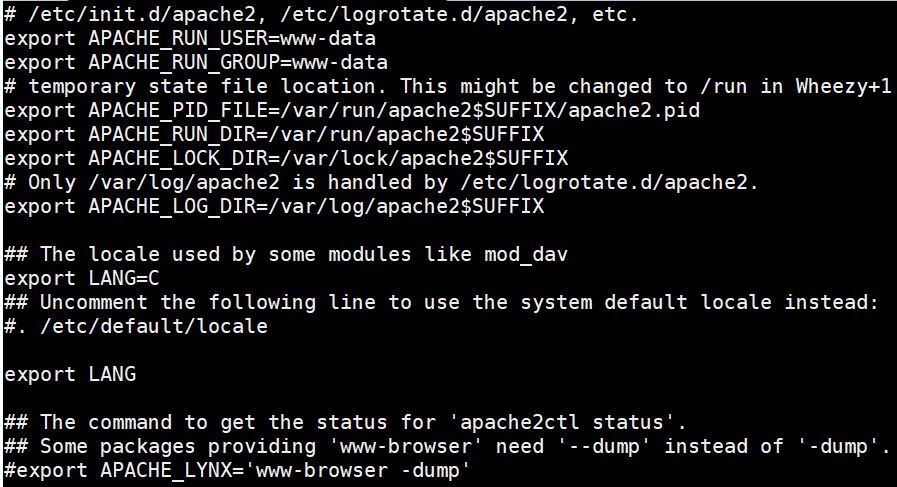
- envvars – It is the file containing the environment variables of Apache2. The variables in this file only affect Apache and are not related to your Linux system. Here are the contents of the file:
- magic – It is the file containing instructions for determining the MIME type of a file. It helps the server to determine the type of a file.
- mods-available –It is the directory containing configuration files to load modules and configure them. However, they are not yet enabled. You can enable them using the a2enmod command.
- mods-enabled – It is the directory containing configuration files to load modules and configure them. The configurations in this directory are already enabled and link to the corresponding modules. You can disable the modules with the a2dismod command.
- ports-conf –It is the file specifying the ports available for virtual hosts and TCP ports Apache is listening to.
- sites-available –It is the directory containing the available configuration files for Apache virtual hosts. Virtual hosts allow Apache to serve different websites. The files in this directory are not yet active. You can enable a virtual host file with the command a2ensite.
- sites-enabled – It is the directory containing the activated virtual host configuration files. It usually contains symbolic links to the files in the sites-available directory. You can disable a virtual host file using the command a2dissite.
The modular design of the Apache configuration files allows you to modify and add files as you need.
Contents of the Apache2.conf File
The file at “/etc/apache2/apache2.conf” contains the main configuration files for Apache. More specifically, it contains the configuration directives that give the server its instructions. It consists of three sections to define the global server process configurations, the default server configuration, and the virtual hosts configurations.
In Ubuntu and Debian systems, the majority of the file contains the global server process configurations. Towards the bottom you can find the configurations for the default server and the virtual hosts by using the “Include” directive. Apache uses the “Include” directive to read other configuration files and then include them into the current configuration file, from the point where the directive appears. This happens on the Apache server startup.
Scrolling to the bottom of the apache2.conf file, you should see several include directives. The directives load the modules’ definitions in the mods-enabled directory, the ports.conf file, the local configurations in the conf-enabled directory, and the virtual hosts’ configurations in the sites-enabled directory.
Global Server Configuration Section
The global server configuration section contains the settings and instructions that control how Apache works globally. It features some directives whose values you can modify to change the behavior of Apache. Let’s discuss some of them:
- Timeout – This directive specifies the maximum time for the server to fulfill a request. By default, it’s 300 seconds which is likely too high if you are developing a faster responsive app. You can change this to a lesser value if your server has enough resources.
- KeepAlive – Specifies that each connection should remain open to handle multiple requests from the same client. By default, it’s set to “On”. However, if it’s set to “Off”, then each request will have to establish a new connection, even if from the same client. This may cause significant server overload.
- MaxKeepAliveRequests – It controls the maximum number of requests to allow during a single persistent connection before dying. To allow an unlimited number of connections, set the value to 0. For maximum performance and efficiency, set the number to the highest possible.
- KeepAliveTimeout – It determines the maximum number of seconds to wait for the next request from the same client after the last one before the connection dies. The default is 5 seconds. If the time elapses, then in the next request, a new connection is made to handle the request.
- HostnameLookups – Decides whether DNS lookup should be enabled or not. By default, it’s off. If you enable it, then every request will result in at least one lookup to the nameserver which will greatly impact your server performance negatively.
Default Virtual Host File
A fresh install of the Apache server comes with a default virtual host file called 000-default.conf. This is the file that serves the default Apache index.html page. It goes in the sites-available directory. The contents of this file will give you a general idea of the format of Apache virtual host files. Enter the following command to open the file:
|
1 |
sudo nano /etc/apache2/sites-available/000-default.conf |
Here are the contents of the file. We have removed the comments for brevity:
|
1 2 3 4 5 6 7 8 9 |
<VirtualHost *:80> ServerAdmin webmaster@localhost DocumentRoot /var/www/html ErrorLog ${APACHE_LOG_DIR}/error.log CustomLog ${APACHE_LOG_DIR}/access.log combined </VirtualHost> |
As you can see in the configuration header VirtualHost *:80, by default this virtual host is configured to handle requests on port 80. This is the standard HTTP port.
Apache is designed to use the most specific virtual host definition that matches a particular request. This means that this particular virtual host may not necessarily handle each request to the server. Rather, if there was another virtual host file with a more specific definition, it would overrule this file.
Here are the descriptions of the directives in the virtual host file:
- ServerAdmin – Specifies the contact email to use when there are server problems. Apache usually displays this on its generated error page. If you set ServerSignature to “Email” in the /etc/apache2/conf-enabled/security.conf file, the email address specified here will be displayed with a mailto
- DocumentRoot – This directive points to the directory containing the website files. You can find the default Apache welcome index page at the /var/www/html directory in Ubuntu 20.04.
- ErrorLog – This directive determines the location of the error log file.
- CustomLog – This directive shows the location of the access log and the log display format.
Additional Virtual Host Directives
- ServerName – It specifies the domain name or IP address that the virtual host should handle. If we were defining multiple virtual hosts so that our Apache server can serve multiple websites, we would add a ServerName directive and specify the domain that each virtual host should serve.
- ServerAlias – This directive makes one virtual host file apply to more than one name, providing alternate domains to get to the same content. For example, when your users have access to the same content if they precede your domain name with www. For example, we could add the following to the virtual host for the example.com domain:
|
1 2 |
ServerName example.com ServerAlias www.example.com |
The Directory Definition Directive
In real-world cases, you will likely have your website files in several directories. The default virtual host file does not have the Directory directive because it can only serve one index.html file. The Directory directive specifies how Apache handles different directories within the website document root. It is in this directive that you also define the access restrictions to the filesystem. By default, Apache only allows Internet access to the files in the /var/www directory. In this directory, you can create other directories that will hold your website files. In addition, you may specify how you want the files in the directory accessed. A sample definition can look like this:
|
1 2 3 4 5 |
<Directory /var/www/html> Options Indexes FollowSymLinks MultiViews Require all granted AllowOverride all </Directory> |
The <Directory /var/www/html> specifies the directory to which these rules will apply. The “AllowOverride” option specifies whether a “.htaccess” file should override the settings if you place it in the specified directory. This is necessary when working with frameworks like Laravel that work with .htaccess and URL rewriting.
To learn more about virtual hosts, you can visit our tutorial on how to set up Apache virtual hosts on Ubuntu 20.04. Here is a sample virtual host file with all the directives we have defined:
|
1 2 3 4 5 6 7 8 9 10 11 12 13 14 15 |
<VirtualHost *:80> ServerName example.com ServerAlias www.example.com ServerAdmin webmaster@localhost.com DocumentRoot /var/www/html ErrorLog ${APACHE_LOG_DIR}/error.log CustomLog ${APACHE_LOG_DIR}/access.log combined <Directory /var/www/html> Options Indexes FollowSymLinks MultiViews Require all granted AllowOverride all </Directory> </VirtualHost> |
Redirect, Alias, and ScriptAlias Directives
In some instances, you may want to access website files or executables that are not directly under the DocumentRoot directory. This is where these three directives come in.
The Redirect directive instructs clients to make a new request with a different URL. Usually, you will use it when you want to direct your website visitors to a different domain name or IP address. Note that Redirect is first executed before Alias and ScriptAlias. The Alias directive maps a URL to a directory path. The ScriptAlias directive maps a URL to the directories that will contain executable scripts. For Alias and ScriptAlias to work, you must set the directory permissions to the www-data user the web uses.
How to Enable Sites and Modules in Apache
Virtual hosts and modules must be enabled before they become active and accessible to the Apache process. Furthermore, virtual hosts are created inside the sites-available directory as explained. If you have a virtual host file with the name example.com.conf, you can enable it using the following command:
|
1 |
sudo a2ensite example.com.conf |
The command enables the virtual host. However, for the changes to take effect, you must instruct Apache to reload the configuration files by entering the following command:
|
1 |
sudo service apache2 reload |
You may want to disable a virtual host file called example.com.conf so that Apache doesn’t use it to serve requests. In order to do that, enter the following command to disable a file:
|
1 |
sudo a2dissite example.com.conf |
Again, for the changes to take effect immediately, you must instruct apache to reload the configuration files by entering the following command:
|
1 |
sudo service apache2 reload |
Similarly, you can enable and disable modules using the same syntax. The command for enabling a module is “a2enmod” and the command for disabling a module is “a2dismod.” For example, there is an Apache module called mod_rewrite that assists with rewriting URLs depending on .htaccess configurations. You must enable this module for the .htaccess file to work. You can do that by entering the command:
|
1 |
sudo a2enmod rewrite |
For this change to take effect, you must reload the Apache configurations. You may also disable the module by entering the command:
|
1 |
sudo a2dismod rewrite |
After that, reload Apache2 configurations for the changes to take effect immediately.
Finally, here are some more resources that will help you get familiar with the Apache web server:
- Installing the Apache Server on Ubuntu 18.04: A How-To Guide
- How To Install Linux, Apache, MySQL, PHP (LAMP) stack On CentOS 7
- Securing Apache with Let’s Encrypt on Ubuntu 18.04
- The World of Web Servers: Apache vs. Nginx
Conclusion
In this tutorial, we defined basic Apache configuration files on Ubuntu and Debian systems. As we demonstrated, Apache is highly modular, which means you can install a lot of modules to perform different tasks.
You can easily enable and disable these modules and change other configurations to achieve different results. You may now modify local configuration files which are then included in the main configuration file. Thus, you don’t have to worry about corrupting the global configuration file.
Happy Computing!
- How To Create a Kubernetes Cluster Using Kubeadm on Ubuntu 18.04 - June 24, 2021
- Nginx Server and Location Block Selection Algorithms: Overview - May 14, 2021
- Configuring an Iptables Firewall: Basic Rules and Commands - April 5, 2021
- How to Configure a Linux Service to Auto-Start After a Reboot or System Crash: Part 2 (Theoretical Explanations) - March 25, 2021
- How to Configure a Linux Service to Auto-Start After a Reboot or System Crash: Part 1 (Practical Examples) - March 24, 2021