

This tutorial will guide you on setting up a Kubernetes cluster from scratch using Ansible and Kubeadm and further deploying a containerized Nginx application with it.
Introduction
Kubernetes (also known as k8s or “kube”) is an open-source container orchestration platform that automates many of the manual processes involved in deploying, managing, and scaling containerized applications. Kubernetes has a rapidly growing open-source community, actively contributing to the project. Take a look at our blog post that will introduce you to everything you need to know about the basics of the Kubernetes platform.
Kubeadm is a tool, which configures several integrated elements, parts, and pieces such as the API server, Controller Manager, and Kube DNS. It also helps in automating the installation. However, it doesn’t create users or handle the installation of operating-system-level dependencies and their configuration and cannot provision your infrastructure.
Ansible is an open-source tool for software provisioning and application deployment. Saltstack is open-source software for information technology automation driven by events. These are the two tools that make creating additional clusters or recreating existing clusters less vulnerable to errors and can be used for these preliminary tasks.
Goals:
Your cluster will include the following physical resources:
1. One master node:
A master node is a node that controls and manages a set of worker nodes (workloads runtime) and resembles a cluster in Kubernetes. It also holds the node’s resources plan to determine the proper action for the triggered event. It runs etcd, an open-source distributed key-value store used to hold and manage cluster data among components that schedule workloads to worker nodes.
For example, the scheduler would figure out which worker node will host a newly scheduled POD.
2. Two worker nodes:
Worker nodes are the nodes that carry on with their assigned work even if the master node goes down once scheduling is complete. Worker nodes are the servers where your workloads (i.e. containerized applications and services) will run. You can also increase the cluster’s capacity by adding workers.
Once you complete this tutorial, you will have a fully functional cluster ready to run workloads (i.e. containerized applications and services) assuming that the servers in the cluster have sufficient CPU and RAM resources for your applications to run. After you have successfully set up the cluster, you can run almost any traditional UNIX application. It could be containerized on your cluster, including web applications, databases, daemons, and command-line tools.
The cluster itself will consume around 300-500MB of memory and 10% of CPU on each node.
Prerequisites:
- You must have an SSH key pair on your local Linux machine and know how to use SSH keys. However, if you haven’t used SSH keys before, you can see this tutorial to help you set up SSH keys on your local machine.
- Three servers running Ubuntu 18.04 with at least 4GB RAM and 4 vCPUs each. You should be able to SSH into each server as the root user with your SSH key pair. Follow this tutorial to install your Ubuntu server.
- Ansible installed on your local machine.
- You must also be familiar with Ansible playbooks.
- You will also need to know how to launch a container from a Docker image. Look at “Step 5 — Working with Docker Images in Ubuntu” in How To Install and Use Docker on Ubuntu 18.04 if you need a refresher.
Step 1 — Setting up the Workspace Directory and Ansible Inventory File
You first need to set up Ansible on your local machine. It will help you execute commands on your remote server. It also eases the manual deployment effort by automating it. For this, you will need to create a directory on your local machine that will serve as your temporary digital storage area (Workspace).
Once you create a directory, you will create a hosts file to store all the information about each server’s IP addresses and group. It will help you store the inventory information within. As stated earlier, there would be three servers, one master, and two workers. The master server will be the master with an IP displayed as master_ip. The other two servers will be workers and will have the IPs worker_1_ip and worker_2_ip.
You need to create a directory named ~/kube-cluster in the home directory of your local machine and enter the directory using the cd command into it:
|
1 2 |
mkdir ~/kube-cluster cd ~/kube-cluster |
The ~/kube-cluster directory will now act as the temporary digital storage area (workspace) inside which you will run all local commands for creating a Kubernetes cluster using kubeadm. The directory will contain all of your Ansible playbooks and be used for the rest of the tutorial.
Creating Hosts File
Create a file named ~/kube-cluster/hosts using nano or your favorite text editor:
|
1 |
nano ~/kube-cluster/hosts |
Now you will need to add the following text, which will specify information about the logical structure of your cluster:
|
1 2 3 4 5 6 7 8 9 |
[masters] master ansible_host=master_ip ansible_user=root [workers] worker1 ansible_host=worker_1_ip ansible_user=root worker2 ansible_host=worker_2_ip ansible_user=root [all:vars] ansible_python_interpreter=/usr/bin/python3 |
As mentioned, that inventory file will help you store all the information about the IP addresses of your servers and the groups that each server belongs to. ~/kube-cluster/hosts will be your inventory file and (masters and workers) will be the two Ansible groups that you’ve added to it specifying the logical structure of your cluster.
The Master group is the group that specifies that Ansible should run remote commands as the root user. It also lists the master node’s IP (master_ip) that can be listed by the server entry named “master”. Likewise, the Workers group has two entries for the worker servers (worker_1_ip and worker_2_ip) that also specify the ansible_user as root.
The last line of the file tells Ansible to use the remote servers’ Python 3 interpreters for its management operations. At last, you need to save and close the file after you’ve added the text. After setting up the workspace directory and Ansible inventory file, let’s move on to the next step of installing operating system level dependencies and creating configuration settings.
Step 2 — Creating a Non-Root User on All Remote Servers
In this step, you will learn how to create a non-root user with sudo privileges on all servers so that you can SSH into them manually as an unprivileged user.
This can be useful for frequently performed operations for the preservation of a cluster. Moreover, this step will help you perform the task more accurately and less error-prone, decreasing the chances of altering or deleting important files unintentionally. If you want to change the setup of files owned by root or see system information with commands such as top/htop and view a list of running containers, the following step will help you perform all the tasks.
Creating the Playbook
Create a file named ~/kube-cluster/initial.yml in the workspace:
|
1 |
nano ~/kube-cluster/initial.yml |
Next, you need to add the following play. A play in Ansible is a collection of steps to be performed that target specific servers and groups. There can be one or many plays in a playbook.
The following play will create a non-root sudo user:
|
1 2 3 4 5 6 7 8 9 10 11 12 13 14 15 16 |
- hosts: all become: yes tasks: - name: create the 'ubuntu' user user: name=ubuntu append=yes state=present createhome=yes shell=/bin/bash - name: allow 'ubuntu' to have passwordless sudo lineinfile: dest: /etc/sudoers line: 'ubuntu ALL=(ALL) NOPASSWD: ALL' validate: 'visudo -cf %s' - name: set up authorized keys for the ubuntu user authorized_key: user=ubuntu key="{{item}}" with_file: - ~/.ssh/id_rsa.pub |
Following is a breakdown of what our playbook does:
- This playbook will create the non-root user
ubuntu. - As you need to run
sudocommands without a password prompt, this play will configure thesudoersfile to allow theubuntuuser to do so. - The main purpose of the above task was to allow you to SSH into each server as a
ubuntuuser. This playbook adds the public key of your local machine (usually~/.ssh/id_rsa.pub) to the remoteubuntuuser’s authorized key list.
Now, after adding the text, you need to save and close the file.
Running the playbook
After that, we need to execute our playbook that will create the non-root user ubuntu by simply running on local machines:
|
1 |
ansible-playbook -i hosts ~/kube-cluster/initial.yml |
The execution of this command will take some time after which you will see the following output:
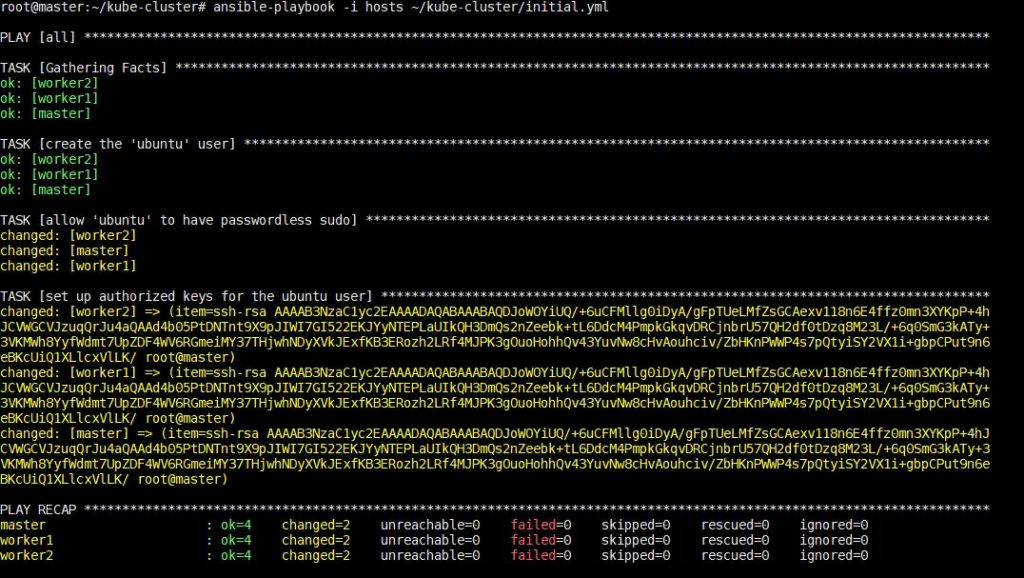
After this step is complete, you can move on to installing Kubernetes-specific dependencies in the next step.
Step 3 — Installing Kubernetes’ Dependencies
In this step, you will learn how to install the operating-system-level packages required by Kubernetes with Ubuntu’s package manager.
These packages are:
- Docker: Docker is a platform and tool for building, distributing, and running Docker containers. You can easily set up Docker by following our tutorial on how to install & operate Docker on Ubuntu in the public cloud. However, support for other runtimes such as rkt is under active development in Kubernetes.
Kubeadm: kubeadm is a CLI tool that performs the actions necessary to get a minimum viable cluster up and running. That will help you install and build various components of the cluster in a standard way.kubelet: The kubelet is the primary “node agent” that runs on each node and handles node-level operations.kubectl: kubectl is also a CLI tool that talks to your cluster and issues commands through its API Server.
Creating the playbook
Create a file named ~/kube-cluster/kube-dependencies.yml in the workspace:
|
1 |
nano ~/kube-cluster/kube-dependencies.yml |
Now you need to add the following plays to the file to install these following packages to your servers:
|
1 2 3 4 5 6 7 8 9 10 11 12 13 14 15 16 17 18 19 20 21 22 23 24 25 26 27 28 29 30 31 32 33 34 35 36 37 38 39 40 41 42 43 44 45 |
- hosts: all become: yes tasks: - name: install Docker apt: name: docker.io state: present update_cache: true - name: install APT Transport HTTPS apt: name: apt-transport-https state: present - name: add Kubernetes apt-key apt_key: url: https://packages.cloud.google.com/apt/doc/apt-key.gpg validate_certs: false state: present - name: add Kubernetes' APT repository apt_repository: repo: deb http://apt.kubernetes.io/ kubernetes-xenial main state: present filename: 'kubernetes' - name: install kubelet apt: name: kubelet=1.16.0-00 state: present update_cache: true - name: install kubeadm apt: name: kubeadm=1.16.0-00 state: present - hosts: master become: yes tasks: - name: install kubectl apt: name: kubectl=1.16.0-00 state: present force: yes |
The first play in the playbook does the following:
- This play will help you install operating-system-level packages, Docker – the container runtime.
- It Installs
apt-transport-https, which allows you to add external HTTPS sources to your APT sources list. - Adds the Kubernetes APT repository’s apt-key for key verification.
- Adds the Kubernetes APT repository to your remote servers’ APT sources list.
- Installs
kubeletandkubeadm.
The second play performs an important and solo task that includes installing kubectl on your master node. Now, after adding the text you need to save and close the file.
Running the playbook
After that, we need to execute our playbook by simply running on local machines:
|
1 |
ansible-playbook -i hosts ~/kube-cluster/kube-dependencies.yml |
The execution of this command will take some time after which you will see the following output:
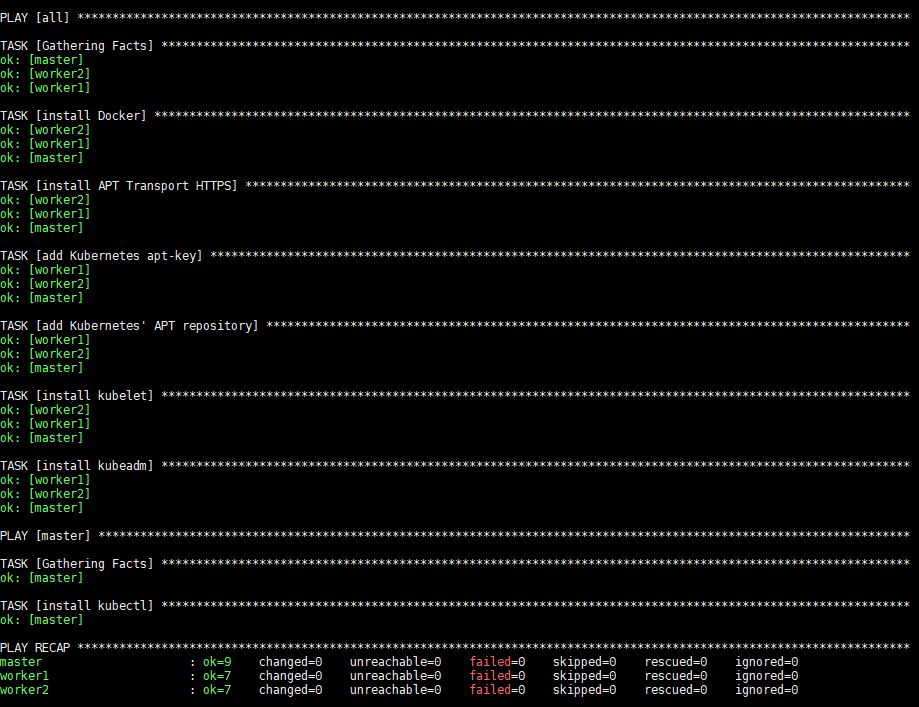
After execution, Docker, kubeadm and kubelet will be installed on all of the remote servers. Kubectl is not a required component and is only needed for executing cluster commands. Installing it only on the master node makes sense in this context since you will run kubectl commands only from the master. Note, however, that kubectl commands can be run from any of the worker nodes or from any machine where it can be installed and configured to point to a cluster.
All system dependencies are now installed. Let’s set up the master node and initialize the cluster.
Step 4 — Setting up the Master Node
In this step, you will learn a few concepts such as Pods and Pod Network Plugins since your cluster will include both once you set up your master node.
Pods are the smallest, most basic deployable objects in Kubernetes. Pods contain one or more containers, such as Docker containers. When a Pod runs multiple containers, the containers are managed as a single entity and share the Pod’s resources.
Each pod has its own IP address, and a pod on one node should be able to access a pod on another node using the pod’s IP. However, the communication between pods is more complex. It needs a separate component that can transparently route traffic from a pod on one node to a pod on another. Pod network plugins are used for this functionality. Many pod network plugins are available, but we will use a Flannel as it is a stable and efficient option.
Creating the Playbook
Create an Ansible playbook named master.yml on your local machine:
|
1 |
nano ~/kube-cluster/master.yml |
Further, you need to add the following play to the file to initialize the cluster and install Flannel:
|
1 2 3 4 5 6 7 8 9 10 11 12 13 14 15 16 17 18 19 20 21 22 23 24 25 26 27 28 29 30 31 32 33 |
- hosts: master become: yes tasks: - name: initialize the cluster shell: kubeadm init --pod-network-cidr=10.244.0.0/16 >> cluster_initialized.txt args: chdir: $HOME creates: cluster_initialized.txt become: yes become_user: root - name: create .kube directory become: yes become_user: ubuntu file: path: $HOME/.kube state: directory mode: 0755 - name: copy admin.conf to user's kube config copy: src: /etc/kubernetes/admin.conf dest: /home/ubuntu/.kube/config remote_src: yes owner: ubuntu - name: install Pod network become: yes become_user: ubuntu shell: kubectl apply -f https://raw.githubusercontent.com/coreos/flannel/2140ac876ef134e0ed5af15c65e414cf26827915/Documentation/kube-flannel.yml >> pod_network_setup.txt args: chdir: $HOME creates: pod_network_setup.txt |
Here’s a breakdown of this play:
- The first task in this play will set up the cluster by running
kubeadm init. For specifying the private subnet that the pod IPs will be assigned we pass the argument--pod-network-cidr=10.244.0.0/16. Flannel uses the above subnet by default. We are using this to tellkubeadmto use the same subnet. - The second task is used for creating a
.kubedirectory at/home/ubuntu. Configuration information such as the admin key files, which are required to connect to the cluster and the cluster’s API address, will be held by this directory. - The third task is used for copying the
/etc/kubernetes/admin.conffile that was generated fromkubeadm initto your non-root user’s home directory. This will allow you to usekubectlto access the newly-created cluster. - The last task runs
kubectl applyto installFlannel.kubectl apply -f descriptor.[yml|json]is the syntax for tellingkubectlto create the objects described in thedescriptor.[yml|json]file. Thekube-flannel.ymlfile contains the descriptions of objects required for setting upFlannelin the cluster.
Now, after adding the text you need to save and close the file.
Running the Playbook
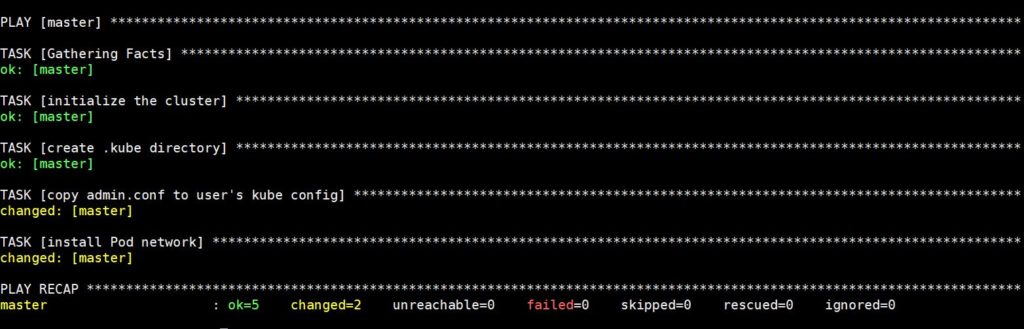
After that, you need to execute our playbook by simply running on local machines:
|
1 |
ansible-playbook -i hosts ~/kube-cluster/master.yml |
The execution of this command will take some time after which you will see the following output:
Now SSH into it with the following command to check the status of the master node :
|
1 |
ssh ubuntu@master_ip |
Once inside the master node, execute:
|
1 |
kubectl get nodes |
You will now see the following output:

On getting the above output you can proclaim that all the setup tasks have been accomplished by the master node and can start accepting worker nodes and executing tasks as it enters in a Ready state. You can now add the workers from your local machine.
Step 5 — Setting up the Worker Nodes
After setting the master node now we can move to our next step of setting up the worker nodes. Adding worker nodes to the cluster can be simply done by executing a single command on each worker server. The important information such as the IP address, port of the master’s API server, and a secure token are included in this command. Although you should note that all the nodes will not be able to join the cluster, only those nodes will be able to join the cluster that pass in the secure token.
Creating the playbook
This command will help you navigate back to your workspace and create a playbook named workers.yml:
|
1 |
nano ~/kube-cluster/workers.yml |
Add the following text to the file to add the workers to the cluster:
|
1 2 3 4 5 6 7 8 9 10 11 12 13 14 15 16 17 18 19 20 21 |
- hosts: master become: yes gather_facts: false tasks: - name: get join command shell: kubeadm token create --print-join-command register: join_command_raw - name: set join command set_fact: join_command: "{{ join_command_raw.stdout_lines[0] }}" - hosts: workers become: yes tasks: - name: join cluster shell: "{{ hostvars['master'].join_command }} >> node_joined.txt" args: chdir: $HOME creates: node_joined.txt |
Here is what the playbook does. There are two plays in the above code:
- The first play is used for getting the joining command that needs to be run on the worker nodes. The format of the command will be:
kubeadm join --token sha256:<hash><token><master-ip>:<master-port> --discovery-token-ca-cert-hash sha256:<hash>;. The task needs to get the correct token and hash values. Once it gets the correct input the task sets it as a fact so that the second play will be able to access that info. - The second play is written only to perform a solo task – to make the two worker nodes be a part of the cluster by simply running the joint command on all worker nodes.
After adding the text, you need to save and close the file.
Running the playbook
After that, we need to execute our playbook by running the following command on the worker machines:
|
1 |
ansible-playbook -i hosts ~/kube-cluster/workers.yml |
The execution of this command will take some time after which you will see the following output:
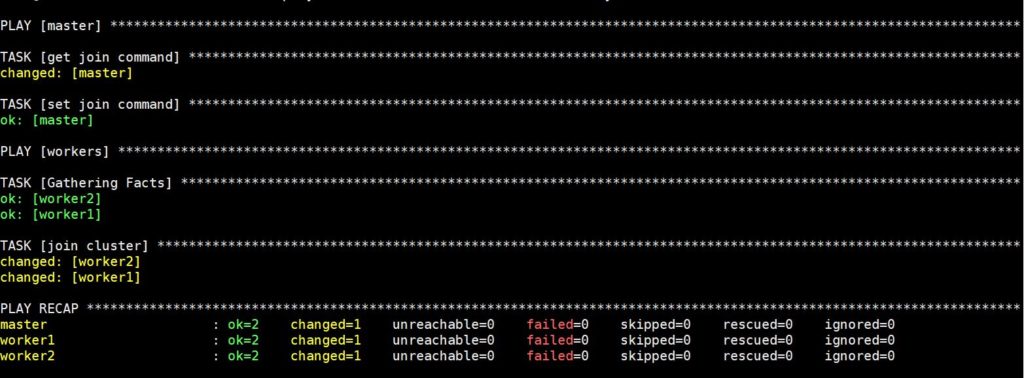
Now, your Kubernetes cluster is fully set up and functional with the workers ready to run workloads. Before moving to the next step, let’s verify that the cluster is working as planned.
Step 6 — Verifying the Cluster
There could be instances where a cluster fails during the setup. It could be because of a network error between the master and worker, or a node issue. So we need to verify the cluster before scheduling applications and ensure that no malfunctioning occurs. For this, you will need to check the current state of the cluster from the master node to ensure that the nodes are ready. You can get back the connection with the following command if the nodes are not ready or you get disconnected:
|
1 |
ssh ubuntu@master_ip |
Use the following commands to get the status of the cluster:
|
1 |
kubectl get nodes |
The execution of this command will take some time after which you will see the following output:

You need to check whether all nodes that are a part of the cluster are in the ready state. If a few nodes have Not Ready as the STATUS, it shows that the worker nodes haven’t finished their setup yet. However, before re-running kubectl get nodes and checking the updated output you should wait for another five to ten minutes. If some of the nodes still show Not Ready as their status, you should go and verify the previous steps and re-run the commands. Only if the nodes have the value Ready for STATUS, they are part of the cluster and ready to run workloads. After successfully executing the 6th step, your cluster is now verified. Now let’s schedule an example Nginx application on the cluster.
Step 7 — Running an Application on the Cluster
Creating Deployment
After creating the cluster successfully, you can deploy any containerized application to your cluster. You can use the following commands below for other containerized applications if you are within the master node. Next, execute the following command to create a deployment named nginx :
|
1 |
kubectl create deployment nginx --image=nginx |
You need to change the Docker image name and any relevant flags (such as ports and volumes). To keep things familiar, you can deploy Nginx using deployments and services to see how applications can be deployed to the cluster.
A Kubernetes deployment is a resource object in Kubernetes that provides declarative updates to applications. A deployment allows you to describe an application’s life cycle, such as container image, replicas, and the update strategy. A deployment ensures the desired number of pods are running and available at all times. If a pod crashes during the cluster’s lifetime, it spawns it again. The update process is also wholly recorded, and versioned with options to pause, continue, and roll back to previous versions. The above command to create a deployment named Nginx will help you deploy a pod with one container from the Docker registry’s Nginx Docker Image.
Setting up Node Port
Next, we need to create a NodePort. NodePort is an open port on every node of your cluster. Kubernetes transparently routes incoming traffic on the NodePort to your service, even if your application is running on another node. For this we can use this command to create a NodePort resource named Nginx that will expose the app publicly:
|
1 |
kubectl expose deploy nginx --port 80 --target-port 80 --type NodePort |
A service is another Kubernetes object responsible for exposing an interface to those pods, which enables network access from either within the cluster or between external processes and the service. It can be defined as an abstraction on the top of the pod which provides a single IP address and DNS name by which pods can be accessed. With service, it is very easy to manage load balancing configuration.
Run the following command:
|
1 |
kubectl get services |
This will output text similar to the following:

After getting the output, Kubernetes will assign a random port that is greater than 30000 automatically, while also making sure that the port assigned is not already bound by another service. The third line of the above output will help you retrieve the port that Nginx is running on.
To verify it is working visit http://worker_1_ip:nginx_port or http://worker_2_ip:nginx_port through a browser on your local machine. You will see Nginx’s familiar welcome page.
Removing Deployment
If you would like to remove the Nginx application, you need to first delete the nginx service from the master node:
|
1 |
kubectl delete service nginx |
For verifying that the application is finally deleted, you need to run this command:
|
1 |
kubectl get services |
You will get the following output:

Post that, you need to delete the deployment using the following command:
|
1 |
kubectl delete deployment nginx |
You can use this command to verify if the deployment is finally deleted:
|
1 |
kubectl get deployments |
![]()
Conclusion:
This tutorial will help you properly set up a cluster on Ubuntu 18.04 using Kubeadm and Ansible. Now that your cluster is set up you can easily start deploying your own applications and services.
Here is a list of links with additional details that will guide you in the process:
- Dockerizing applications – This link contains examples that guide you on how to load applications using Docker. Such as Dockerizing PostgreSQL, a CouchDB service, etc.
- Pod Overview – This link exhibits details on how to use a pod, the functioning of pods, and how pods are related to other Kubernetes objects. Pods are an important part of Kubernetes so understanding them will help you to succeed in your task.
- Deployments Overview – It will help you learn about deployments. A deployment provides declarative updates for Pods and ReplicaSets. You will learn how to update, roll over, and roll back a deployment.
- Services Overview -This link will guide you about cover services that are another frequently used object in Kubernetes clusters. A service in Kubernetes is an abstraction that defines a logical set of Pods and a policy by which you can access them. Understanding the types of services and the options they have are essential for running both stateless and stateful applications.
Furthermore, take a look at our other tutorials focusing on Docker and Kubernetes that you can find on our blog:
- Getting to Know Kubernetes
- Clean Up Docker Resources – Images, Containers, and Volumes
- How to Run Docker on CloudSigma (with CloudInit) Updated
- Installing and Setting up Docker on CentOS 7
- How to install & operate Docker on Ubuntu in the public cloud
There are also many other important concepts such as Volumes, Ingresses, and Secrets that you can use while deploying production applications.
Happy Computing!
- How To Create a Kubernetes Cluster Using Kubeadm on Ubuntu 18.04 - June 24, 2021
- Nginx Server and Location Block Selection Algorithms: Overview - May 14, 2021
- Configuring an Iptables Firewall: Basic Rules and Commands - April 5, 2021
- How to Configure a Linux Service to Auto-Start After a Reboot or System Crash: Part 2 (Theoretical Explanations) - March 25, 2021
- How to Configure a Linux Service to Auto-Start After a Reboot or System Crash: Part 1 (Practical Examples) - March 24, 2021