

What is Ruby?
Ruby is an open-source programming language that is well known for having one of the most natural and easy-to-read syntaxes. This object-oriented programming language combines the best features of other languages to make a simple yet rewarding approach a possibility. In addition to its object-oriented nature, Ruby also offers features such as operator overloading, iterators and closures, exception handling, and garbage collection among several others.
Taking into consideration the incredible functionality and ease of use that Ruby brings to the table, CloudSigma PaaS allows our users to integrate with Ruby web servers. The goal is to make Ruby’s convenient management and automatization tools accessible and available for your application development and deployment process.
This tutorial will cover everything you need to know to optimally utilize Ruby environment hosting for your application on the CloudSigma PaaS platform.
Setting Up Ruby Environment Hosting
As you will see in other tutorials, setting up new hosting environments is extremely simple and straightforward on the CloudSigma PaaS platform. The incredibly intuitive CloudSigma PaaS topology wizard is a consolidated tool that allows you to set up and configure your hosting environment. Let’s see how you can set up Ruby environment hosting using the wizard.
First, locate and click on New Environment in the top left corner of your dashboard:

By clicking on it you will open up the Topology Wizard. This window gives you the power to create your new environment and fully customize your environment settings.
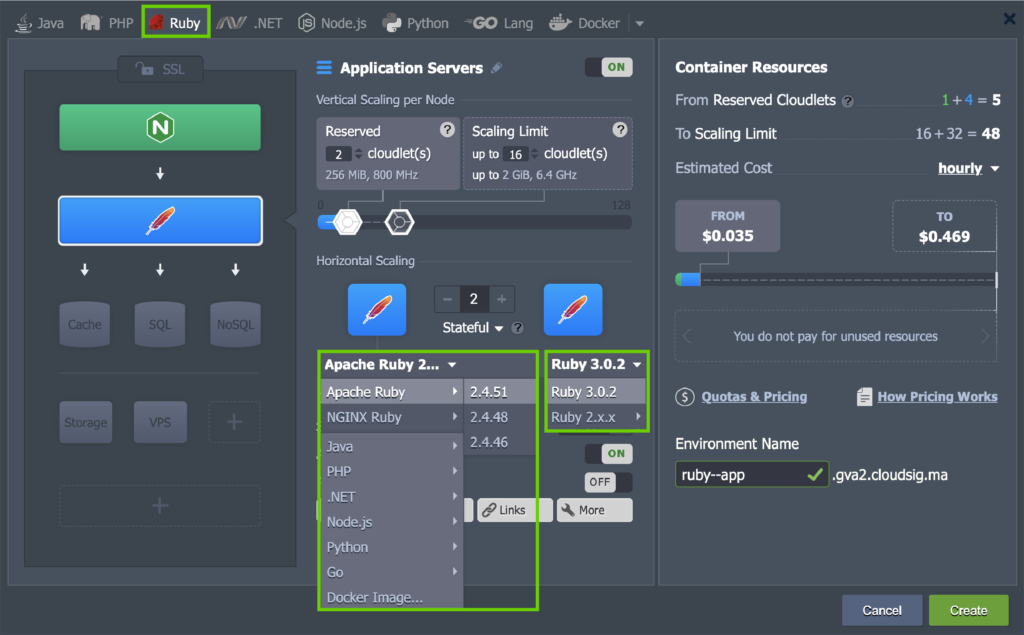
Next, from the Topology Wizard locate and click on the Ruby tab from the programming languages available to you. Choose your application server, the preferred engine version, and any other software stack your application might need. You can also use the wizard to configure other parameters. Some of those may include the number of cloudlets (RAM and CPU), allocated disk space, the number of nodes, and Public IPv4/IPv6 among others:
Remember that each instance is an independent container that is completely isolated. The system also ensures high availability for your application by distributing scaled-out nodes across the physical servers or virtual machines.
Ruby Application Servers
As you will see in the topology wizard, CloudSigma offers Ruby application servers based on either Apache or Nginx software stacks. Regardless of which option you select, your application will be implemented as per the Ruby on Rails framework. The application server, by default, will be Passenger. However, it is possible for you to configure the Nginx Ruby stack with another one of the built-in servers on the CloudSigma PaaS:
- Passenger
As the default app server, Passenger offers a number of features for Ruby that are designed to facilitate the development and deployment of modern web applications and APIs.
- Puma
Puma, on the other hand, is a web server that capitalizes on the accuracy of its HTTP 1.1 protocol parsing to provide optimum speed and parallelism.
- Unicorn
Lastly, Unicorn is an HTTP server that is ideal for fast clients operating on low latency and high bandwidth connections as it uses Unix/Unix-like kernels.
Which Versions are Available?
The topology wizard also lets the user select which version of Ruby they wish to use. You can also adjust it as needed for existing instances with container redeployment. At the time that this tutorial is being written, the following Ruby versions are available for use on the CloudSigma PaaS:
- 3.0.2
- 2.7.3
- 2.6.8
Ruby Application Deployment
The deployment process with CloudSigma PaaS is automated. For the Apache/Nginx Ruby app servers, this is done using the following:
- The application archive. This can be uploaded from the local machine or with the help of an external URL.
- The remote VCS repository such as GitHub.
This is what the deployment window looks like:
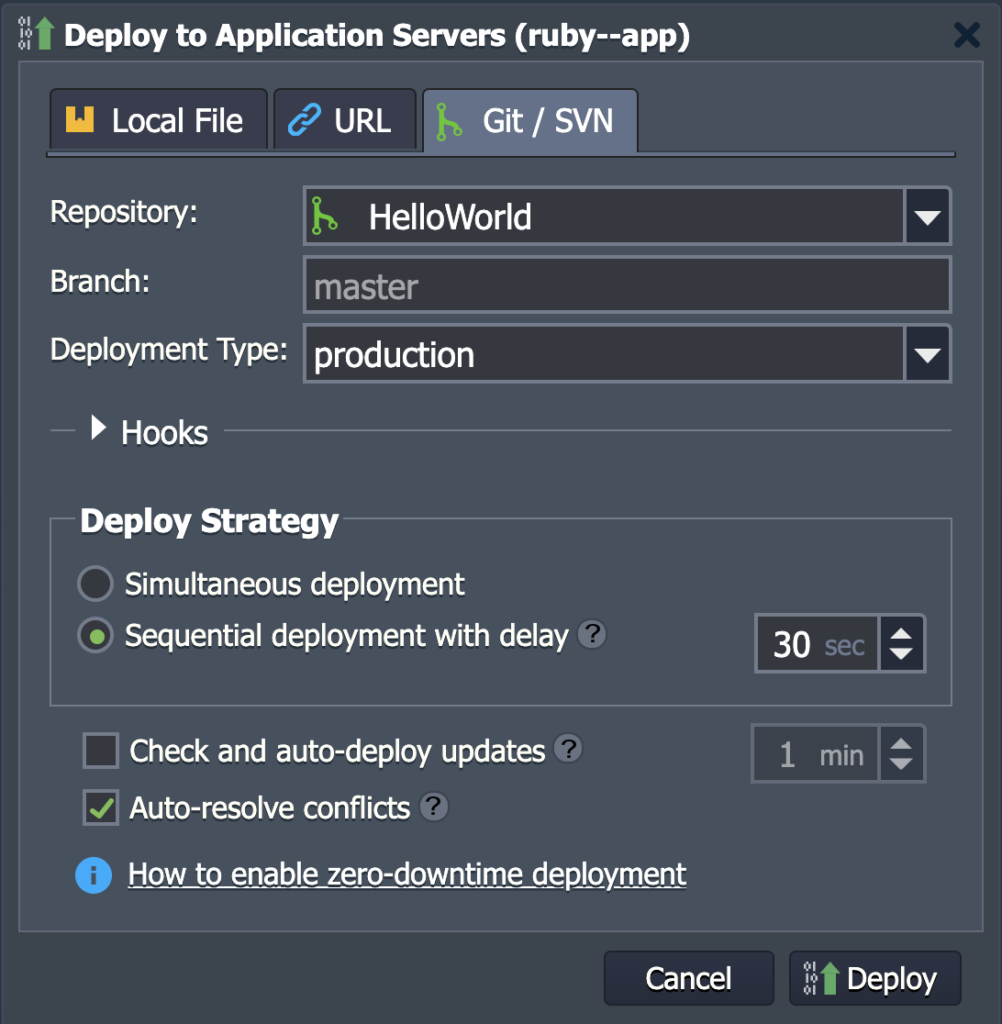
You can only use a single context, i.e. ROOT when deploying a Ruby application. It is possible, however, to determine the Development Type, i.e. RAILS_ENV, for the app. You can choose between three different deployment types:
- development
You can choose this option if you are striving for a faster development cycle. It reloads all application classes and turns caching off.
- production
This turns on all caching.
- test
Selecting this will wipe out the database between test runs.
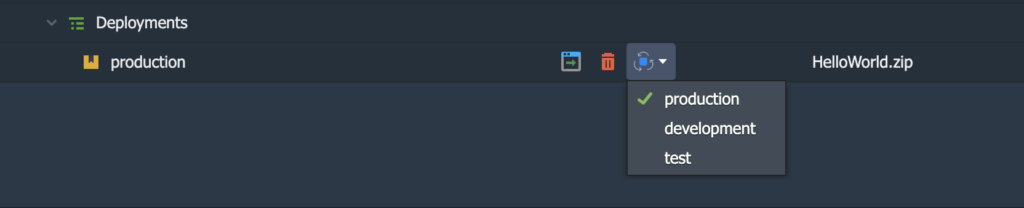
If needed, you can switch between the Ruby deployment types at any time using the drop-down menu next to the application:
Dependency Manager for Ruby
All of the Ruby instances come with the Bundler dependency manager on the CloudSigma PaaS. Bundler allows the user to automatically track and install accurate versions and gems that your project requires for optimum functioning. For example, say that your project’s root folder contains a Gemfile file. The system does not require you to manually perform any action. It will automatically resolve dependencies with Bundler after the app has deployed to the server.
Remember that you can modify your Gemfile as per the needs of your project. This means that if you need to use any Ruby framework such as Sinatra, Rack, Ramaze, therubyracer, etc., all you need to do is include it in the Gemfile. Another option is to use the very popular Ruby on Rails which is the default framework available on the platform.
Performing Post Deploy Configuration
Some repetitive tasks ideally need to be automated to save time and resources. For example, you may need to automate an action like db:migrate after you have already deployed the application. In such a situation, you can create a rake_deploy file that is typically located in the root folder of the project.
The rake_deploy file must contain a list of commands that will be executed consecutively with the help of the rake tool every time the Apache or Nginx node is restarted. Each command should constitute a new line. The file will be removed automatically once the commands have been executed successfully.
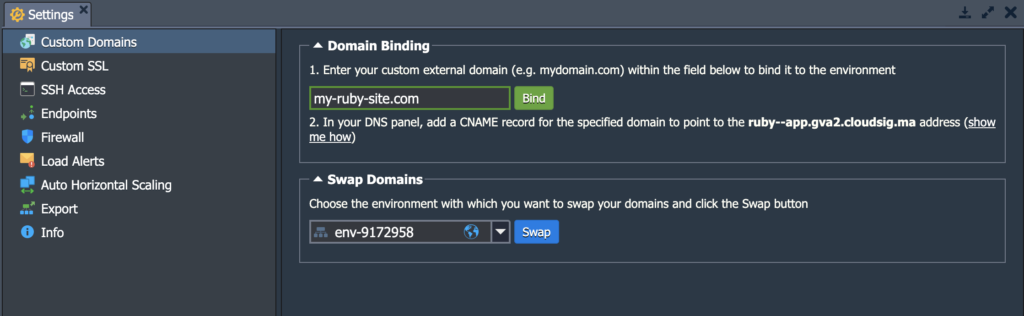
Managing Your Domains
The system will give you a default domain name to begin with. You can also use a custom domain for your Ruby application if you would like to. If you are using a Shared Load Balancer, use CNAME redirect for dev and test environments in particular. If you are using a Public IP, we recommend using DNS A Record as it is capable of handling high traffic loads and managing production environments.
Use the option to swap domains from the Settings window if you would like to redirect traffic from one environment to another without experiencing any application downtime. It is also available as the SwapExtIps API/CLI method:
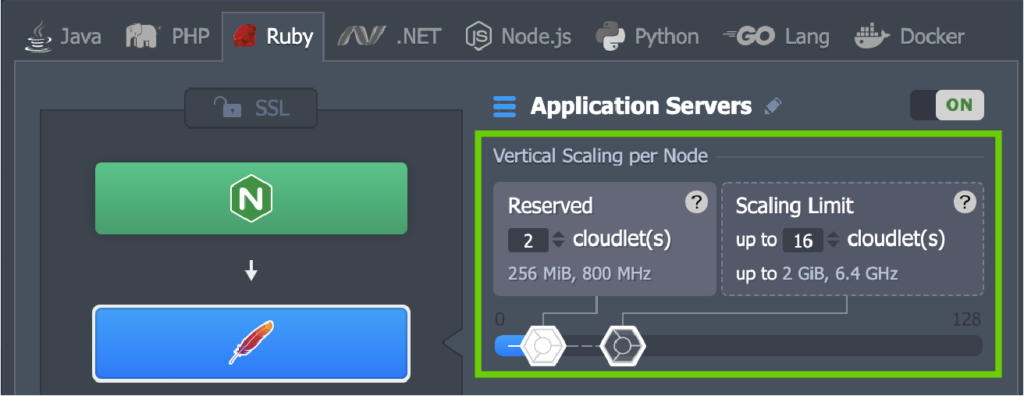
Setting Up Vertical Scaling
CloudSigma PaaS allows you to determine the exact amount of resources (RAM and CPU) that will be used by your nodes depending on your present load. All you need to do at the time of configuring your new environment is to set the limit for required cloudlets for your Ruby app server (128MiB of RAM and 400 MHz of CPU for each cloudlet). The rest of the parameters will be handled by the PaaS:
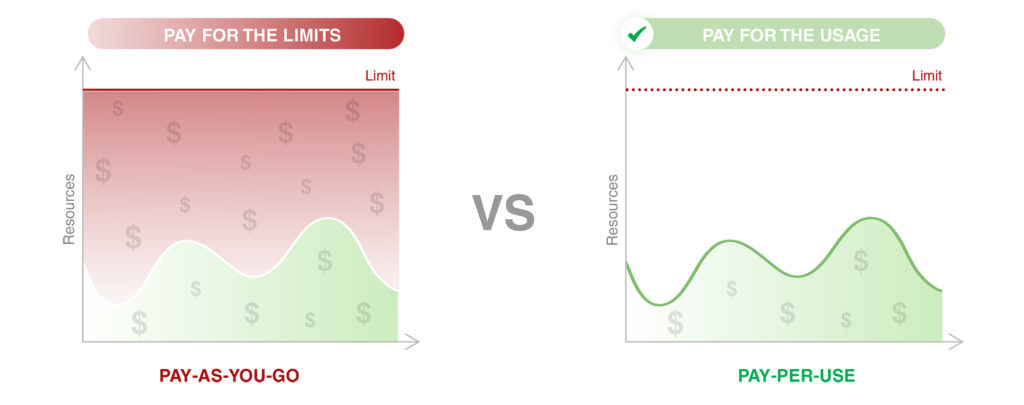
This means that you do not need to predict your future traffic load and manually modify the limits. Such an approach helps you save up on precious time as the mechanism is completely automated. The Pay-per-Use model of the CloudSigma PaaS platform ensures that you only pay for the resources you use so that you never overpay or end up with surprising hidden charges:
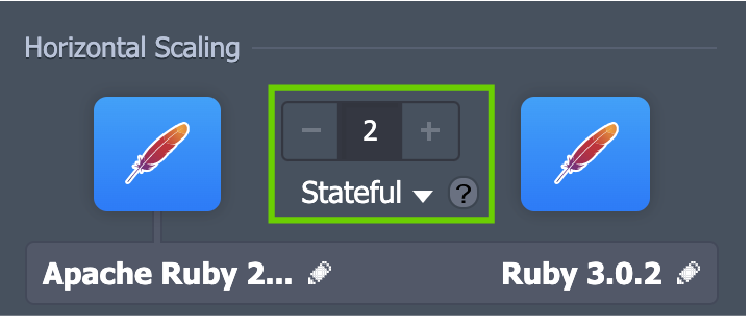
Setting Up Horizontal Scaling Manually
When it comes to horizontal scaling on the CloudSigma PaaS, all you have to do is determine the number of nodes you need on the topology wizard. You can also select between two available scaling modes:
- Stateless
This simultaneously creates all new nodes from the base image template.
- Stateful
It sequentially copies the file system of the master container into the new nodes:
When you perform server scaling with Ruby, the system adds a load balancer instance automatically so that requests may be distributed appropriately. The maximum number of same-type servers you can have in one environment layer is up to 16 nodes. However, this can be extended by sending a request to support.
Automatic Horizontal Scaling on CloudSigma PaaS
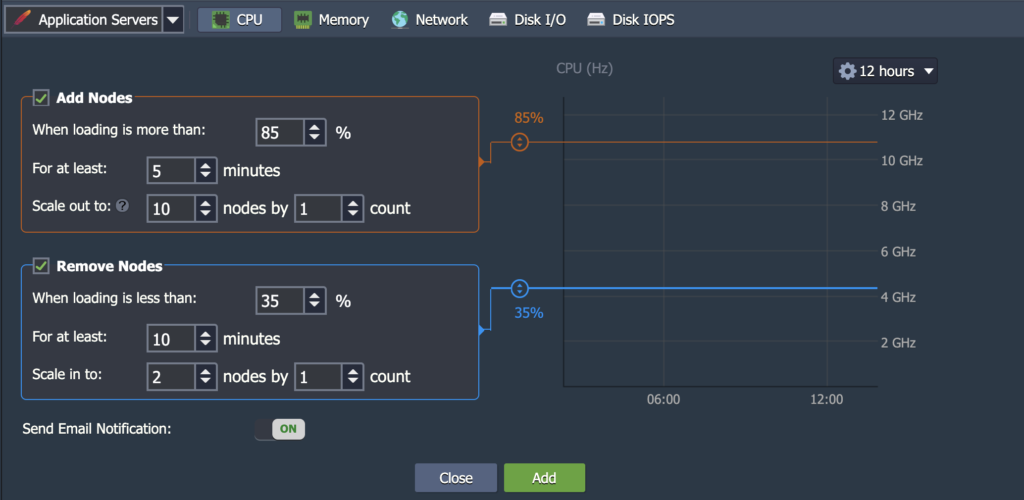
Users have tunable triggers at their disposal to configure automatic horizontal scaling for their Ruby application on the CloudSigma PaaS. Here, you can monitor the changes in the load for each of the nodes. Then, you can increase or decrease their number as required.
Simply go to Settings and click on the Auto Horizontal Scaling section. Here, select the appropriate layer and the resource you wish to monitor at the time. This can be CPU, RAM, Network, Disk I/O, or Disk IOPS. Use the UI form to determine the conditions and specifics for your nodes as you scale:
You can learn more about Ruby from the official documentation. If you would like to take advantage of the unique features Ruby hosting environments provide, all you need to do is sign up for the CloudSigma PaaS platform.
Give CloudSigma PaaS a try with our 7-day free trial or contact us if you want us to provide you with more details and a platform demo. Apart from Ruby hosting, there are many more benefits that CloudSigma PaaS gives you access to for the development and deployment of your applications. You can learn how to perform load balancing, set up automatic vertical scaling, facilitate migration across cloud platforms, and even use containerization technology.
- 5 Tips to Achieve Optimal Cloud Computing Cost Efficiency - October 31, 2022
- CloudSigma Empowers Blockchain Infrastructure Provider with a Green, Reliable, and Cost-Efficient Cloud Platform - October 27, 2022
- Whitech Launches New Egypt Cloud Computing Offering, Powered by HPE and CloudSigma - October 17, 2022
- Key Aspects of Protecting your Data in the Cloud - September 20, 2022
- How to Configure MongoDB Replication and Automated Failover - September 19, 2022