Kubernetes, also known as K8s, is an open-source orchestration system for automating deployment, scaling, and managing containerized applications. Its portability, flexibility, and automatic scaling capabilities make it an extensively used system. Above all the standout features, the option to create DNS records for services and pods makes it unbeatable from other software systems. Kubernetes DNS service allows you to contact services with consistent DNS names instead of IP addresses.
Prerequisites
To get the most out of the tutorial and understand Kubernetes DNS service better, make sure to brush up yourself with the basics of Kubernetes. You will also benefit from reading the Overview of DNS Terminologies, Components, and Concepts to get a better understanding of the DNS concepts. In addition, an overview of the Docker ecosystem and the basics of containerization technology will add a great advantage.
What is a DNS System?
The Domain Name System (DNS) is a mechanism for linking various sorts of information with easy-to-remember names, such as IP addresses. Using a DNS system to translate request names into IP addresses makes it easy for end-users to reach their target domain name effortlessly. Most Kubernetes clusters include an internal DNS service configured by default to offer a lightweight approach for service discovery. Even when pods and services are created, deleted, or shifted between nodes, built-in service discovery simplifies applications to identify and communicate with Kubernetes clusters.
In recent versions of Kubernetes, the technical specifics of the Kubernetes DNS service have changed. This tutorial aims to introduce both the kube-dns and CoreDNS implementations of the Kubernetes DNS service. We’ll understand Kubernetes DNS records in detail and demonstrate how Kubernetes DNS works.
What’s Included in Kubernetes DNS Service?
Previously, the Kubernetes DNS service was based on kube-dns before the version 1.11 release. However, security and privacy were still a serious concern. Later, the Kubernetes community introduced CoreDNS in the new version 1.11 to address kube-dns security and stability issues.
No matter which software version you are using to handle DNS records, kube-dns and CoreDNS function in a similar way:
- A kube-dns service and one or more pods are created.
- The kube-dns service monitors the Kubernetes API for service and endpoint events and changes its DNS entries as appropriate. When you modify these Kubernetes services and their related pods with creating, editing, or deleting operations, these events are auto-triggered.
- Kubelet assigns the cluster IP of the kube-dns service to every new pod etc/resolv.conf nameserver option, along with suitable search settings to allow for shorter hostnames:
|
1 2 3 |
nameserver 10.32.0.10 search namespace.svc.cluster.local svc.cluster.local cluster.local options ndots:5 |
-
Containerized applications may then resolve hostnames like example-service.namespace to the appropriate cluster IP address.
An Overview of the Kubernetes DNS Records
Let’s understand Kubernetes DNS records better with the help of an example. The entire DNS A record for a Kubernetes service will look like:
service.namespace.svc.cluster.local
A pod would have a record in this format, which would represent the pod’s real IP address:
10.32.0.125.namespace.pod.cluster.local
Besides, SRV records are created for the specified ports of a Kubernetes service:
|
1 |
_port-name._protocol.service.namespace.svc.cluster.local |
As a result, your application or microservice may hit a simple and consistent hostname to reach other services or pods on the cluster, thanks to the built-in DNS-based service discovery mechanism.
Resolving Shorter Hostnames and Searching Domains
You won’t always need to utilize the whole hostname to access another service because of the search domain suffixes set in the resolv.conf file. If you’re contacting a service in the same namespace, you may just call it by its name:
|
1 |
other-service |
Add other-service to the query if the service is in a different namespace:
|
1 |
other-service.other-namespace |
You’ll need to utilize at least the following if you’re going after a pod:
|
1 |
pod-ip.other-namespace.pod |
Only the .svc suffixes are automatically completed in the default resolv.conf file. Therefore, it is essential to specify the settings up to .pod. Next, let’s go over the intricacies of the two alternative Kubernetes DNS implementations that we’ve learned about so far.
Kubernetes DNS Implementation
Kubernetes version 1.11 provided new software to manage the kube-dns service, as mentioned in the previous section. The prime reason behind the new update was to improve the service’s performance and security. Let’s start with the kube-dns integration from the beginning.
-
kube-dns
In the previous Kubernetes 1.11 version, the kube-dns service had three containers operating in a kube-dns pod in the kube-system namespace. Take a look at the three containers below:
- kube-dns: a container that runs SkyDNS and functions as a DNS query resolution service.
- dnsmasq: SkyDNS answers are cached by dnsmasq, a common lightweight DNS resolver, and cache.
- sidecar: a container on the side of the service that performs metrics reporting and reacts to health checks.
CoreDNS was created as a result of security vulnerabilities in Dnsmasq and scalability performance concerns with SkyDNS.
-
CoreDNS
Аs a new Kubernetes DNS service, CoreDNS, has been upgraded to General Availability in Kubernetes 1.11. This implies it’s ready for production and will be used by many installation tools and managed Kubernetes providers as the default cluster DNS service.
CoreDNS is a flexible and extensible DNS server that acts as a Kubernetes DNS cluster. It performs all the functionalities of the previous system. A DNS container is responsible for resolving and caching DNS queries. CoreDNS responds to health checks and provides metrics in a single container. Additionally, it addresses a few minor flaws and provides new capabilities to resolve performance and security issues:
- Some conflicts between the use of stubDomains and external services have been resolved.
- By randomizing the order in which some entries are returned, CoreDNS can improve DNS-based round-robin load balancing.
- By being better about iterating over each of the search domain suffixes defined in resolv.conf, a feature called autopath can enhance DNS response times when resolving external hostnames.
- Even if the pod doesn’t exist, kube-dns 10.32.0.125.namespace.pod.cluster.local will always resolve to 10.32.0.125. CoreDNS offers a pods validated mode that will only resolve if a pod with the correct IP address and namespace exists.
To advance your knowledge on Kubernetes endpoints, autopaths, and wildcards, check a tutorial on how Kubernetes enables reading zone data from its cluster.
Customization Features
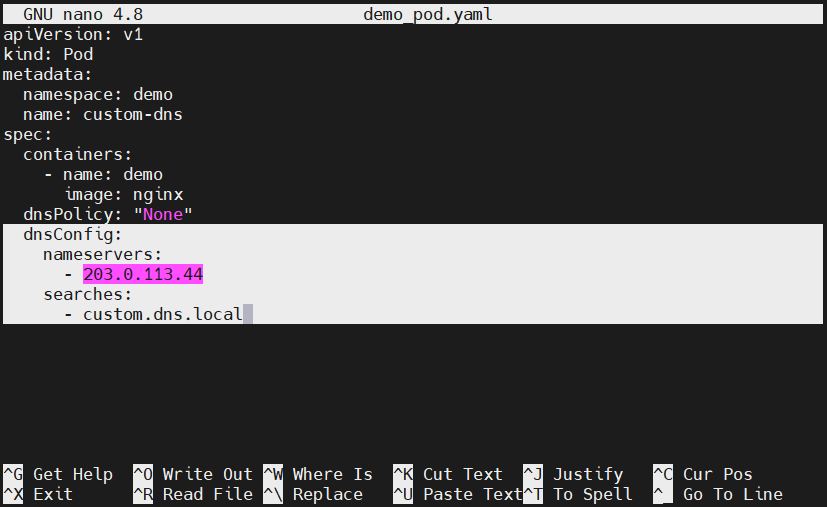
Kubernetes allows you to configure DNS pods and customize the DNS resolution of the cluster, thanks to Kubernetes customizing DNS service. Administrators can leverage these services to alter the upstream nameservers or search domain suffixes defined in resolv.conf. Above all, there is an add-on feature to personalize pods and containers using the dnsConfig option:
Updating this config will force a rewrite of a pod’s resolv.conf, allowing the changes to take effect. The above setup will create a file containing nameserver 203.0.113.44 and search custom.dns.local lines, which transfers directly to the normal resolv.conf options.
Conclusion
In this tutorial, we’ve walked you through the basics of the Kubernetes DNS service and its implementation in different versions. Kubernetes DNS records were also discussed with the help of an example. Additionally, we highlighted some additional configuration options for customizing pods and resolving DNS queries. This covers the basics of Kubernetes DNS service, but your learning shouldn’t end here. Check the official Kubernetes documentation to explore more about the topic.
To further your DevOps knowledge and dive into Kubernetes essentials, check the following tutorials from our blog:
- Introduction to Helm: Package Manager for Kubernetes
- How to Install and Use Kubernetes on Ubuntu 20.04
- Deploy a PHP Application on a Kubernetes Cluster with Ubuntu 18.04
Happy Computing!
- How to Deploy WordPress with Persistent Volume on Kubernetes Cluster - March 17, 2023
- Deploying Applications on Kubernetes Using Argo CD and GitOps - October 26, 2022
- Using Node.js Modules with npm and package.json: A Tutorial - October 6, 2022
- Using Ansible to Install and Configure WordPress with LAMP on Ubuntu - September 23, 2022
- Creating Views in the Django Web Application Framework - September 22, 2022


