
Django is a high-level web framework that allows the rapid development of secure and maintainable websites. It’s a free and open-source framework written with Python. Django is also popular for additional features like performance, security, scalability, portability, and maintainability.
This guide will demonstrate how to install Django and set up a simple web app on Ubuntu 20.04.
Django on Ubuntu
There are multiple ways of installing Django on the system. Each method suits a different goal.
- Global installation: Django is readily available from the official Ubuntu package repos. We can install it directly using the APT package manager. While the installation method is simple, it offers less flexibility than other methods. Moreover, it may not contain the latest version of the framework.
- Installing using
pipin a virtual environment: Using tools likevenvandvirtualenv, we can establish a virtual environment and install Django there. The benefit of this approach is, it doesn’t affect the larger system. It also allows per-project customization and packages. It’s the most practical and recommended method of working with Django. - Installing Django development version: Django is also available on GitHub. The latest development version will have the latest features/fixes. However, it comes at the cost of potential performance and stability issues.
This guide expects you to have a properly configured Ubuntu server. If you don’t have an Ubuntu server yet you can follow our guide on how to set up your own Ubuntu server.
Installing Django on Ubuntu
1. Global installation using the package manager
Django is readily available from the official package repos. The installation process is quite straightforward. First, update the APT package index:
|
1 |
$ sudo apt update |
Next, check the version of Python installed. By default, Ubuntu 20.04 ships with Python 3.8:
|
1 |
$ python3 -V |
Now, we’re ready to install Django:
|
1 |
$ sudo apt install python3-django |
We can verify if the installation was successful. Run the following command to check the Django version:
|
1 |
$ django-admin --version |
![]()
It verifies that Django is successfully installed. Note that the Django version isn’t the latest stable release. At the time of writing, the latest version of Django available is v3.2.5 (LTS release).
2. Installing Django with pip (in a virtual environment)
This is the recommended way of installing Django because it has the most flexibility. We will generate the virtual environment using the venv module that comes as a part of the Python 3 standard library. It lets you create virtual Python environments and install Python packages without causing changes elsewhere in the system. You can have numerous virtual environments with unique configurations.
Let’s get started. First, we need the Python pip and venv modules:
|
1 2 |
$ sudo apt update $ sudo apt install python3-pip python3-venv |
The modules are installed successfully. Now, we will create a dedicated directory for the virtual environment:
|
1 |
$ mkdir -pv ~/sample_project |
Next, change the active directory to the new directory:
|
1 |
$ cd ~/sample_project |
Now, we can tell venv to establish a virtual environment within the directory. As for the environment name, it should be something descriptive:
|
1 |
$ python3 -m venv sample_project_env |
The venv module will create a copy of Python and pip into an isolated directory structure within the project directory. It will contain a directory with the name selected that contains the file hierarchy where all the packages are installed.
To install additional packages, we need to activate the environment:
|
1 |
$ source sample_project_env/bin/activate |
The shell prompt should change to something like this:

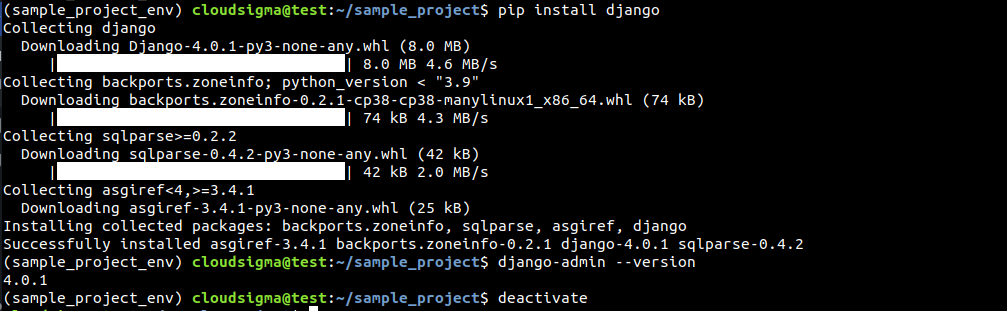
Within the virtual environment, we can now install Django:
|
1 |
$ pip install django |
Verify if the installation was successful:
|
1 |
$ django-admin --version |
To leave the virtual environment, run the following command:
|
1 |
$ deactivate |
3. Installing Django development version
The Django development version is directly available on GitHub. We’ll be using git to clone and deploy it within a virtual environment.
First, ensure that we have the necessary tools installed. The following command will install venv and pip (Python modules) and git:
|
1 |
$ sudo apt update && sudo apt install python3-pip python3-venv git |
Next, clone the Django repo. It will contain all the latest features and bug fixes (at the expense of stability). We’ll clone it to a directory ~/django-dev:
|
1 |
$ git clone git://github.com/django/django ~/django-dev |
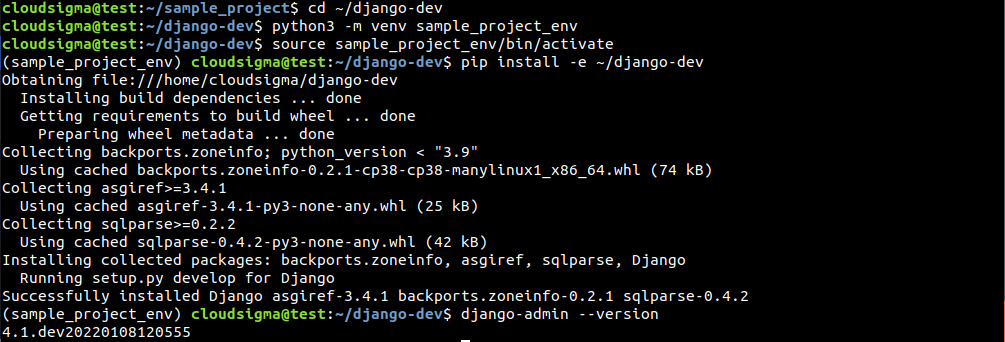
Change the current directory to the cloned repo:
|
1 |
$ cd ~/django-dev |
After that, establish a virtual environment using Python venv module:
|
1 |
$ python3 -m venv sample_project_env |
Then, activate the virtual environment:
|
1 |
$ source sample_project_env/bin/activate |
Now, we can install the Django we cloned from GitHub. Here, the flag -e refers to the “editable” mode to allow installation from version control:
|
1 |
$ pip install -e ~/django-dev |
Finally, verify the installation:
|
1 |
$ django-admin --version |
Sample Django Project
So far, we have demonstrated how to install Django on the system. Now, it’s time to put Django into action. In this section, we’ll demonstrate how to create a sample Django project. The sample project will be created within a virtual environment.
Create a directory for the sample project:
|
1 |
$ mkdir -pv ~/django-test |
Change the current directory to the project directory:
|
1 |
$ cd ~/django-test |
Then, use the venv module to establish a Python virtual environment:
|
1 |
$ python3 -m venv dummy_env |
The virtual environment is ready. Activate the environment:
|
1 |
$ source dummy_env/bin/activate |

We can install Django within the environment:
|
1 |
$ pip install django |
We can use django-admin to build the project base. Here, the sample project will be named sampleproject. The project will have a directory within the environment directory that includes all the necessary files.
manage.py: A management script that administers various Django-specific tasks.sample project: A directory with the project name that contains actual project code.
However, we don’t want a cobweb of too many nested directories. Thus, tell Django to place the files and directories in the current directory:
|
1 |
$ django-admin startproject sampleproject . |

The next step is migrating the database. By default, Django uses SQLite. Migrations apply any changes made to the Django models to the database schema. Run the following command to migrate the database:
|
1 |
$ python manage.py migrate |
Finally, we’ll establish an admin user to use the Django admin interface. Run the following command:
|
1 |
$ python manage.py createsuperuser |
It will ask for a username, an email address, and a password for the user.

ALLOWED_HOSTS in Django Settings
To test the application, we need to modify a certain directive in Django settings. Open the settings.py file in a text editor:
|
1 |
$ nano ~/django-test/sampleproject/settings.py |
We’re interested in the directive ALLOWED_HOSTS. It describes a list of addresses or domain names that can connect to the Django instance. Any incoming host request from a host that’s not on the list will raise an exception. It’s required by Django to prevent certain classes of security vulnerabilities.
Within the square bracket, list the IP addresses or domain names associated with the Django server. Each item will be listed in quotations, separated by a comma (,). Here’s how the structure of the directive would look like:
|
1 |
$ ALLOWED_HOSTS = ['<server_ip_or_domain>', '<server2_ip_or_doman>'] |

Save the list and close the editor.
Testing the Server
We can now start the Django deployment server. It will present a fresh Django project. Note that it should only be used for development purposes. For full-fledged deployment, follow the official Django guide on deployment.
Before accessing the development server, ensure that the firewall allows access to port 8000. If you follow the Ubuntu server setup guide, then tell UFW to open port 8000 for communication:
|
1 |
$ sudo ufw allow 8000 |

UFW is a common firewall available on all the major Linux distros. Here is a guide explaining various basics of UFW. The development server is now ready to run. Start the server:
|
1 |
$ python manage.py runserver <server_ip>:8000 |

Next, visit the server’s IP address on port 8000 in a web browser. It will land on the Django welcome page:
|
1 |
$ http://<server_ip>:8000 |

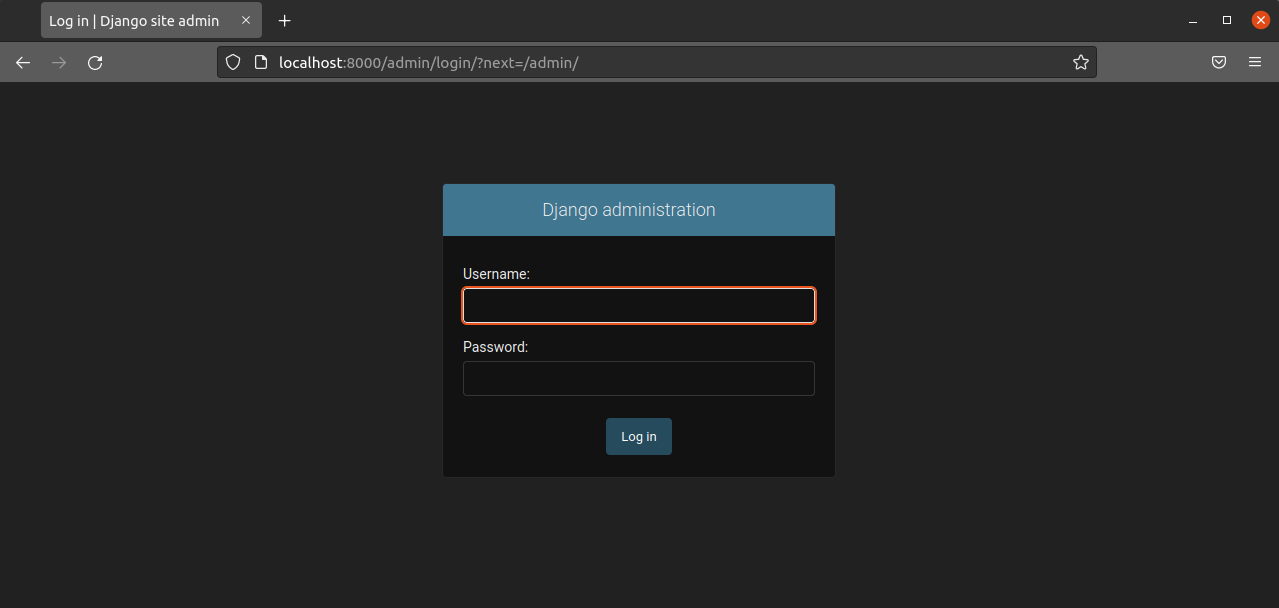
To access the Django admin panel, append /admin/ at the end of the URL:
|
1 |
$ http://<server_ip>:8000/admin/ |
Enter the admin username and password to access the admin section:

You can stop the server by pressing CTRL-C in the terminal.
Final Thoughts
The Django project offers a structural basis for designing a more complete site. It provides the main tools needed to power a web application. Leveraging a web framework like Django allows you faster project development and spending more time on the unique aspects of your application.
Happy Computing!
- How To Enable, Create and Use the .htaccess File: A Tutorial - March 8, 2023
- An Overview of Queries in MySQL - October 28, 2022
- Introduction to Cookies: Understanding and Working with JavaScript Cookies - October 25, 2022
- An Overview of Data Types in Ruby - October 24, 2022
- The Architecture of Iptables and Netfilter - October 10, 2022