
Introduction
Node.js is a free-to-use, open-source server environment. It is commonly used for browser-based web development purposes. It allows developers to use JavaScript to do backend programming. Since most developers are intimately familiar with JavaScript, it makes things very easy. The program lets you add, modify, and delete files on the server, produce dynamic content, and collect data. In this tutorial, we will discuss how you can set up Node.js on a CentOS 8 server. We will cover all the different ways you can go about performing this installation. If you are an Ubuntu user, you can also read about how to install Node.js on Ubuntu 18.04 over here.
Before Installation
Before you think about installing the program, you have to take care of a few prerequisites. For example, you have to make sure that you are using a server with CentOS 8. You also need to log in as the non-root user that is sudo-enabled. You can follow our tutorial on configuring the Linux sudoers file to help you set that up. Once you ensure this, you can move on to installing the program on your system.
Different Ways to Install Node
You have three different options when it comes to installing Node.js for your server. The first option for you is to use the default AppStream repository from CentOS. You have to use dnf to install the nodejs package from the CentOS repository. The second option is for you to use the Node Version Manager, or the nvm, to install the program. With this installation approach, you can install and manage many different versions of node. The third and last approach is for you to build and install node from the source. Next, we are going to explain in detail each option, so you can choose the one that suits you best.
Let’s start!
How to Install Node Using the CentOS AppStream Repository
Let’s further explore how you can install Node.js from the AppStream repository of CentOS. You will be glad to know that there are multiple versions of Node.js available on the AppStream software repository. The way to install each version is by enabling the relevant module stream. You can view all the streams with the dnf command like this:
|
1 |
sudo dnf module list nodejs |
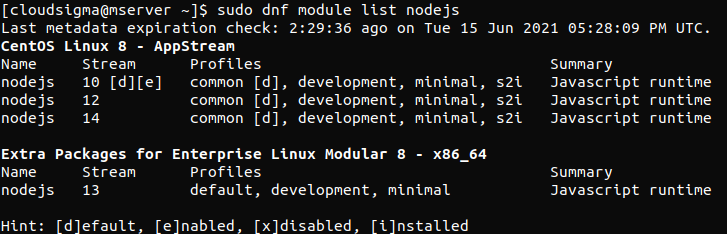
This shows that there are currently three available streams. These are 10, 12, and 14. The [d] symbol next to 10 stands for default. It means that stream version 10 is the default stream. It is possible for you to switch between module streams. To install Node.js 12, you have to use the following command:
|
1 |
sudo dnf module enable nodejs:12 |
After running this command, you have to confirm the decision. This will enable the version 12 stream for Node.js. Now you can finally download your nodejs package using dnf as follows:
|
1 |
sudo dnf install nodejs |
You will confirm your decision once again. To install the program, press y and then the ENTER key. If you want to confirm that the software was installed, you have to ask the node for the version number like this:
|
1 |
node --version |
If you installed version 10, then the output will show something like this:
![]()
The version will, understandably, be different if you installed nodejs 10 instead of 12. When it comes to choosing between the two, you can confidently select either version. They are considered as long-term support releases. This means that the source will continue to update and maintain the software for a considerable period of time. If you want to know more, you can read about it on the official website over here. Another thing that comes with the nodejs package installation is the Node Package Manager. It is also known as the npm utility. It is a dependency that you will need later. To make sure you installed it, verify it with this command:
|
1 |
npm --version |
How to Install Node Via the Node Version Manager
The second method is to use the Node Version Manager, or the nvm, to install Node.js. You can use this software to install several versions of Node.js at a time. It also houses the related node packages. You can download nvm from its official GitHub page. Locate the README file on the main page. Copy the curl command. This will give you access to the latest version of the program’s installation script. Remove | bash from the end of the command to audit the script. Next, send the command through to bash:
|
1 |
curl -o- https://raw.githubusercontent.com/nvm-sh/nvm/v0.35.3/install.sh |
Double-check the script for the changes it is making. Then, run the command once more with the | bash segment placed at the end of the script. You can execute the script as follows:
|
1 |
curl -o- https://raw.githubusercontent.com/nvm-sh/nvm/v0.35.3/install.sh | bash |
As a result, the nvm script will install on your account. You can use it after accessing it from the .bash_profile file like this:
|
1 |
source ~/.bash_profile |
To know all the available Node versions, use this command with nvm:
|
1 |
nvm list-remote |
You can install any version of Node from this available list. All you have to do is type the relevant version with the install command like so:
|
1 |
nvm install v13.6.0 |
In our example, we are installing version 13.6.0 of Node. You can see the versions you currently have installed with this command:
|
1 |
nvm list |
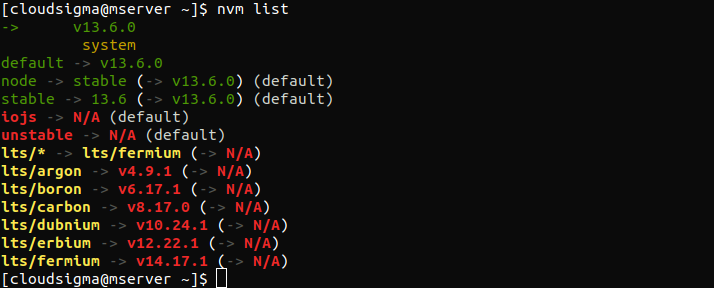
The first line always shows the version of Node that is currently in use. In this case, it is (-> v13.6.0). After that, we see some aliases and the version they signify. It will also show you aliases for a number of long-term support releases of Node. Let’s say we want to install the latest long-term support version- erbium. You should type the following:
|
1 |
nvm install lts/erbium |
You can switch between different installed versions as required. In addition, you can use nvm use for this like so:
|
1 |
nvm use v13.6.0 |
Now using node v13.6.0 (npm v6.13.4). Use this command to verify your successful installation:
|
1 |
node --version |
The output confirms that we installed the correct version of the program.
How to Install Node Through the Source
The third way to install Node.js is to compile it on your own after downloading the source code. You can find the link and copy it from the official download page for Node.js. Open your home directory in the SSH session:
|
1 |
cd ~ |
Enter curl with the copied link and add | tar xz at the end:
|
1 |
curl https://nodejs.org/dist/v12.16.1/node-v12.16.1.tar.gz | tar xz |
Now access the new source directory with this:
|
1 |
cd node-v* |
Next, you have to compile the code. To do so, you need to download some packages from the CentOS repositories. You can install them using dnf:
|
1 |
sudo dnf install gcc-c++ make python2 |
Confirm your decision to install the packages. Now type y and then ENTER. Let’s start configuring the software:
|
1 |
./configure |
|
1 |
make -j4 |
If you are using a four-core server, the compilation can take around 30 minutes. Adding the -j4 option runs four parallel compilation processes. Once the compilation is complete, install the software:
|
1 |
sudo make install |
Like previous sections, verify the installation by querying the version number:
|
1 |
node --version |
The packages are installed successfully if you see the correct version as output. You will also have an associated npm available with Node.
Conclusion
We covered all the basics when it comes to installing Node.js on your system. Now you are aware of the details of each of the three methods you can use to install the program. The first being through the CentOS AppStream repository, the second being using the Node Version Manager, and lastly by compiling from the source code. Now you can capitalize on the benefits of the Node.js program with JavaScript. For more on programming with JavaScript, take a look at the related blog posts from our blog:
- A Guide on Adding JavaScript to HTML
- Setting up Your Application: How to Choose the Best Server Setup?
- Setting up a Blog Using Ghost
Happy Computing!
- How To Enable, Create and Use the .htaccess File: A Tutorial - March 8, 2023
- An Overview of Queries in MySQL - October 28, 2022
- Introduction to Cookies: Understanding and Working with JavaScript Cookies - October 25, 2022
- An Overview of Data Types in Ruby - October 24, 2022
- The Architecture of Iptables and Netfilter - October 10, 2022