

Introduction
Third-party extensions are extremely helpful additions. These make your experience of configuring and working with a server, such as Apache HTTP, much simpler and more facilitative. In a time of need, you can even use some of these modules in Apache to run a reverse proxy. You can either remove a layer from your server setup or you can use a module to redirect the connections.
In this guide, we will discuss Apache and the various modules associated with the server platform, such as mod_proxy. We will also see how you can use it as a reverse proxy to redirect connections to your backend application servers.
What is Apache?
Apache is an HTTP server that is very commonly used for web-related purposes. But you can use it for a variety of reasons and across several platforms. You can install your Apache web server on Ubuntu by following our step-by-step tutorial. Furthermore, follow this tutorial to learn how to secure your Apache server with Let’s Encrypt. You can also check out how to set up Apache virtual hosts on Ubuntu 20.04.
You can further explore Apache’s functions and implementation with the help of external modules. These are third-party modules that you can use to perform various tasks pertaining to connections and configurations. For example, you can use the mod_rewrite module to perform rule-based URL rewriting. Another one of these modules is mod_proxy. The latter module is largely underused in the community. Primarily because many people are not aware of the extent of its functionality and applications. Mod_proxy, as suggested by the name, can help you put in place a gateway or proxy for backend servers.
Let’s explore the mod_proxy in detail and how you can use it as a reverse proxy.
Mod_proxy: Using Apache as a Reverse Proxy
As you can probably tell, mod_proxy is a module. It is a module in Apache that you can use to form and redirect various connections. You can also activate and configure it like any other module on your system. The unique thing about mod_proxy is that it is not just one module. In fact, it comprises a collection of different modules which you will find below. Each of these has its own function to perform. In this way, mod_proxy gives you a lot of diversity in functionality.
Take a look at the following mod_proxy modules:
mod_proxy
This is the main proxy module. In Apache, you can use this module to configure and manage various connections. It can also help you redirect connections.
mod_proxy_http
As the name suggests, this module deals with the HTTP and HTTPS protocols. You can use this module to implement the proxy features of these protocols.
mod_proxy_ftp
Mod_proxy_ftp works for when you are dealing with the FTP protocol.
mod_proxy_connect
This module is helpful for when you are performing SSL tunneling.
mod_proxy_ajp
You can use mod_proxy_ajp when you are working with the AJP protocol.
mod_proxy_wstunnel
This is useful for when you are working with web sockets like WS and WSS.
mod_proxy_balancer
If you are looking to access load balancing and clustering features, then you can use this module.
mod_cache
The mod_cache module is helpful for, as expected, caching purposes.
mod_headers
You can use this module to manage the headers you create using the HTTP protocol.
mod_deflate
This module is used for compression purposes.
If you want to learn even more details about these modules, you can visit the official Apache website. The official documentation gives you more information about mod_proxy and Apache itself as well.
How to Install Apache and mod_proxy?
Here are some easy to follow steps to install Apache and mod_proxy on your system:
- Prepare the Server
First of all, you need to make sure your cloud server is prepared. To do this, you need to update your operating system and associated software to the latest versions.
Use the following commands to upgrade your applications:
|
1 2 3 |
apt install aptitude aptitude update aptitude -y upgrade |
- Install the Essentials Package
Once you have prepared your server, you need to equip it with the essential tools. For this purpose, you need to install the build-essential package. This package consists of all the basic tools you need to install stuff from source. You can install it with this command:
|
1 |
aptitude install -y build-essential |
- Grab the Modules and Dependencies
Lastly, you need to install the modules and dependencies. You can do so by running the following command:
|
1 |
aptitude install -y apache2 apache2-bin libxml2-dev |
Activating Modules: How to Configure Apache with Proxy Connections?
Before you even get around to configuring Apache, you need to activate your modules. These modules will help you make the necessary configurations and perform various tasks.
To begin with, you need to check which modules are already working on your system. Not only that, but you also need to ensure that all the modules are installed properly and can be enabled. Running this command will show all of the available modules on your Apache server:
|
1 |
a2enmod |
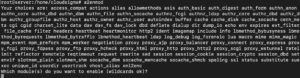
As you can see, the response shows you all of the available modules in the form of an elaborate list. Browse through this list and determine which modules you want to activate. To let Apache know, you can use the following command and enter your desired modules in place of the examples:
|
1 |
proxy proxy_ajp proxy_http rewrite deflate headers proxy_balancer proxy_connect proxy_html lbmethod_byrequests |
On the other hand, you can also activate each module individually. To do that, you would use the following commands:
|
1 2 3 4 5 6 7 8 9 10 |
a2enmod proxy a2enmod proxy_http a2enmod proxy_ajp a2enmod rewrite a2enmod deflate a2enmod headers a2enmod proxy_balancer a2enmod proxy_connect a2enmod proxy_html a2enmod lbmethod_byrequests |
Certain modules will probably be activated by default on your server. You may wonder how you can confirm they are enabled. To make sure that the desired module is active, you can try to activate it twice. This will guarantee that the module is enabled.
- Alter Default Configuration Settings
First, you have to change the default configuration settings. To do so, you must access the default configuration file which is 000-default.conf. This file is located inside /etc/apache2/sites-enabled. We need to modify it as such so that it attains the proxy function.
You will start by opening the nano text editor to edit the default virtual host. You can do this by running this command:
|
1 |
nano /etc/apache2/sites-enabled/000-default.conf |
We will collectively refer to the mod_virtual host and mod_proxy as the proxy virtual host. Now, you can implement the following configuration settings. You can make necessary changes as you see fit for your system and your requirements:
|
1 2 3 4 5 6 7 |
<VirtualHost *:*> ProxyPreserveHost On ProxyPass / http://0.0.0.0:8080/ ProxyPassReverse / http://0.0.0.0:8080/ ServerName localhost </VirtualHost> |
You can save and exit once you press Ctrl + X and confirm with Y.
- Activate the Load Balancing Feature
Load balancing helps you effectively distribute the connections on your proxy. This is a very useful idea for when you are using multiple backend application servers instead of a single one. The load balancing feature will distribute the connection or the ‘load.’
To enable this feature, you have to repeat the steps mentioned previously in this guide. However, you need to use the following configuration settings when setting up the virtual host:
|
1 2 3 4 5 6 7 8 9 10 11 12 13 14 15 |
<VirtualHost *:*> <Proxy balancer://mycluster> # Define back-end servers: # Server 1 BalancerMember http://0.0.0.0:8080/ # Server 2 BalancerMember http://0.0.0.0:8081/ </Proxy> # Apply VH settings as desired # However, configure ProxyPass argument to # use "mycluster" to balance the load ProxyPass / balancer://mycluster </VirtualHost> |
- Activate Reverse Proxy Support
You will need to make a virtual host support your reverse proxy if you are working with SSL connections and certificates. This secondary virtual host has to have the following settings. You will need to perform the instructions in the previous steps. All you have to do is replace the configuration options with the ones mentioned below:
|
1 2 3 4 5 6 7 8 9 10 11 12 13 14 15 16 17 18 19 20 |
<VirtualHost *:443> SSLEngine On # Set the path to SSL certificate # Usage: SSLCertificateFile /path/to/cert.pem SSLCertificateFile /etc/apache2/ssl/file.pem # Servers to proxy the connection, or; # List of application servers: # Usage: # ProxyPass / http://[IP Addr.]:[port]/ # ProxyPassReverse / http://[IP Addr.]:[port]/ # Example: ProxyPass / http://0.0.0.0:8080/ ProxyPassReverse / http://0.0.0.0:8080/ # Or, balance the load: # ProxyPass / balancer://balancer_cluster_name </VirtualHost> |
You would also need to enable SSL module for the above configuration to work:
|
1 |
sudo a2enmod ssl |
- Restart Apache
All of the configurations are done. Finally, you can restart your Apache server to apply the changes. You can restart Apache by running the following command:
|
1 |
service apache2 restart |
Conclusion
Voila! You just successfully set up a reverse proxy gateway in your Apache server. Now Apache will redirect the incoming connections to your application servers in the backend.
The great thing about this is that the configuration process takes little effort and is quite straightforward. Now that you know the exact steps on how to get there, you should have no trouble at all setting up a reverse proxy in Apache.
Happy Computing!
- Removing Spaces in Python - March 24, 2023
- Is Kubernetes Right for Me? Choosing the Best Deployment Platform for your Business - March 10, 2023
- Cloud Provider of tomorrow - March 6, 2023
- SOLID: The First 5 Principles of Object-Oriented Design? - March 3, 2023
- Setting Up CSS and HTML for Your Website: A Tutorial - October 28, 2022