

Many web apps face the necessity of interfacing with a REST API at some point in their development. For React-based web apps, we can use Axios, a lightweight HTTP client based on the $http service within Angular.js v1.x. The features are similar to JavaScript’s native Fetch API.
Axios is promise-based, allowing us the ability to incorporate JavaScript’s async and await for more readable synchronous code. It also supports intercept and request cancellation. Moreover, there’s built-in client-side protection against cross-site request forgery.
In this guide, we will showcase how to use Axios to access the popular JSON Placeholder API in a demo React application. You can learn more about the JSON format in JavaScript from this tutorial.
Prerequisites
To complete the steps demonstrated in this guide, you’ll need the following components:
- A properly-configured Ubuntu server. Here are the steps of setting up your own Ubuntu server on CloudSigma.
- The latest version of Node.js installed. Check out how to install Node.js on Ubuntu.
- A new React project using Create React App. It will be useful to first follow and execute this guide on setting up a React project using Create React App.
- Basic understanding of HTML, CSS, and JavaScript.
Step 1: Install Axios in the React Project
Axios is directly available as an npm module. Check out Axios on npm. All we need is to establish a React project and install the Axios package.
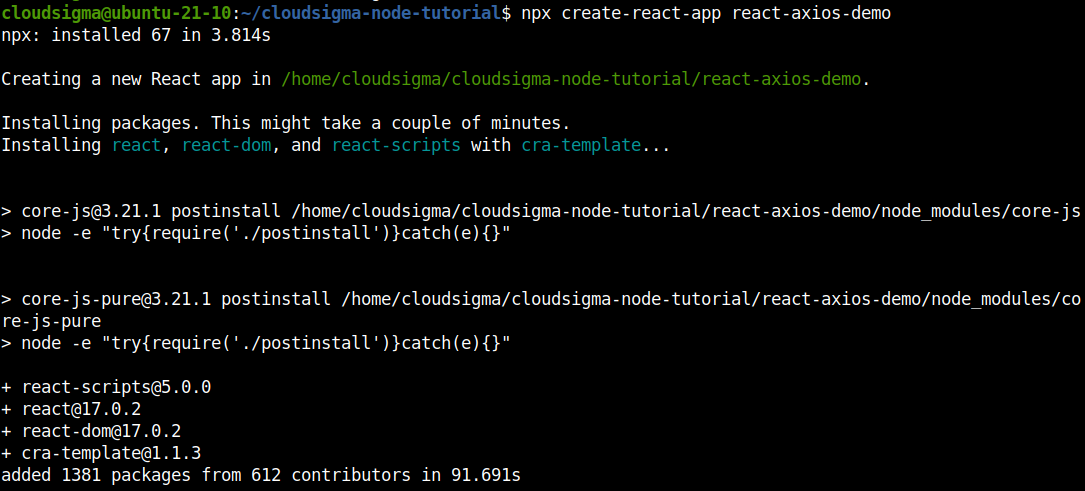
The following npx command will run create-react-app to create a new React project. The project name will be used to create a dedicated directory for the project. Here, we named the project react-axios-demo. Run the command:
|
1 |
npx create-react-app react-axios-demo |
Change the current directory to the newly-created project directory:
|
1 |
cd react-axios-demo/ |
Next, invoke the npm install command to install Axios. If no version is specified, then npm will automatically download and install the latest version of Axios:
|
1 |
npm install axios |

Our project is now ready to use Axios! It’s time to put its features into action.
Step 2: Construct a GET Request
In this step, we will showcase creating a new component that uses Axios to send a GET request.
First, create a new component PersonList that will show a list of names. Create a dedicated directory to store the component:
|
1 |
mkdir -pv src/components |
Next, create the file PersonList.js :
|
1 |
touch PersonList.js |
Open the file in a text editor. We are using Visual Studio Code for comfort and readability. Enter the following JavaScript code:
|
1 2 3 4 5 6 7 8 9 10 11 12 13 14 15 16 17 18 19 20 21 22 23 24 25 26 27 28 29 |
import React from 'react'; import axios from 'axios'; export default class PersonList extends React.Component { state = { persons: [] } componentDidMount() { axios.get(`https://jsonplaceholder.typicode.com/users`) .then(res => { const persons = res.data; this.setState({ persons }); }) } render() { return ( <ul> { this.state.persons .map(person => <li key={person.id}>{person.name}</li> ) } </ul> ) } } |
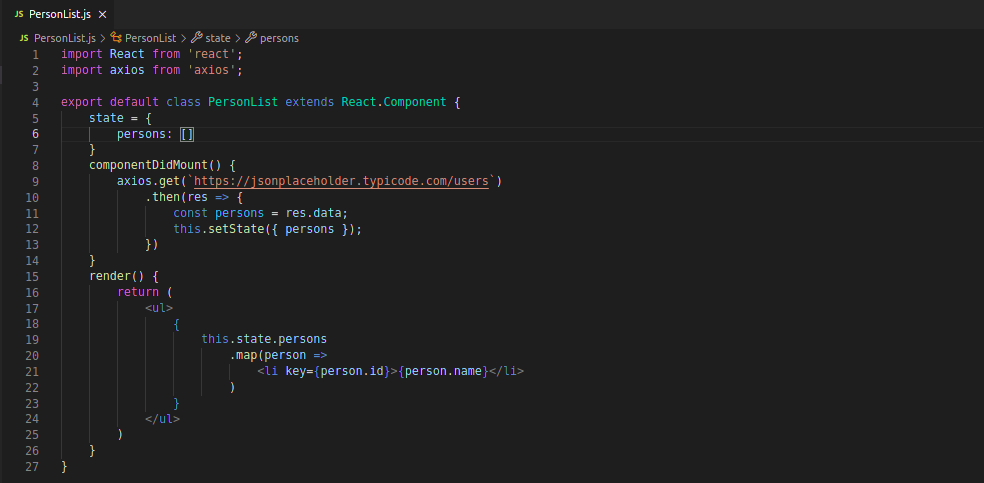
Here:
-
We’ve imported React and Axios so that we can use them both in the component.
-
We hook into the componentDidMount lifecycle hook and send a GET request.
You can use axios.get(<url>) from an API endpoint to get a promise (returns a response object). Within the response object, it contains the desired data. We then assign it to the value of person. We can also gather additional info about the request, like status code under res.status or further info from res.request.
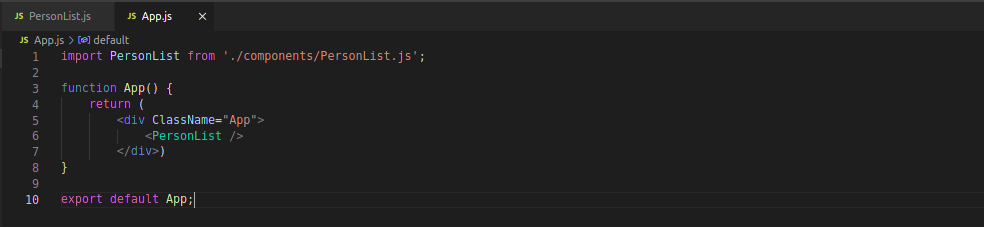
Next, we need to add our component to the main App.js file. Add the following codes:
|
1 2 3 4 5 6 7 8 9 |
import PersonList from './components/PersonList.js'; function App() { return ( <div ClassName="App"> <PersonList/> </div> ) } |
The configuration is complete for the step. You can now run the app and test it using your favorite browser. Start the development server:
|
1 |
npm start |
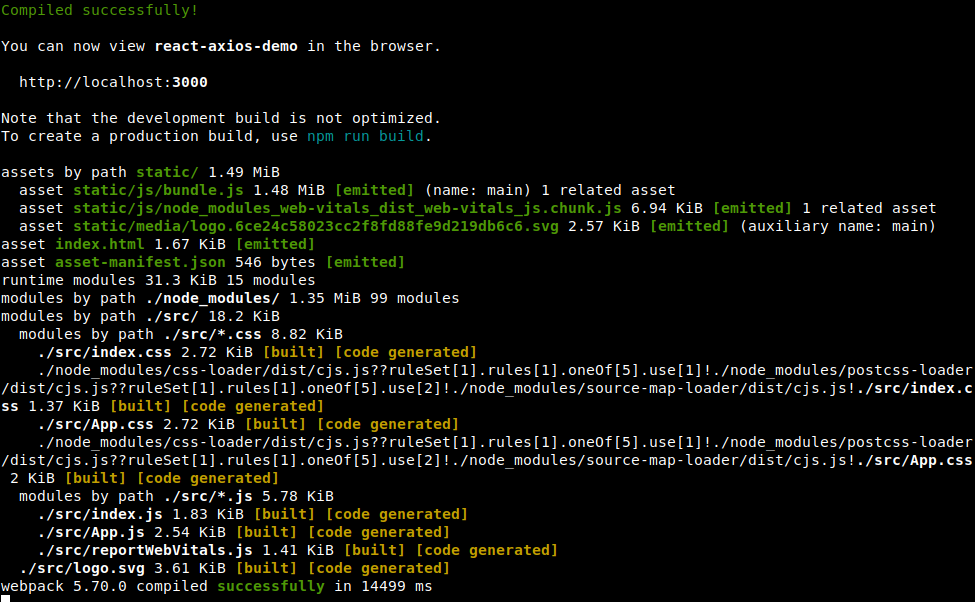
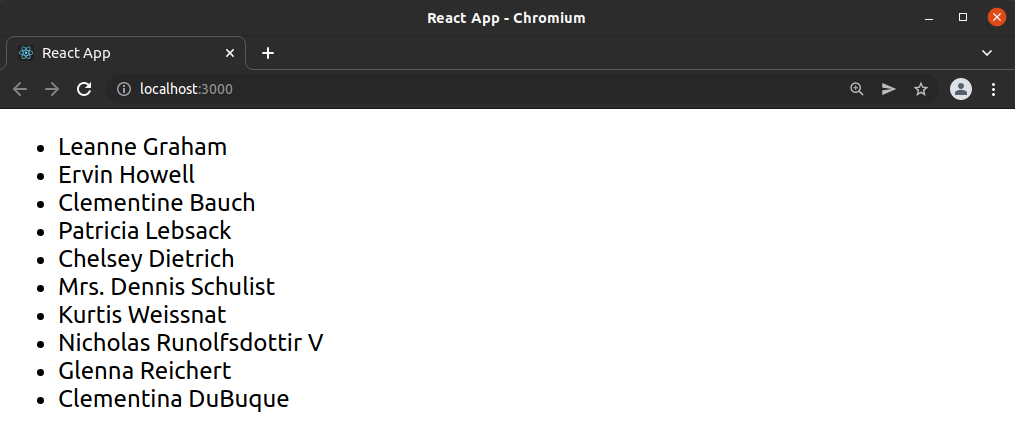
As we can see, the output shows a list of people’s names in random order:
Step 3: Construct a POST Request
In this section, we will showcase using Axios to perform another HTTP request method called POST. To demonstrate this, our goal is to create a new component to our React project named PersonAdd.
Create the file PersonAdd.js:
|
1 |
touch src/components/PersonAdd.js |
![]()
Then, open the file in a text editor and enter the following code:
|
1 2 3 4 5 6 7 8 9 10 11 12 13 14 15 16 17 18 19 20 21 22 23 24 25 26 27 28 29 30 31 32 33 34 35 |
import React from 'react'; import axios from 'axios'; export default class PersonAdd extends React.Component { state = { name: '' } handleChange = event => { this.setState({ name: event.target.value }); } handleSubmit = event => { event.preventDefault(); const user = { name: this.state.name }; axios.post(`https://jsonplaceholder.typicode.com/users`, { user }) .then(res => { console.log(res); console.log(res.data); }) } render() { return ( <div> <form onSubmit={this.handleSubmit}> <label> Person Name: <input type="text" name="name" onChange={this.handleChange} /> </label> <button type="submit">Add</button> </form> </div> ) } } |
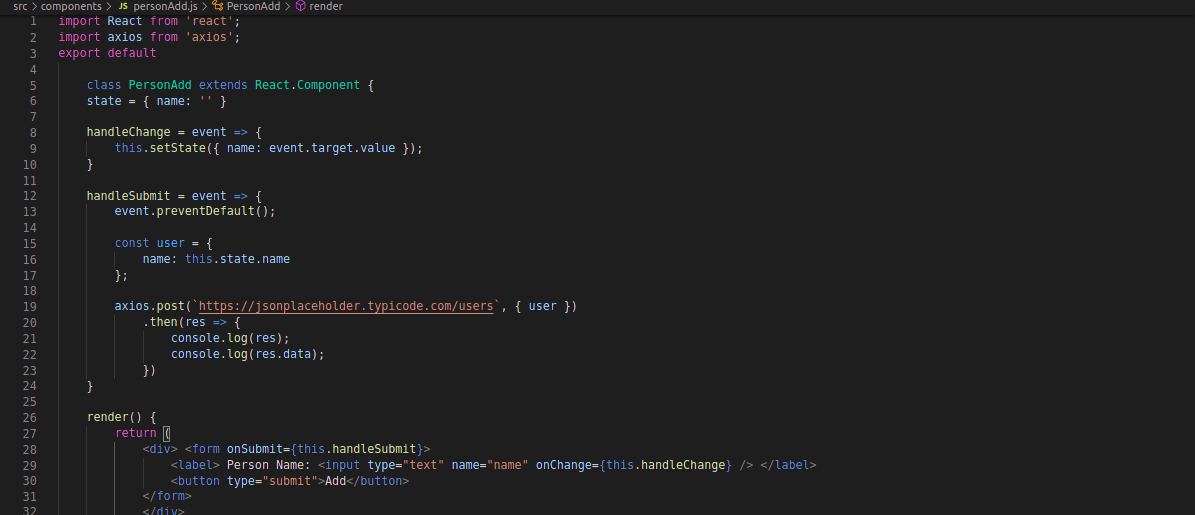
In this code, we’re taking user input and POSTing the content to an API. Inside the handleSubmit function, we’re preventing the default action of the form and updating the state to the user input. When using POST it returns the same response object. We can use the object inside of a then call. To fulfill the POST request, we’re capturing the user input and adding it along with the POST request. It gives us a response. We’re logging the response using console.log. It should show the user input in the form.
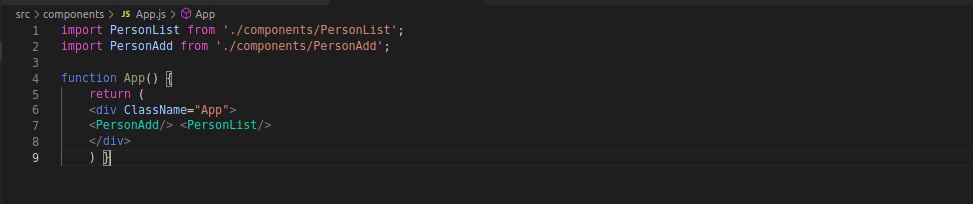
Next, add the component to App.js. The full code should look like this:
|
1 2 3 4 5 6 7 8 9 10 11 |
import PersonList from './components/PersonList'; import PersonAdd from './components/PersonAdd'; function App() { return ( <div ClassName="App"> <PersonAdd/> <PersonList/> </div> ) } |
Now, time to test the changes. Start the development server:
|
1 |
npm start |
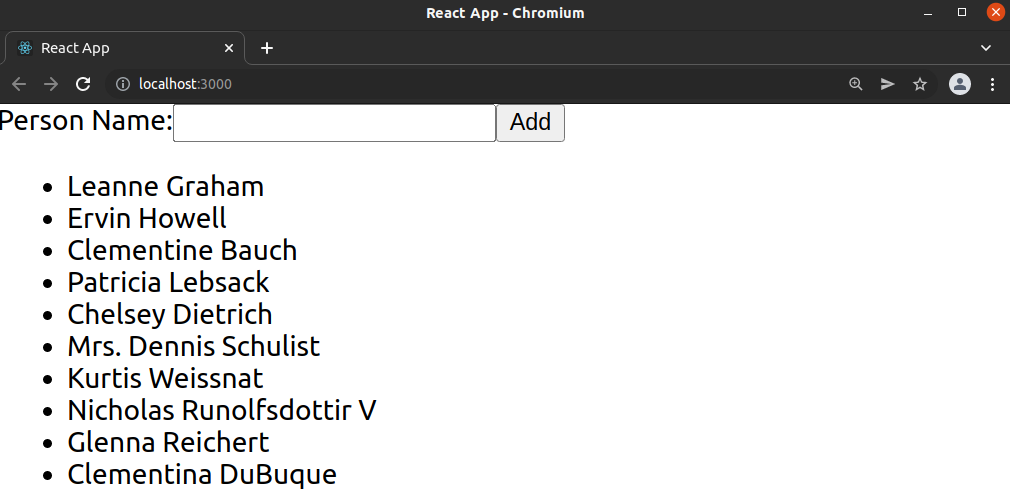
Check the change on the web browser:
Step 4: Construct a DELETE Request
In this section, we will demonstrate deleting items from an API with the help of axios.delete and using a URL as the parameter. To demonstrate, create the component PersonRemove. Create the file PersonRemove.js in the src/components directory:
|
1 |
touch src/components/PersonRemove.js |
![]()
After that, open the file in a text editor and add the following code:
|
1 2 3 4 5 6 7 8 9 10 11 12 13 14 15 16 17 18 19 20 21 22 23 24 25 26 27 28 29 30 31 32 33 34 35 |
import React from 'react'; import axios from 'axios'; export default class PersonRemove extends React.Component { state = { id: '' } handleChange = event => { this.setState({ id: event.target.value }); } handleSubmit = event => { event.preventDefault(); axios.delete(`https://jsonplaceholder.typicode.com/users/${this.state.id}`) .then(res => { console.log(res); console.log(res.data); }) } render() { return ( <div> <form onSubmit={this.handleSubmit}> <label> Person ID: <input type="number" name="id" onChange={this.handleChange} /> </label> <button type="submit">Delete</button> </form> </div> ) } } |
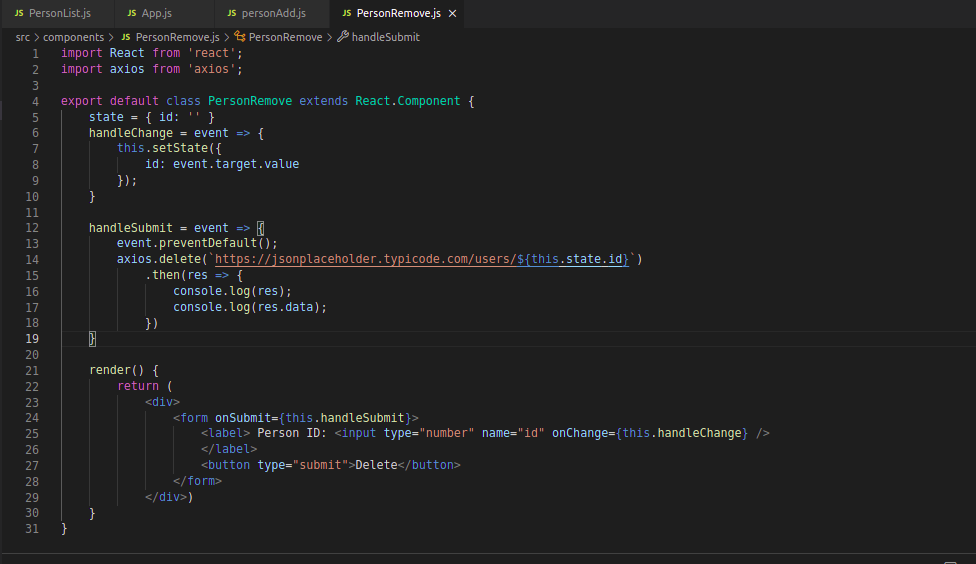
Here, the res object is offering the info about the request. We can then use console.log after the form is submitted.
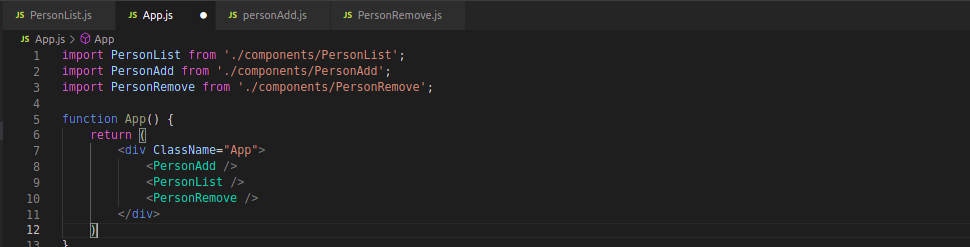
Next, implement the component to App.js:
|
1 2 3 4 5 6 7 8 9 10 11 12 13 |
import PersonList from './components/PersonList'; import PersonAdd from './components/PersonAdd'; import PersonRemove from './components/PersonRemove'; function App() { return ( <div ClassName="App"> <PersonAdd/> <PersonList/> <PersonRemove/> </div> ) } |
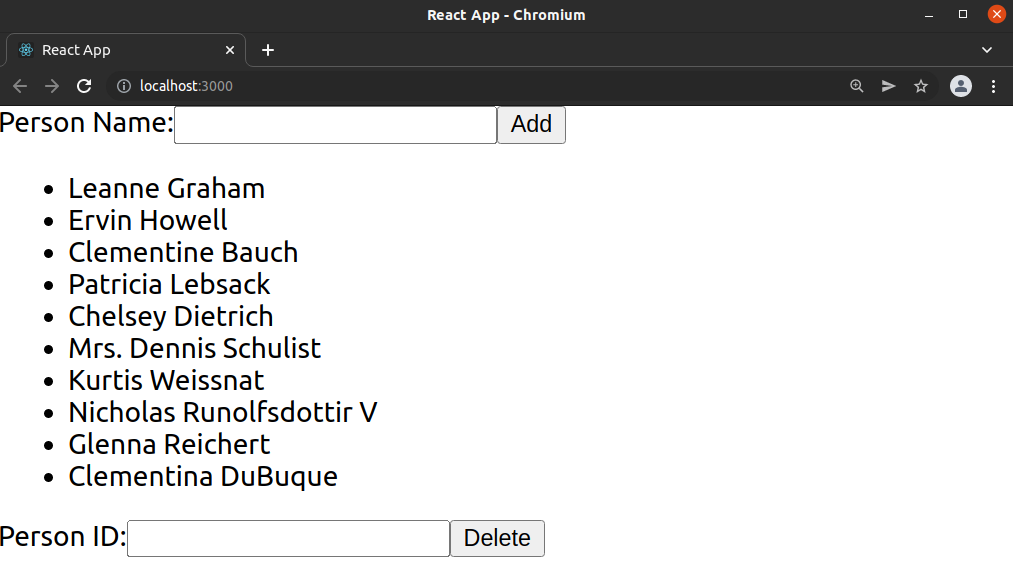
Time to test our code again. Start the server:
|
1 |
npm start |
You should find a new form that takes the user’s name and removes it from the list:
Step 5: Apply Base Instance in Axios
Now, we will work with Axios base instance. Here, we can define a URL and other configuration elements. To implement it, create a separate file api.js:
|
1 |
touch src/api.js |
![]()
Open it in a text editor and enter the following code:
|
1 2 3 4 5 |
import axios from 'axios'; export default axios.create({ baseURL: `http://jsonplaceholder.typicode.com/` }); |

Once it’s set, we can use it inside the PersonRemove component. Here’s what the code would look like:
|
1 2 3 4 5 6 7 8 9 10 11 12 13 |
import React from 'react'; import API from '../api'; export default class PersonRemove extends React.Component { handleSubmit = event => { event.preventDefault(); API.delete(`users/${this.state.id}`) .then(res => { console.log(res); console.log(res.data); }) } } |
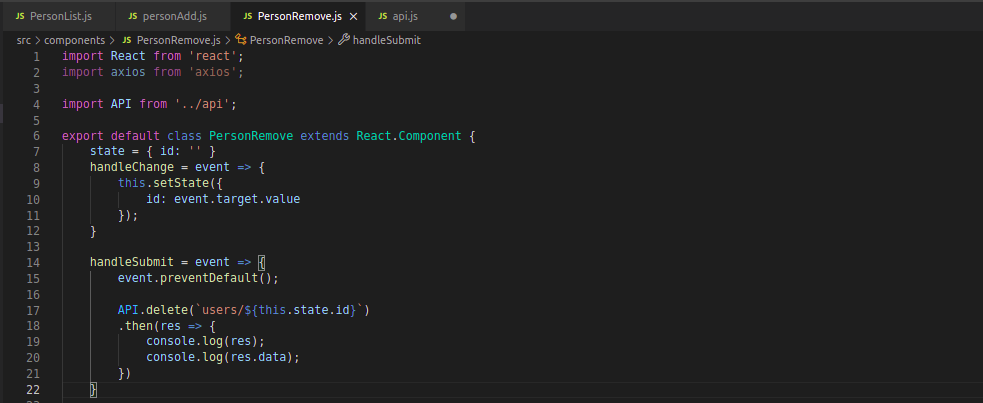
Here, http://jsonplaceholder.typicode.com/ is set as the base URL. Now, we no longer need to use the full URL every time we reach an endpoint of the API.
Step 6: Implement async and await
In this section, we will have a look at how to implement async and await to work with promises. The await keyword resolves promise and returns value. We can assign this value to a variable for more comfortable usage.
Here’s what the updated code of PersonRemove.js would look like:
|
1 2 3 4 5 6 7 8 9 10 11 |
import React from 'react'; import API from '../api'; export default class PersonRemove extends React.Component { handleSubmit = event => { event.preventDefault(); const response = await API.delete(`users/${this.state.id}`); console.log(response); console.log(response.data); } } |
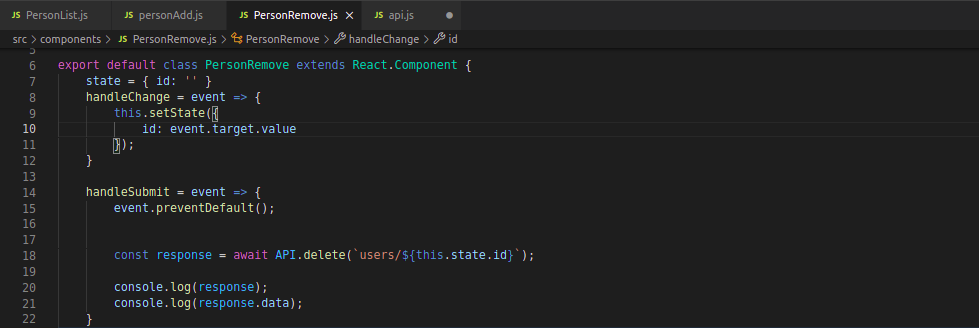
Here, we’ve replaced .then(). Once promise is resolved, we store the value in the variable response.
Final Thoughts
In this tutorial, we’ve explored various examples of using Axios to work with REST API. The codes showcase creating HTTP requests and handling responses.
Interested in learning more about JavaScript? Check out our other beginner guides on various JavaScript concepts and features, for example, date and time, string manipulation, classes, and objects.
Happy Computing!
- How To Enable, Create and Use the .htaccess File: A Tutorial - March 8, 2023
- An Overview of Queries in MySQL - October 28, 2022
- Introduction to Cookies: Understanding and Working with JavaScript Cookies - October 25, 2022
- An Overview of Data Types in Ruby - October 24, 2022
- The Architecture of Iptables and Netfilter - October 10, 2022