How to correctly use PuttyGen to generate an SSH key to use with the CloudSigma webapp?
Putty is a popular SSH client for Windows, allowing Windows users secure SSH access to Linux VMs running on CloudSigma’s cloud. You can download PuTTY and PuTTYgen here:
Generating a set of RSA keys with PuTTYgen to securely access CloudSigma’s cloud:
Start PuTTYgen
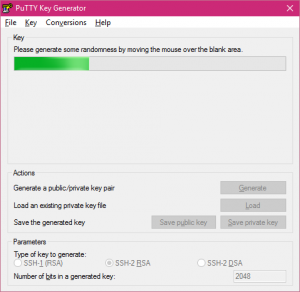
Click the Generate button
Move your mouse pointer around randomly in the blank area of the Key section below the progress bar until the progress bar is full. This will ensure the key is as random and unique as possible. When the progress bar completes, a public / private key pair has been generated.
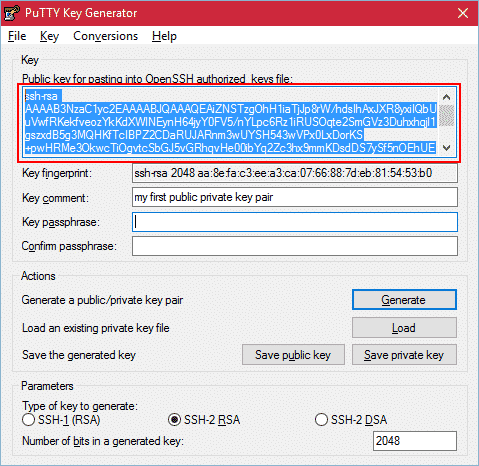
In the Key comment field, enter any comment that will help you identify this key pair. Examples include your e-mail address, nickname etc. The key comment is particularly useful in the event you end up creating more than one key pair.
Optionally, type a passphrase in the Key passphrase field then re-type the same passphrase in the Confirm passphrase field. Please note that should you choose to complete this step, you will not be able to use your keys for automated processes, as you will be prompted to enter this phrase each time the key is used.
Click the Save public key button and save your new public key.
Click the Save private key button and choose whatever filename you’d like. You can save it in the same location as the public key, but it should be a location that only you can access and that you will NOT lose! If you lose your keys and have disabled username/password logins, you will no longer be able log in!
Adding PuTTYgen generated public / private key pairs to your CloudSigma account:
Now that we have created our public / private key pair, we can proceed to upload it to your CloudSigma account. Please note that should you ever lose your public key, simply load your private key in Puttygen and it will be displayed to you.
Please do NOT click on ‘save public key’, as Puttygen uses a different format to OpenSSH. Thankfully, Puttygen does display the OpenSSH-compatible public key in the field labeled ‘Public key for pasting into OpenSSH’. Select all the text in this field and copy it to clipboard.
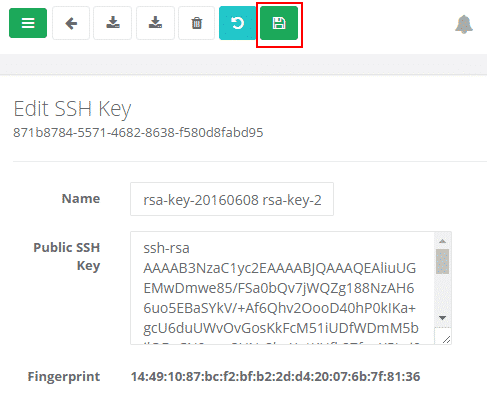
Go back to the CloudSigma SSH key screen and paste this into the ‘public SSH key’ field. Click save.
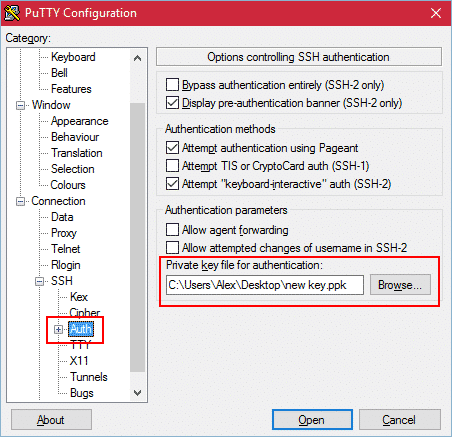
Open Putty and expand Connection / SSH / Auth and under ‘Private key file for authentication’, click browse and locate the Private Key (.ppk) that Puttygen created. In order to avoid having to manually add your SSH private key to Putty every time it launches, go back to the ‘Session’ menu, give this session a name and click save.
We use cookies on our website to give you the most relevant experience by remembering your preferences and repeat visits. By clicking “Accept”, you consent to the use of ALL the cookies. However you may visit Cookie Settings to provide a controlled consent.
This website uses cookies to improve your experience while you navigate through the website. Out of these cookies, the cookies that are categorized as necessary are stored on your browser as they are essential for the working of basic functionalities of the website. We also use third-party cookies that help us analyze and understand how you use this website. These cookies will be stored in your browser only with your consent. You also have the option to opt-out of these cookies. But opting out of some of these cookies may have an effect on your browsing experience.
Necessary cookies are absolutely essential for the website to function properly. This category only includes cookies that ensures basic functionalities and security features of the website. These cookies do not store any personal information.
Any cookies that may not be particularly necessary for the website to function and is used specifically to collect user personal data via analytics, ads, other embedded contents are termed as non-necessary cookies. It is mandatory to procure user consent prior to running these cookies on your website.