

Businesses imply lots of data and that makes the problem of handling and managing it harder. Traditionally, the industry has been using RDBMS systems over the decades now, but with the advent of Big Data in the 21st century, NoSQL (Not only SQL) databases came into the picture for large scale unstructured and semi-structured data.
In this post, I am going to set up a MongoDB cluster.
MongoDB is a free and open-source NoSQL document database, which is widely used due to the high level of scalability and flexibility that it provides.
To roll out MongoDB in production, it is advisable to use Replica Sets. Replica sets are MongoDB’s equivalent of a Master/Slave setup in the relational world, but in contrast, they are very painless to set up, as everything is built-in. For more on Replica Sets, check out TutorialsPoint’s definition on the process of replication.
Planning your MongoDB Cloud Server Cluster
I am going to create a 3 node cluster. It is important to give them equal resources because any of them can become the primary (i.e. master) server. These nodes or machines can run on any operating system, but in this tutorial, I am going to use Ubuntu 18.04 LTS. On how to attach and set up the pre-installed image from CloudSigma’s library, you can refer to this tutorial.
Since the whole point with a Replica Set is that the cluster should survive a single node going down, it would be rather pointless if all your servers reside on the same physical host. Fortunately, CloudSigma does offer something called availability groups. What this means is that you can instruct the system to group all three of your servers into different groups. By doing so, they will never reside on the same physical host. More information about this and other security and business continuity features can be found here.
It is also important to use a 64-bit version of Linux. The reason is simply that MongoDB doesn’t run well on 32-bit systems (more about that here).
Installing MongoDB in the Cloud
This section is pretty straightforward. Either use one of the pre-configured Ubuntu 18.04 images or install it yourself.
The CPU, RAM and disk configuration is really individual and depends on your load. For a smallish installation, 4 GHz CPU, 4 GB RAM and 10 GB disk (for the system) should be sufficient. When you attach your drives, make sure you are using VirtIO. If you use IDE, performance will suffer significantly. Also, since you’re creating a Replica Set, you need all nodes (and app servers) to be on the same VLAN.
Contrary to many other cloud vendors, there’s no need to configure your storage with RAID10 or similar to improve performance. As many of our clients report, you will get amazing performance out-of-the-box by using both SSD and magnetic disks at CloudSigma.
I still recommend keeping the MongoDB data on a separate drive. The reason for this is simply that at some point you might have to make some file system optimizations that you wouldn’t want to do to your entire file system.
With this in mind, it’s easiest to just add this drive after the set up of servers. For now, let’s just focus on the system installation. If you’re installing yourself (instead of using the pre-configured systems), I’d recommend that you press F4 in the boot menu and select ‘Install a minimal virtual machine’.
I am creating 3 machines, each with the following specifications:
- CPU: 4 GHz
- RAM: 4 GB
- SSD: 10 GB (Ubuntu 18.04 LTS), 20 GB (extra drive)
As listed in the SSD part, I am attaching a drive of size 10 GB with Ubuntu 18.04 LTS installed on it.
Moreover, I am attaching another empty drive of size 20 GB along with it to store MongoDB data. The size of this highly depends on your usage, but for a small system, 20GB should probably be sufficient. However, since it’s sometimes hard to predict how much data you will store, we will use LVM. This will allow you to simply add another drive later on and expand the volume without having to start over. Alternatively, you can use a single drive and scale it up later withresize2fs.
To add the disk, just go to the ‘Drives’ Section, click on ‘Create a new drive’ icon on the top, give the new disk a name and size it to 20 GB. Once it’s saved, go to the individual machine to which you want to attach it and under drives section of that machine’s details, I can click on ‘Attach a drive’ and select the disk.
Now that you have three machines, you can go onto mounting the extra disk you added for your MongoDB data storage to each machine. I recommend adding this disk as a partition. Using partitioning allows the operating system to manage information in each region separately. For adding the disk as a partition, I am going to first check all the disks attached to our machine. For the same, I will execute the following command:
|
1 |
fdisk -l |
When I execute the command, I get the output stating the disks and the devices on my machine.
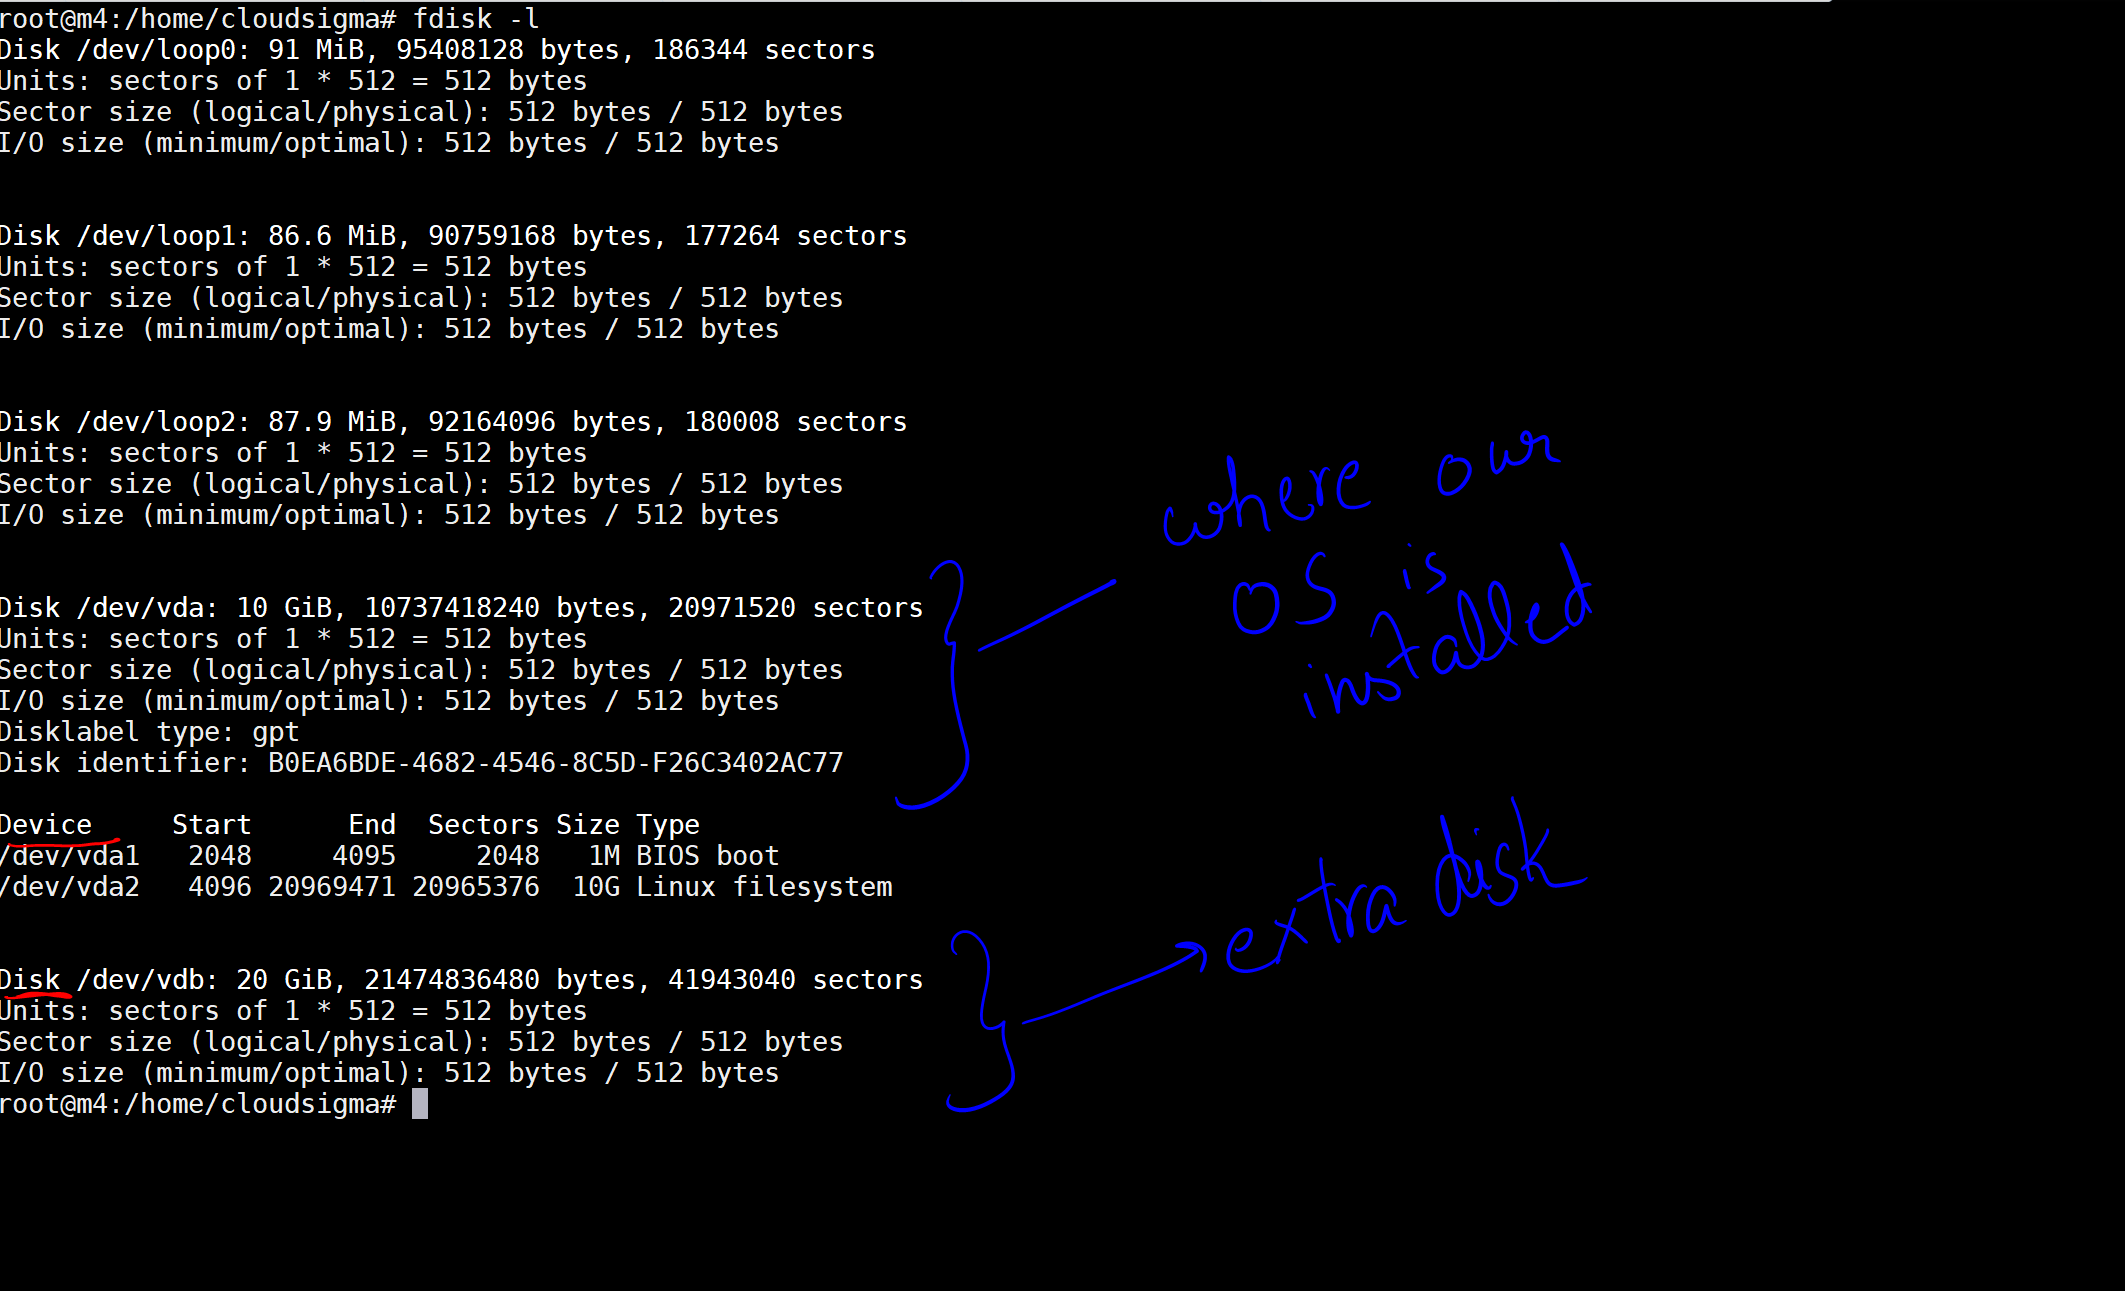
In the image, I have marked a 10 GB disk as the one where our OS is installed. Then there is another disk of 20 GB which has now been attached. The disk location is /dev/vdb. You can create a partition on this disk using the following commands:
|
1 |
sudo fdisk /dev/vdb |
It would open fdisk utility, a command line utility that provides disk partitioning functions, wherein you can create partitions on our disk. It will give a prompt “Command (m for help):” where you need to enter n to create a new partition, and then just keep pressing enter for accepting the default values. And after it has created the partition, enter w for writing changes. It would look like this:
|
1 2 3 4 5 6 7 8 9 10 11 12 13 14 15 16 17 18 |
Command (m for help): <strong>n</strong> Partition type p primary (0 primary, 0 extended, 4 free) e extended (container for logical partitions) Select (default p): Using default response p. Partition number (1-4, default 1): First sector (2048-41943039, default 2048): Last sector, +sectors or +size{K,M,G,T,P} (2048-41943039, default 41943039): Created a new partition 1 of type 'Linux' and of size 20 GiB. Command (m for help): <strong>w</strong> The partition table has been altered. Calling ioctl() to re-read partition table. Syncing disks. |
It has created a new partition 1 of type ‘Linux’ and of size 20 GiB. Now that the partition is created, let’s create an LVM pool:
|
1 2 3 |
sudo pvcreate /dev/vdb1 sudo vgcreate mongodb /dev/vdb1 sudo lvcreate -n db -L 19.5g mongodb |
I have entered ‘19.5g’ since my partition size is 20g. Next, execute the following command to find out the name for the disk:
|
1 |
fdisk -l | grep mongo | awk '{print $2'} |
After that, format the disk using the ext4 method with the following command:
|
1 2 3 4 5 6 7 8 9 10 11 12 13 14 15 |
sudo mkfs.ext4 /dev/mapper/mongodb-db Output: root@m4:/home/cloudsigma# sudo mkfs.ext4 /dev/mapper/mongodb-db mke2fs 1.44.1 (24-Mar-2018) Creating filesystem with 5217280 4k blocks and 1305600 inodes Filesystem UUID: 695a62e6-021d-4fc0-945c-cc51a92d86da Superblock backups stored on blocks: 32768, 98304, 163840, 229376, 294912, 819200, 884736, 1605632, 2654208, 4096000 Allocating group tables: done Writing inode tables: done Creating journal (32768 blocks): done Writing superblocks and filesystem accounting information: done |
Next, let’s create a location to mount the disk and a folder into which to keep your MongoDB data.
|
1 |
sudo mkdir -p /mongodb/data |
In order to add an entry to the fstab about your new disk to be mounted, you can directly use the command below:
|
1 |
echo -e "` blkid | grep mongodb | awk {'print $2'}`\t/mongodb\text4 auto,noexec,rw,sync,nouser\t0\t0" >> /etc/fstab |
In the command, blkid gives you a UUID – Universally Unique Identifier of each disk. Here I grep out the one for MongoDB disk and combine this UUID with the location of the mount folder, filesystem type and other options for the disk respectively. I am adding this line to /etc/fstab. If you don’t do that, you will get an error while mounting the disk. The entry looks like this:
UUID=”695a62e6-021d-4fc0-945c-cc51a92d86da” /mongodb ext4 auto,noexec,rw,sync,nouser 0 0
Now, you can mount the disk on/mongodb location:
|
1 |
sudo mount /mongodb |
Installing MongoDB
With the system prepared, let’s move on to installing MongoDB. While Ubuntu does offer a version of MongoDB in their own repository, I recommend that you use the official MongoDB version instead. The reason being that the Ubuntu repository is pretty far behind in releases, so if you want to get the most out of MongoDB, you’ll have to turn to official releases.
Since MongoDB offer their own repository, you can simply add this to your system and then install MongoDB as normal. Here are the steps to follow:
First, import the public key used by the package management system:
|
1 |
sudo apt-key adv --keyserver hkp://keyserver.ubuntu.com:80 --recv 9DA31620334BD75D9DCB49F368818C72E52529D4 |
Then, I create a list file. This would contain the repository where MongoDB is, so your system can download it from there:
|
1 |
echo "deb [ arch=amd64 ] https://repo.mongodb.org/apt/ubuntu bionic/mongodb-org/4.0 multiverse" | sudo tee /etc/apt/sources.list.d/mongodb-org-4.0.list |
Now, I am updating my local package database so I can account for the changes.
|
1 |
sudo apt-get update |
Now, I can just install the package using the following command:
|
1 |
sudo apt-get install -y mongodb-org |
I have installed MongoDB on each of the machines.
|
1 |
sudo service mongod start |
Now the MongoDB is up and running, with the data on the drive created. If heavy load and/or a lot of connections are expected, you may need to raise the ulimit values.
If you want to gain more insight into your data, you might also want to sign up for MongoDB’s MMS, which is a free cloud-based monitoring service for MongoDB.
Creating the Replica Set for your MongoDB Cloud
Now, let’s create a replica set. Before that, you need to ensure that each of the machines can communicate with each other. For this purpose, go and add will add these entries in /etc/hosts
|
1 2 3 |
IP-1 m1.mongo.cluster m1 IP-2 m2.mongo.cluster m2 IP-3 m3.mongo.cluster m3 |
For verification, you can try pinging the machines using the hostname. So if my machine 1’s IP is IP-1, say, 213.189.123.12, then instead of writing
|
1 |
ping 123.189.123.12 |
I will write,
|
1 2 3 |
ping m1.mongo.cluster or ping m1. |
If you’ve activated the firewall (which you really should), make sure that the nodes can send and receive TCP traffic on port 28017 and 27017 on the internal interface.
Now, on each of the machine, go ahead and start the mongod service using the following commands.
On machine m1,
|
1 |
mongod --dbpath /mongodb/data --replSet rs0 --bind_ip localhost,m1.mongo.cluster |
Next, on machine m2,
|
1 |
mongod --dbpath /mongodb/data --replSet rs0 --bind_ip localhost,m2.mongo.cluster |
On machine m3,
|
1 |
mongod --dbpath /mongodb/data --replSet rs0 --bind_ip localhost,m3.mongo.cluster |
Here,
mongod is the name of the service
dbpath is the location of our database directory
replSet is the name of our replication set. It should be the same for each of the machines in the same replica set
bind_ip is the hostname of that machine where you are running it.
Once you have started the mongod service, go to the primary server ( in my case, I have chosen m1 ), and run mongo.
|
1 |
mongo |
It will start the MongoDB terminal. On the terminal, go and initiate the replicaSet using the command below. It will create the replicaSet with default configurations:
|
1 |
rs.initiate() |
Now, let’s just add the other two machines as replicas using the following commands:
|
1 2 |
rs.add("m2.mongo.cluster") rs.add("m3.mongo.cluster") |
You can monitor the status using the command:
|
1 |
rs.status() |
That’s really it. You should now be up and running with your MongoDB cluster on CloudSigma’s blazing fast cloud.
- Removing Spaces in Python - March 24, 2023
- Is Kubernetes Right for Me? Choosing the Best Deployment Platform for your Business - March 10, 2023
- Cloud Provider of tomorrow - March 6, 2023
- SOLID: The First 5 Principles of Object-Oriented Design? - March 3, 2023
- Setting Up CSS and HTML for Your Website: A Tutorial - October 28, 2022