

The command sed is an abbreviation for stream editor. It’s a widely popular tool on Linux/UNIX systems. Sed isn’t a text editor by itself. However, it can perform various modifications to manipulate a given text. The text input is sent as a stream. Sed then performs the instructed actions on the stream. This guide gives an overview of the sed command and how to operate it in order to successfully manipulate text in Linux.
Sed in Linux
The input stream of sed may come from either a text file or STDIN (standard input). We can work with the output of another command or work directly with a text file. The sed tool comes pre-installed on all Linux distributions.
Sed Usage Overview
The sed command follows the following structure:
|
1 |
$ sed <options> <commands> <file> |
For demonstration purposes, we’ve grabbed the text version of GPL license version 3:
|
1 |
$ wget https://www.gnu.org/licenses/gpl-3.0.txt |

The following sed command will print the content of the text file:
|
1 |
$ sed '' gpl-3.0.txt |
Here, sed is performing the operations described within the single quotes and printing the output. As there’s no option defined, sed will simply perform a blank operation and print the entire content of the file.
Sed also accepts the output from a different command as the input stream. In the next example, pipe the content of the GPL v3 text file to sed to perform a blank operation:
|
1 |
$ cat gpl-3.0.txt | sed '' |
How to Print Lines
Without any option given, sed will print all the contents of the file directly. Instead, we can explicitly send the print command to print the results directly to the standard output (STDOUT).
To print the output, use the character p:
|
1 |
$ sed 'p' gpl-3.0.txt |
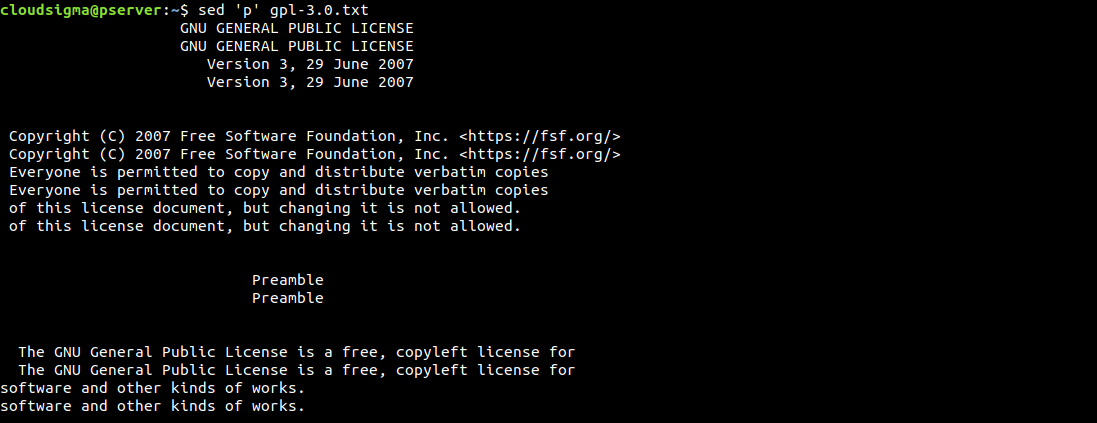
By default, sed prints the output to the screen. Because we specifically used the print command, sed will print each line twice. Sed operates line-by-line. It reads one line, performs specific operations, prints it out, and moves to the next line.
As we can see, every line is printed twice. If the result is confusing like this, we can clean it up using the -n option. It suppresses the automatic printing function. Because we are sending the print command, we don’t need the default output printing function enabled:
|
1 |
$ sed -n 'p' gpl-3.0.txt |
Regex Character Classes
In regular expressions, there are various character classes. Each of these classes has a range. Many classes also have multiple expressions. Most classes are character ranges:
-
- [a-z]: Lowercase character
-
- [A-Z]: Uppercase character
-
- [0-9]: Digits
-
- [a-zA-z]: Alphabet
-
- [a-zA-z0-9]: Any alpha-numeric character
These character classes also have different notations:
-
- [:lower:]: Lowercase character
-
- [:upper:]: Uppercase character
-
- [:digit:]: Digits
-
- [:alpha:]: Alphabet
-
- [:alphanum:]: Alpha-numeric character
For example, the following command will print all the lines that contain at least one digit:
|
1 |
$ sed -n 's/[[:digit:]]/&/p' gpl-3.0.txt |

Address Ranges
We can specify the specific part of the text stream to work with. It can be the static location of a line or a range of lines. In the first example, we will print line 5 from the GPL v3 text file:
|
1 |
$ sed -n '5p' gpl-3.0.txt |

Instead of a single line, we can also specify a range of lines to work with. Here, we’ve given the address range from line 5 to line 9 (total 5 lines) that sed will work on:
|
1 |
$ sed -n '5,9p' gpl-3.0.txt |

There are also different ways of specifying the line address. Instead of determining the line numbers ourselves, we can rearrange the previous example so that sed will start from line 5 and operate on the next 5 lines:
|
1 |
$ sed -n '5,+5p' gpl-3.0.txt |

Another way to specify lines is by using intervals. In the next example, sed will start from line 1 and operate on every other line:
|
1 |
$ sed -n '1~2p' gpl-3.0.txt |
Text Deletion
So far, we have worked on printing target text lines. Instead of printing, we can remove the lines from the output. In the following example, we’ll remove multiple lines from the start. Here, we don’t need to use the option -n because we want sed to print everything else that’s not deleted. For line deletion, we will use the option d:
|
1 |
$ sed '1~2d' gpl-3.0.txt |

Note that the source file is still intact. Sed is just performing the line deletion during the output. If you want, you can save the sed output to a file. You can overwrite the original file or save it as a different one:
|
1 |
$ sed '1~2d' gpl-3.0.txt > gpl-3.0.modified.txt |
Instead of manually writing the output to a file, sed can perform an in-place edit on the original file. In short, sed will edit the original file and write any changes made. This method will overwrite the original file, so it should be used with care:
|
1 |
$ sed -i '1~2d' gpl-3.0.txt |
Because in-place editing is dangerous, sed comes with the backup feature. When performing in-place edits, use -i.bak instead of -i to make a backup before editing. Sed will create the backup file with .bak extension:
|
1 |
$ sed -i.bak '1~2d' gpl-3.0.txt |
Text Substitution
This is, by far, one of the most common implementations of sed. It searches for a text pattern and replaces the pattern with a given text. Here, the text pattern is described in regular expressions (regex for short). To learn more about using regex follow this tutorial that outlines how to use Grep with regex to search for text patterns in files.
Here’s an example of the most basic text substitution using regex:
|
1 |
$ 's/<search_pattern>/<replacement>' |
Here, s is the command for substitution. The slashes are delimiters for the pattern and replacement. Let’s put it into action:
|
1 |
$ echo "hello world" | sed 's/hello/HELLO/' |
![]()
The next example will be demonstrating the usage of the underscore (_). Here, the underscores will act as delimiters:
|
1 |
$ echo http://example.com/index.html | sed 's_com/index_net/home_' |
Here, we’re searching for com/index to change with net/home. Note the placements of underscores as they are very crucial. For example, if you’re missing the last underscore, sed will throw an error:
|
1 |
$ echo "http://www.example.com/index.html" | sed 's_com/index_net/home' |
![]()
We need a dummy file to practice some substitution. Here, I have a cropped version of the GPL v3 text file:
|
1 |
$ cat gpl-3.0.cropped.txt |
Let’s perform some basic text substitutions:
|
1 |
$ cat gpl-3.0.cropped.txt | sed 's/GNU/GNU is Not Unix/' |
Have a look at the next example. We want to change all the instances of the to THE :
|
1 |
$ echo "the the quick brown fox jumps over the lazy dog" | sed 's/the/THE/' |
![]()
Notice anything? Sed didn’t change all the instances of the. In fact, it’s only the first instance. What’s going on? This is the default behavior of the option s. It matches only the first instance of a given line and moves to the next. To ensure that sed checks the entire line for the search pattern, we need to use an optional flag g. Let’s fix the command:
|
1 |
$ echo "the the quick brown fox jumps over the lazy dog" | sed 's/the/THE/g' |
Now it’s working as intended. Another interesting way of using the command is specifying the number of instances to change. In the previous example, there were 3 instances of the, right? How about we specify to change only the 3rd instance? The change will occur at the optional flag:
|
1 |
$ echo "the the quick brown fox jumps over the lazy dog" | sed 's/the/THE/3' |
If you’re working with a big text file, then it may help if sed printed only those lines where the substitutions took place. To achieve that, we need to add another additional flag p:
|
1 |
$ sed -n 's/GNU/GNU is Not Unix/gp' gpl-3.0.txt |

Case Sensitivity
By default, all the sed operations are case-sensitive. The following command will demonstrate the default behavior of case sensitivity:
|
1 |
$ echo "HELLO WORLD" | sed 's/hello/hElLo/' |
![]()
Because of the case mismatch, there’s no change. In such a situation, we can tell sed to disable case sensitivity. To do so, add the optional flag i:
|
1 |
$ echo "HELLO WORLD" | sed 's/hello/hElLo/i' |
How to Replace and Reference Texts
The power of sed is mostly within its capability of using regular expression. With more advanced and complex regex patterns, we can accomplish a lot more. For example, we can substitute text from the beginning of a file to a certain location. Have a look at the following expression:
|
1 |
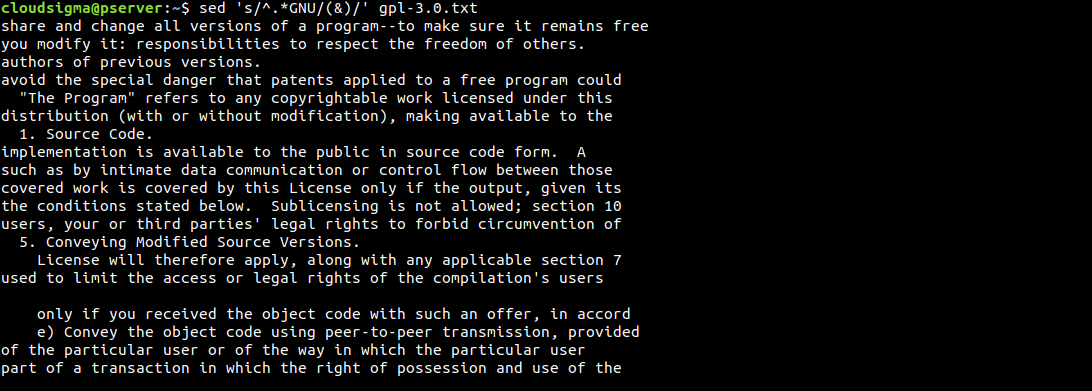
$ sed 's/^.*GNU/GNU_replaced/' gpl-3.0.txt |
Here, the caret text (^) denotes the start of the line. The match-any-character operator is signified using full-stop (.). The asterisk (*) is the wildcard expression, matching from the beginning of the line up to GNU.
Another interesting trick is using the & symbol. We can use it to highlight the areas that sed finds the search pattern:
|
1 |
$ sed 's/^.*GNU/(&)/' gpl-3.0.txt |
Final Thoughts
In this tutorial, we explored the basics of the sed command. We learned how to print specific lines, search texts, delete and replace texts, overwrite texts, and use regular expressions. A properly constructed sed command can dramatically transform a text document. You can now successfully manipulate text in Linux with the help of sed.
Happy Computing!
- How To Enable, Create and Use the .htaccess File: A Tutorial - March 8, 2023
- An Overview of Queries in MySQL - October 28, 2022
- Introduction to Cookies: Understanding and Working with JavaScript Cookies - October 25, 2022
- An Overview of Data Types in Ruby - October 24, 2022
- The Architecture of Iptables and Netfilter - October 10, 2022