
Every developer understands how crucial version control is to the software development lifecycle. It enables multiple people to work simultaneously on a single project, each person maintaining their own copy of the code and choosing when to share it with the rest of the team. To achieve this, developers make use of Git repositories to help with version control. GitLab is a web-based Git repository that’s more than a version control tool. It further provides DevOps tools, issue-tracking, continuous integration, and deployment.
GitLab offers three options you can choose from: GitLab Community Edition (CE), GitLab Enterprise Edition (EE), and Gitlab SaaS. GitLab CE and GitLab EE are self-managed solutions. This means you get to download, install and manage the GitLab instance yourself. GitLab SaaS is hosted by GitLab Inc. Thus, you don’t have to worry about installing anything to use it. You only need to create a GitLab account and get started.
In this tutorial, we will show you how to set up Continuous Integration pipelines with GitLab CI to monitor your repositories for changes and run automated tests to validate new code. We will start by setting up a Git repository to host the code. Then, we will configure a CI process to monitor commits to the repository and initiate a CI runner to run the tests in an isolated Docker container.
Prerequisites
To start, you will need a server running the GitLab version control software. Both GitLab self-managed and SaaS can run automated tests. However, there are some limits in terms of minutes and resources made available to your tests in the free SaaS options. You have more freedom if you are using the self-managed options because you can allocate as many resources as you wish to your GitLab instance. Follow our tutorial on hosting your own Git Repositories with GitLab to learn how to set up your own GitLab instance.
You will need at least one server to use as a GitLab CI runner. However, if you want you can have more servers as well. If you have set up a self-managed GitLab instance, you can use the same server, but we prefer setting a different server for the CI runner. This tutorial on How to Set up your Ubuntu server is a good start.
You will need Docker installed on your GitLab CI runner servers to isolate the testing environments in Docker containers. We have a tutorial on How to install and Operate Docker on Ubuntu that can help you complete this requirement.
Now that we have everything we need, let’s start!
Step 1: Create a Project on a GitLab Instance
We will start by creating a project repository on GitLab. We are going to base this tutorial on a Node.js application. Since we do not want to create the project files from scratch, GitLab offers a tool to import projects from other version control repositories that we will make use of. The application we are importing is a simple “hello world” app built with Express.js – a minimalist web framework for Node.js applications. We will be implementing the tests using Mocha and Chai – these are JavaScript frameworks used for unit testing. Mocha enables asynchronous testing, test coverage reports, and can be paired with other assertion libraries. Chai is an assertion library. It can be paired with any test framework, for our case, we will be pairing Mocha with Chai.
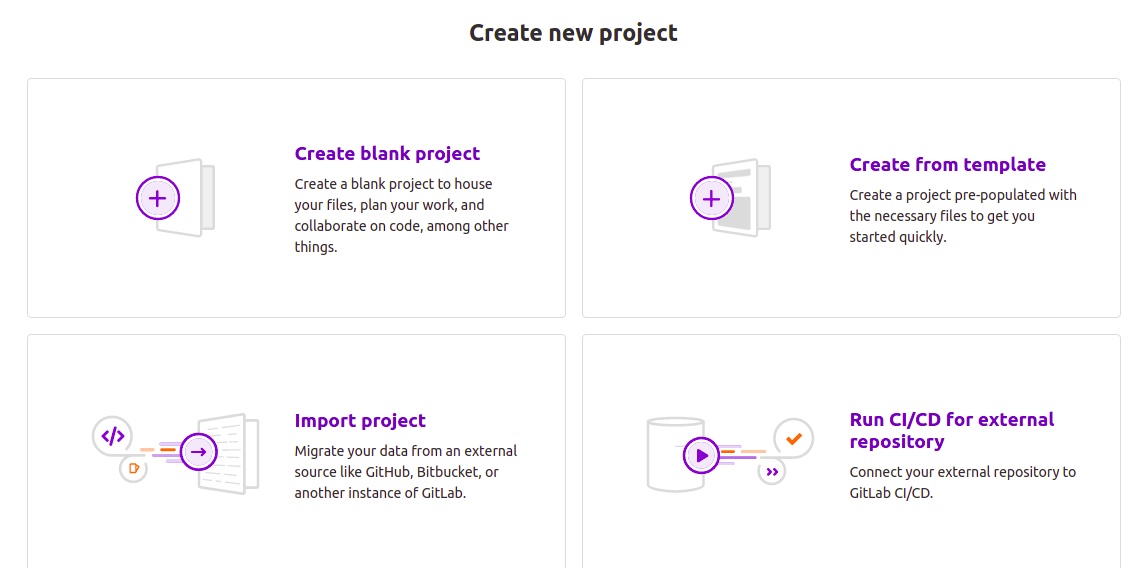
Now that you know the basics of our project, log in to your GitLab instance (whether self-managed or SaaS), click on the ‘plus’ icon on the top navigation bar, and select ‘New project’. Optionally, if you scroll to the top of your account’s homepage, you can click on the ‘New project’ button:

On the new project page, click on the Import project tab:
Next, in the opened page, click on the Repo by URL button:
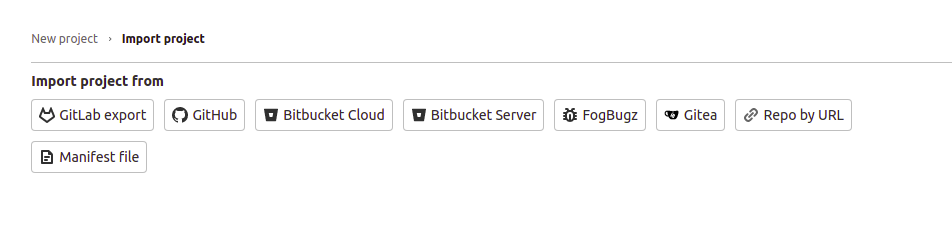
While there’s a GitHub import option, we are not going to use it since it requires a Personal access token. We don’t need to set up Personal access tokens since we are working with a public repository, and importing with just the URL is straightforward.
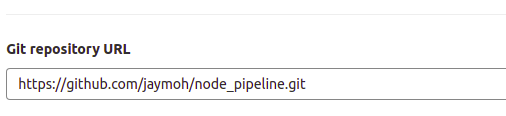
After that, copy the following URL and paste it into the Git Repository URL field:
|
1 |
https://github.com/jaymoh/node_pipeline.git |
It should look like this:
Leave the repository as Private and click the Create project button when you are finished. Wait for a couple of seconds for the project to be imported from GitHub and it will appear among your GitLab repositories. GitLab imports the project with the same details as the GitHub repository project.
Step 2: Analyzing the .gitlab-ci.yml File
GitLab CI scans through every repository on GitLab for a file called .gitlab-ci.yml to know how it should run automated tests. In the repository we just imported, you can see a .gitlab-ci.yml file among the project files. You can find more info about the GitLab CI yml on their official Keyword reference for the .gitlab-ci.yml file docs.
While in the GitLab repository interface, click on the .gitlab-ci.yml file to open it in the browser page. It should look like this:
|
1 2 3 4 5 6 7 8 9 10 11 12 13 14 15 16 17 18 19 |
image: node:latest stages: - build - test cache: paths: - node_modules/ install_dependencies: stage: build script: - npm install artifacts: paths: - node_modules/ test_with_mocha: stage: test script: npm test |
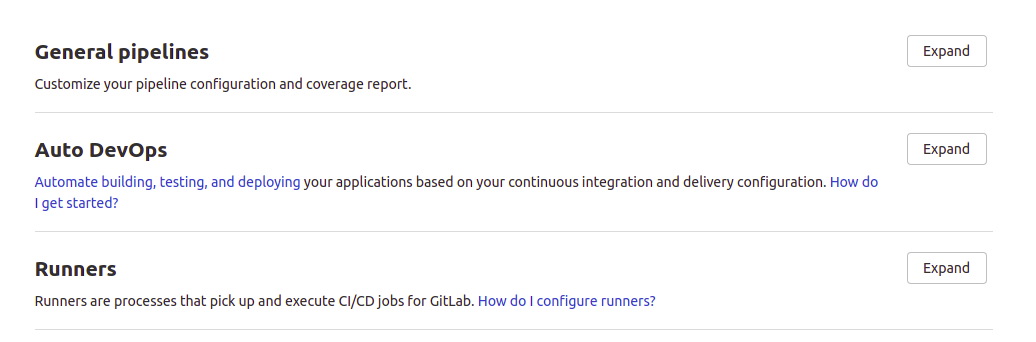
Notice the indentation of the lines. The file follows a strict GitLab CI YAML configuration syntax to define the various actions to be taken, in a specified order under certain conditions. To ensure that your configuration files are correct, GitLab provides a test utility for validation. Inside your GitLab instance, in your project repository, you can visit the CI lint interface to validate your .gitlab-ci.yml. Click on CI/CD on the left navigation menu, and click on the CI lint button in the page that appears:
The directives in the configuration file are discussed below.
-
Base Docker image
The first line in the configuration file declares a Docker image that should be used to run the tests. Since we are building a Node.js application, we are going with the latest Node.js image:
|
1 |
image: node:latest |
-
Stages
Then, we define the different stages we want our continuous integration tests to pass through. We have only two stages:
|
1 2 3 |
stages: - build - test |
While defining the stage names, the names like build or test are randomly chosen – you can choose any name you like. However, you must order the stages properly because that determines the flow of execution. In our case, the jobs in the build stage execute before the jobs in the test stage. GitLab runner will execute jobs in the same stage in parallel and will wait for all the jobs to complete before it starts executing jobs in the next stage.
-
Cache
A cache definition is included to specify the files and directories that will be cached or saved for later use between the job runs:
|
1 2 3 |
cache: paths: - node_modules/ |
Defining caching helps minimize the time taken to run jobs that rely on resources that are unlikely to change between runs. We specify the node_modules directory to be cached. This is the directory in which npm installs the dependencies for the project.
-
Jobs
We have two jobs in the configuration:
- install_dependencies
|
1 2 3 4 5 6 7 |
install_dependencies: stage: build script: - npm install artifacts: paths: - node_modules/ |
npm install with the commands in the test stage. We only separated them to help demonstrate how jobs interact since this is quite a small project. The stage directive marks this job as build – it’s run in the build stage.
The script directive specifies the commands to run in this job’s execution. You can specify multiple commands by adding lines within the script block. Of course, you need to be careful about properly indenting, and keeping in mind the order in which the scripts should be executed.
The artifacts directive specifies files or directory paths to save and share between stages. Again, a reminder that ordering the stages properly is crucial to ensuring other files will have what they need to execute. The npm install command will install the dependencies in the node_modules directory. By declaring it in the artifacts, we make it available to jobs executed in subsequent stages. The files are also made available in the GitLab UI if you would like to download them.
- test_with_mocha
|
1 2 3 4 5 |
test_with_mocha: stage: test script: -npm start -npm test |
test stage. Since this job runs after the job in the build stage has run, the artifacts declared in the build stage (which are the dependencies for our app) will be available to the test stage. The script block specifies the npm commands to run our tests. We first start our application and then run the tests against the application. Running these commands fires the commands specified in the package.json script block section:|
1 2 3 4 |
"scripts": { "start": "node app.js", "test": "mocha" }, |
.gitlab-ci.yml file. We say basic because this is only a static hello world app. Next, let’s see how we can trigger a new CI run.
Step 3: Triggering a GitLab CI Run
You will be happy to know that once your repository has the .gitlab-ci.yml file, any new commits you push to it will trigger a new Continuous Integration run. For the case of self-managed GitLab instances, if you have not configured a GitLab runner, the CI run will be set to “pending”.
GitLab SaaS gives users some shared runners that can pick up their jobs and execute them automatically. This is only possible if the shared runners are free and you have not exceeded your quota. In GitLab SaaS, you can choose whether you want your repository to use the shared runners or not by going to your project’s Settings > CI / CD page as shown in the screenshot below. In this page, you will also find information on GitLab runner installation instructions which we will delve into in the next step:
Now, let’s make a small change to trigger a CI run. Navigate back into your node_pipeline GitLab project repository:
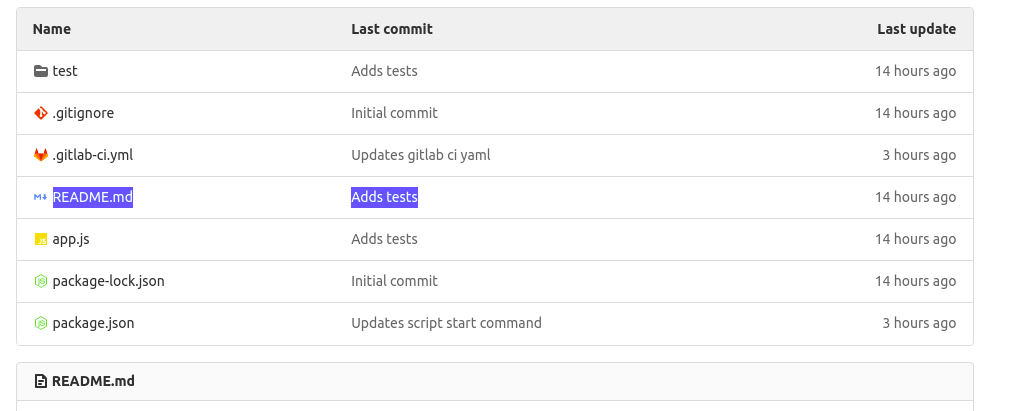
Click on the README.md file highlighted above to view it:

Click on the ‘Edit’ button to open the file for editing in the browser, and add some text:
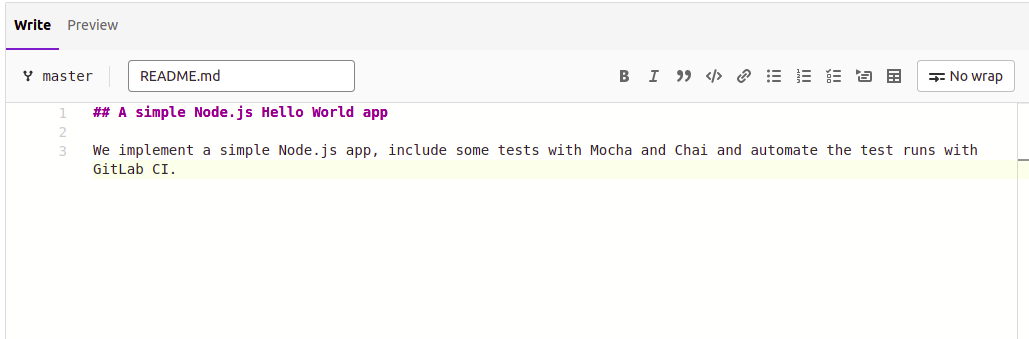
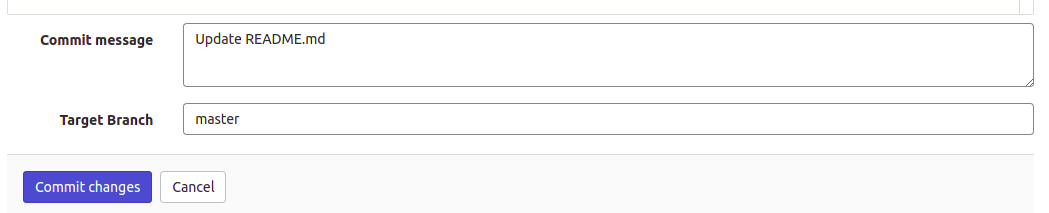
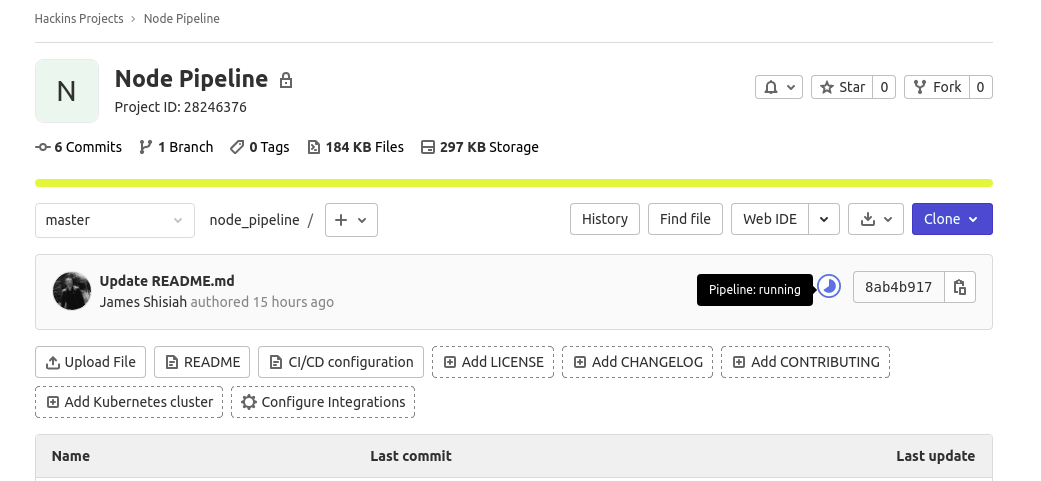
Once you have added some text, scroll down and click the Commit changes button to save the changes. You can modify the commit message as you wish. It will appear as a title in the GitLab UI when the pipeline is running. We have left it as Update README.md as it’s quite descriptive:
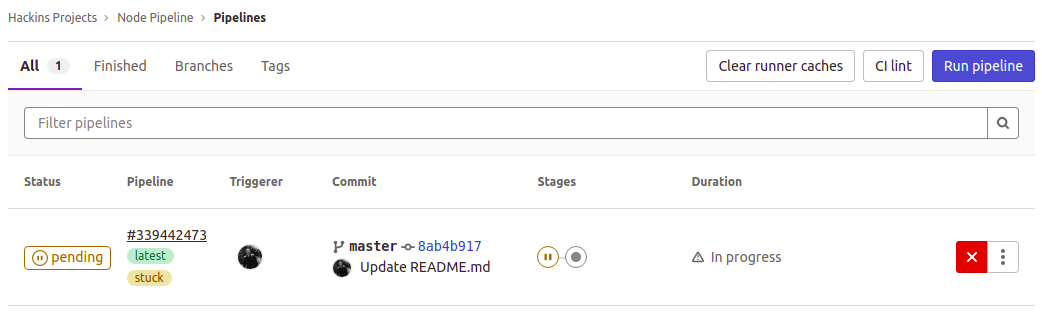
Once you have committed the changes, return to the main project page. You will notice a small paused icon attached to the most recent commit. If you hover your mouse over the icon, it will display: ‘Pipeline:pending’:

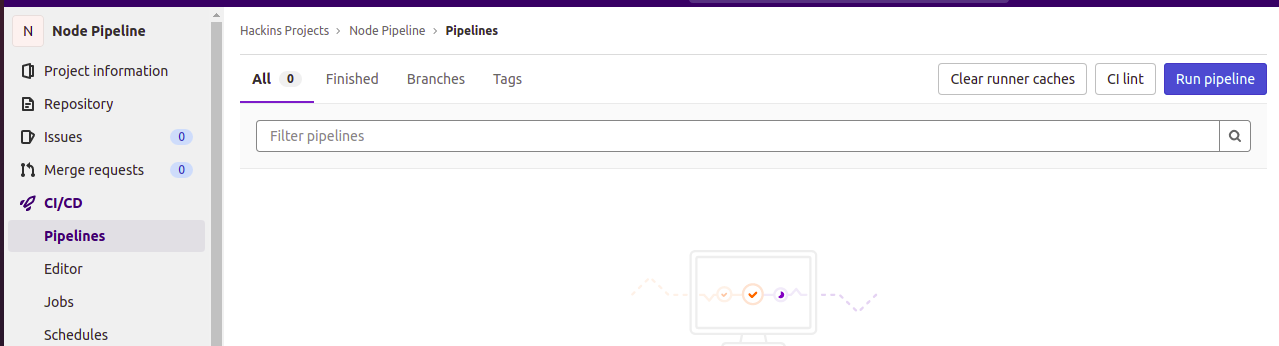
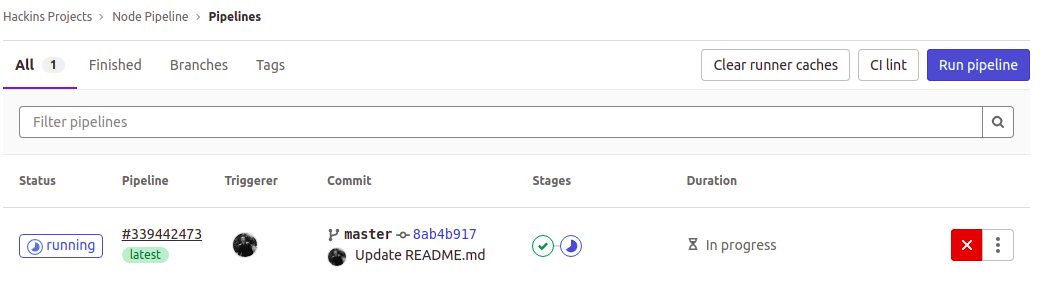
This means that the CI run was triggered. However, the tests have not been run yet. In the navigation menu on the left, click on CI/CD, then select Pipelines. This will open a page showing more details about the pipeline. You can see that CI is pending and marked as stuck:
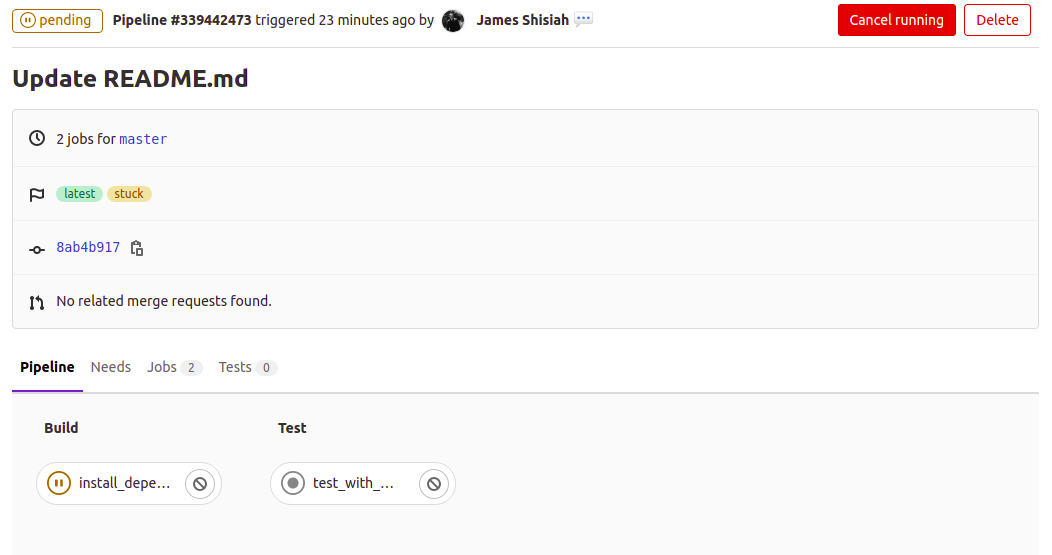
To get more details about the run, click on the pending status. Yow will see the view below, displaying the different stages of the run, and the individual jobs linked to each stage:
You can also click on individual jobs to see its finer details like what’s causing the delays. In the case of failed runs, here is where you will see what caused the job to fail:
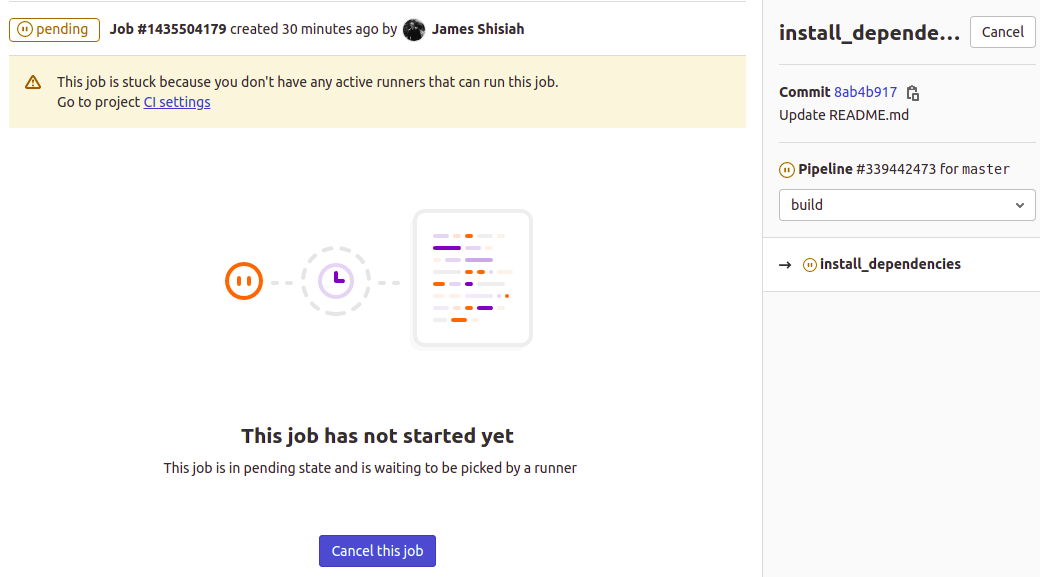
The message indicates that the job is stuck because you have not configured any active runners that can execute this job. We will be doing that in the next step. When you make a runner available, the job will start executing automatically. When a job executes, you will see the output on this interface as well as the other downloadable artifacts generated when the job was running.
Step 4: Setting up a GitLab CI Runner Service
It is now time to make use of the second server we declared in the Prerequisites section of this tutorial. We will be installing and setting up a GitLab runner service on this server. You can deploy the service to run multiple runner instances for different projects on GitLab.
You have the option to deploy the runner on the same server that hosts your self-managed GitLab instance. However, to ensure an instance is not limited by resources, it’s preferable to set up a separate CI runner instance. Whichever configuration you choose to go with, Docker must be installed to isolate the test environments.
The process for installing the GitLab CI runner is comparable to the one for installing the GitLab self-managed instance. We start by downloading a script to add the official GitLab repository to the apt sources using the following command:
|
1 |
curl -L "https://packages.gitlab.com/install/repositories/runner/gitlab-runner/script.deb.sh" | sudo bash |

Provide your root password when prompted. Next, you can now run the command to install the latest GitLab CI runner:
|
1 |
sudo apt-get install gitlab-runner |

The above command installs and registers a runner service ready to be used by your projects.
Step 5: Obtaining Registration Tokens and Linking the GitLab Runner
To set up a GitLab CI runner to start accepting jobs, you need a GitLab runner token. It is needed for the runner to authenticate with your GitLab server instance. There are two types of tokens depending on how you want to use the runner: project-specific and shared runner.
Project-specific runners are applicable if you have unique requirements for the runner. For example, if you have deployment definitions in your gitlab-ci.yml with unique tokens, then a specific runner may be recommended to authenticate correctly into the deployment environment. Another consideration is if your continuous integration stages have resource-intensive processes. Then, it would be ideal to go with a project-specific runner. Note that, a project-specific runner does not accept jobs from other projects.
Shared runners are general purpose and can be used by multiple projects. The GitLab SaaS instance hosted on GitLab Inc has some shared runners that will automatically pick up your pipelines as explained in Step Three. Runners take jobs from your configurations based on an algorithm that accounts for the number of jobs currently being executed for each project. A shared runner is more flexible than a specific runner. It can be configured from the admin account of the GitLab instance. Let’s see how we can go about getting the tokens for both runners.
- Registering a Project-Specific Runner
To register a project-specific runner, open your project in your GitLab instance or GitLab SaaS account. From the navigation menu on the left, click the Settings item and select CI/CD option:
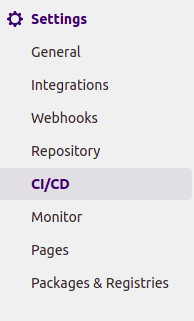
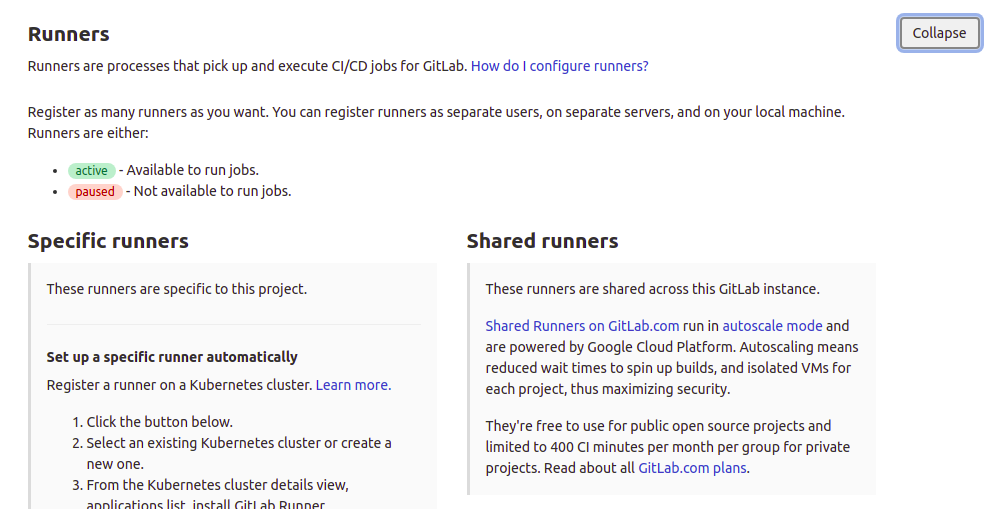
After that, scroll down to the Runners section and click the button to expand the section:
The left side explains how to register a project-specific runner. This is a view of the GitLab SaaS instance. You may also configure automatic runners with Kubernetes, but we are doing the manual runner for this tutorial:
Next, you need to focus on the section where you are given the token for this project. For a self-managed GitLab instance, the URL will display the domain of the server on which your GitLab instance is running on:
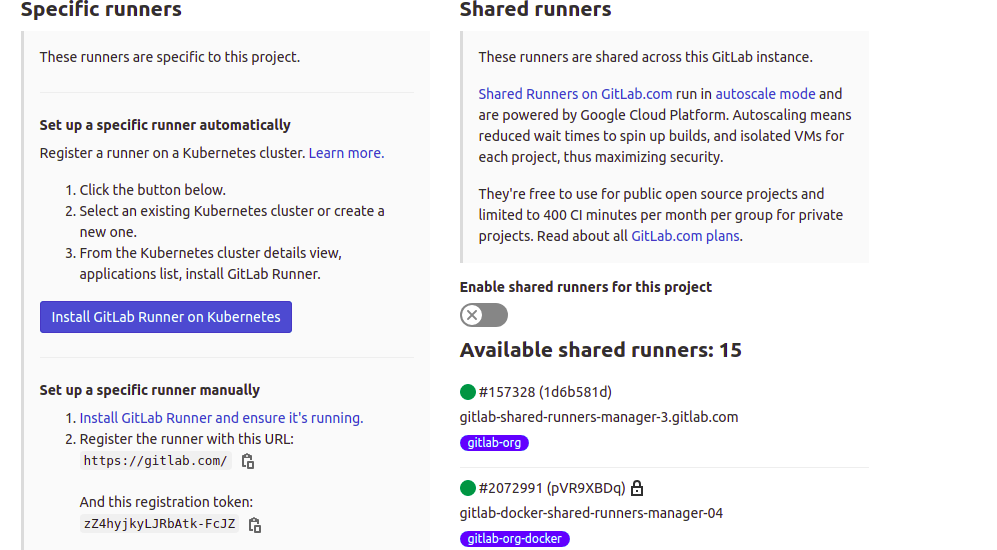
You can choose to disable shared runners for this project by flipping the switch on the right-hand section under Shared Runners. Then, copy the registration token displayed to your notepad, as we will use it later.
- Registering a Shared Runner
To register a shared runner, you need to log into your self-managed GitLab instance as an admin. To access the admin panel, click the wrench/spanner icon in the top navigation menu:

In the Admin Panel, click on Runners in the Overview section of the left-hand menu. This will open a page with the Shared Runners configurations instructions:
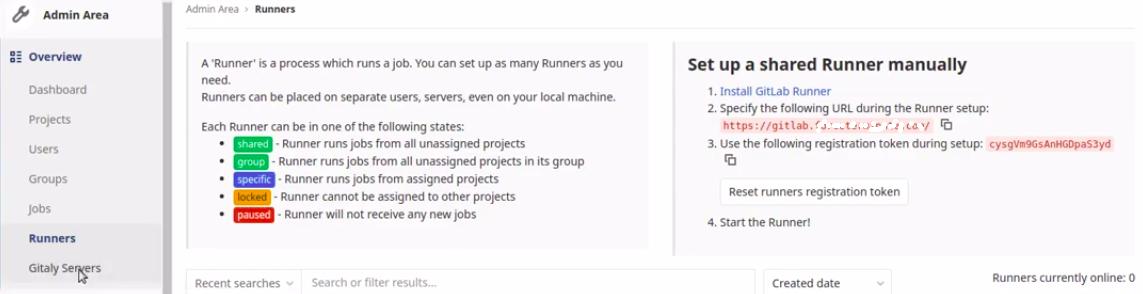
Copy the registration token displayed on the right-hand side under Set up a shared Runner manually. You will use the token to register the runner in the next step.
- Linking a GitLab CI Runner with a GitLab Instance
In this step, you will link your GitLab instance with the CI runner. Log back into the server where you installed the GitLab runner service in Step Four. To start the runner registration process, enter the following command in your terminal:
|
1 |
sudo gitlab-runner register |
The command prompts you with a series of questions:
- Enter the GitLab instance URL (for example, https://gitlab.com/):
Provide your GitLab instance’s domain name using https:// to specify SSL.
- Enter the registration token:
Provide your registration token. Here is where you will choose whether you want this runner to be project specific or shared. You can only provide one of the tokens you copied earlier for either of the options.
- Enter a description for the runner:
Choose a descriptive name for your CI runner as it will appear on the GitLab instance UI.
- Enter an executor: custom, docker-ssh, parallels, virtualbox, docker, shell, ssh, docker+machine, docker-ssh+machine, kubernetes:
Here, it provides you options to choose an executor to run the jobs. Enter Docker.
- Enter tags for the runner (comma-separated):
This is optional. You can enter any tag names such as dependencies this runner includes. You may leave it blank for now.
- Enter the default Docker image (for example, ruby:2.6):
Here, you are expected to specify a default general purpose image used to run jobs in case the gitlab-ci.yml file does not specify an image. Enter alpine:latest since it’s a small, general purpose, and secure image. Press enter and the runner will be registered and started automatically:
To view the list of runners currently available, enter the following command:
|
1 |
sudo gitlab-runner list |
Step 6: Confirming the CI Runner is Successfully Linked in GitLab
Next, return to your browser and visit your project page in the GitLab instance. Depending on how many minutes have passed since you registered the runner, you may see the job is currently running:
Or it may have been completed:
After that, navigate to the Pipelines page either through the left menu CI/CD > Pipelines, or by clicking on the running, passed, or failed icon (if the pipeline encountered errors) to view the state of the CI run. Here we can see one of the stages (build stage) has passed, while one is still running:
In the table, under the Stages header, click on one of the stages icons to view the associated jobs:

Then, click on a job in the pop-up to view details:
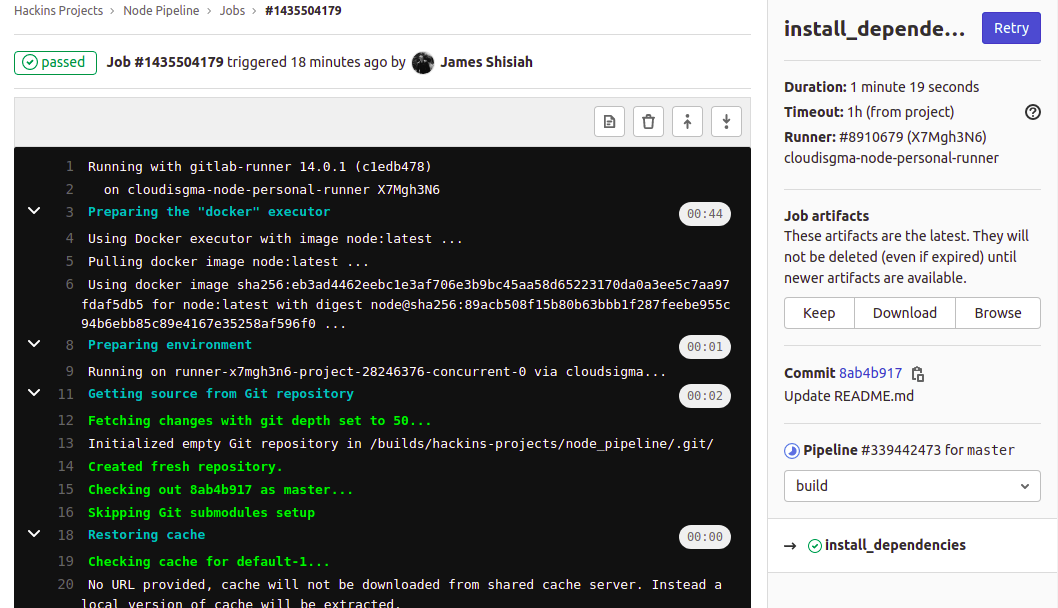
The job ran and you can see the progress when the npm command was installing the dependencies. To the right-hand side, you can view other related information. You have an option to download the artifacts from the job. You can also switch between stages to view other jobs from the dropdown.
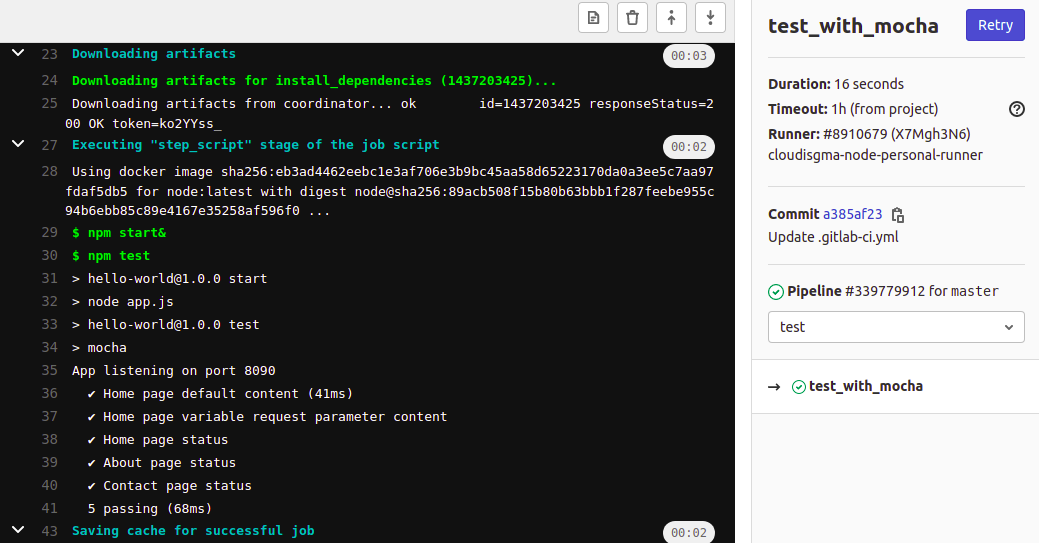
Here, you can view our test cases showing when you select the job in the test stage:
Available Runners
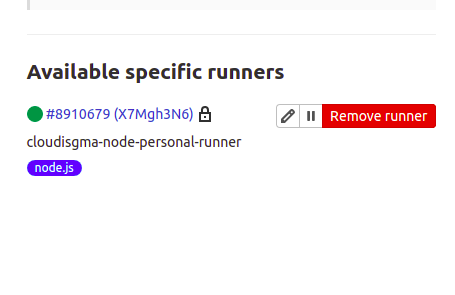
On the left-hand menu, if you click Settings > CI/CD, and expand the Runners section, you should see the runner you have just registered. Depending on whether you had specified a project-specific token or a shared token, the runner will appear in either section respectively.
Here you can see that we registered a project-specific token. The runner appears under Specific Runners:
Conclusion
In this tutorial, you learned how you can automate your tests with GitLab CI. We started by setting up a Node.js app project on GitLab. The project included some test cases and a gitlab-ci.yml. We learned that GitLab uses the gitlab-ci.yml file to determine what to do when it’s triggered. A gitlab-ci.yml file is just a configuration file that contains instructions on building and testing applications, written in YAML format that a GitLab CI runner can understand.
We also managed to set up a GitLab CI runner on a separate host. We registered it to take jobs from our GitLab instances whenever there is a trigger. While this was a simple project, you can build on this information to set up pipelines for complex projects. The steps for adding a project to GitLab and linking a GitLab CI runner remain the same. The things that change are the instructions and stages in the gitlab-ci.yml file.
Happy Computing!
- How To Enable, Create and Use the .htaccess File: A Tutorial - March 8, 2023
- An Overview of Queries in MySQL - October 28, 2022
- Introduction to Cookies: Understanding and Working with JavaScript Cookies - October 25, 2022
- An Overview of Data Types in Ruby - October 24, 2022
- The Architecture of Iptables and Netfilter - October 10, 2022