

This is the first in a series of brief how-to tutorials. The series will cover some of the most used features of our cloud. We hope you find them useful in getting from A to B with your cloud computing at CloudSigma.
CloudSigma offers two approaches to server creation – a quick and simple creation process and a detailed, flexible and extremely granular custom one. The ‘simple server creation’ is the topic of this tutorial.
Using this process, you can quickly create a server from a predefined list of sizes and available operating systems and applications. In addition, the quick server creation process takes less than 30 seconds with a provisioning time of 15 seconds. A new server can be configured, provisioned and accessible in under one minute using this method.
Step 1: Select a server size
Based on your requirements, you can select between a number of server sizes. Bear in mind that during your trial, the amount of free resources you have available will restrict you.
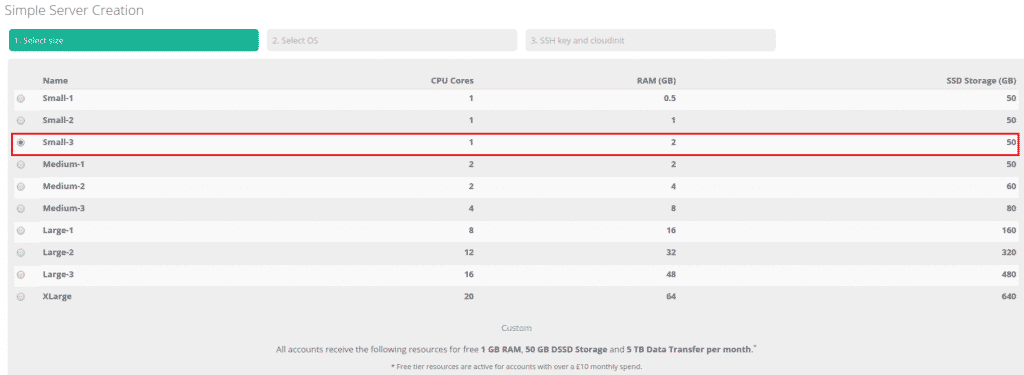
Simple Server Creation
If your preferred server size is not available in our list, you can always use the ‘custom server creation’. In case you encounter any difficulties with that option, please do not hesitate to contact our free and friendly 24/7 customer support in the live chat.
Step 2: Select a pre-installed OS image to deploy
As a next step, you can choose the operating system you wish to deploy. The cloud optimizes the server settings automatically based on your choice of operating system.
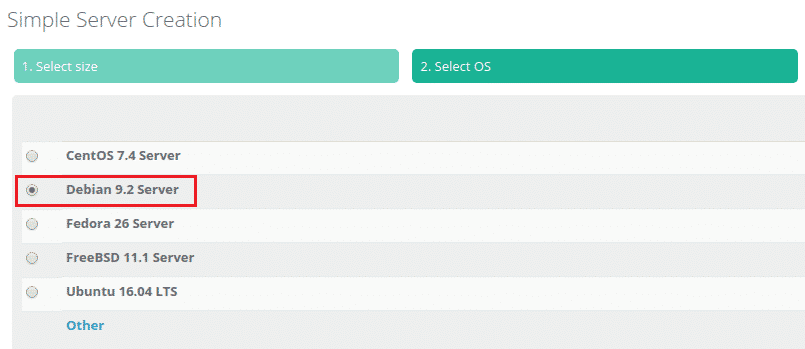
Simple Server Creation
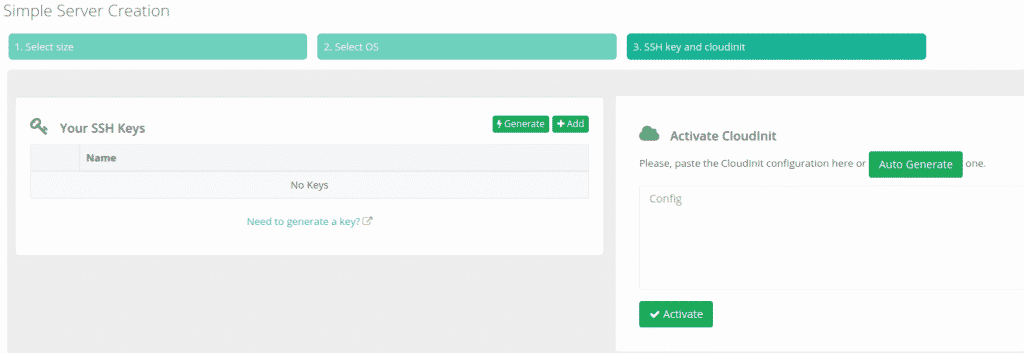
Step 3: Add an SSH key
If you are using Linux you can choose to have an SSH key injected on first boot-up into yoru new server. This will also disable password login.
Additionally, please note that CloudSigma is an Ubuntu certified cloud and as such all pre-installed images are validated and deployed only with SSH access initially. Learn more about CloudSigma’s Ubuntu Certified Cloud Partnership.
Next, you can choose to add a key from your account that’s already uploaded or paste a new public key into the server creation process.
Server is running
Step 4: Deploy your server
After this, the cloud server will automatically be created with associated storage and networking and will be booted up. You should use your details such as the username when you log in to the server. Also, you will find the VM’s public IP address once the server is up and running.

Server is running
Step 5: Open VNC
Where appropriate (i.e. if you didn’t add an SSH key during server creation), we can open a VNC connection in the browser to allow you immediate access:

Server is running
- To access your server via the in-browser VNC. Click on the ‘Open VNC’ button
- To access your server via VNC. You are provided with the public IP of your server along with your login credentials
- View your server’s detailed installation instructions by clicking on ‘Install Notes’
- Click ‘Take me to my server’ to open the summary view of your new server
That’s it. If you prefer to watch a video version of this tutorial – just have a look at it on Youtube:
If you have any questions or inquiries, please do not hesitate to contact your personal account manager or our friendly 24/7 customer support in the live chat.
Happy computing!
- CloudSigma How To Series: CloudSigma Customer Support - February 26, 2018
- CloudSigma How To Series: Simple Server Creation - February 21, 2018