

With our sponsorship of EuroBSDcon 2013, a blog-post on the topic of FreeBSD, NetBSD, and OpenBSD felt in order.
If you didn’t already know it, we’re one of the few cloud providers in the world that allows you to run unmodified FreeBSD, NetBSD and OpenBSD (including derivatives, such as pfSense).
If you simply want to take one of these systems for a spin, the fastest way is to simply clone one of these images from our drives library. That way you can get up and running in minutes. There are installation notes available for these images that you should take a look at prior to booting them. The installation notes include how you can retrieve the password etc.
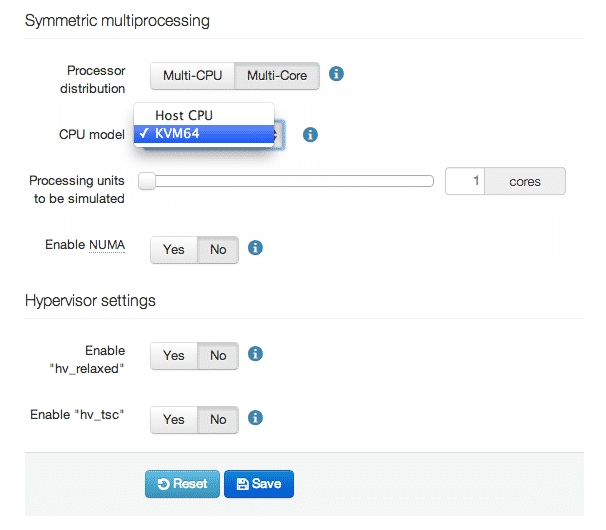
When you create the server, it is also important that you go to ‘Advanced’ tab of the server set-up and set the ‘CPU Model’ to ‘KVM64’. Otherwise, you will not be able to boot the system (more about that below). Also, make sure to attach the drive as Virtio (and not IDE). (If you’re not familiar with Virtio, it is basically an I/O drivers optimized to run in a virtualized environment that gives you better performance.)
Installing FreeBSD yourself
Many technical users prefer to install the system themselves from scratch (including yours truly). This gives you a greater level of control of how things are set up, as well as the ability to determine the size of the disk, and how the partitions are set up without having to jump through hoops.
Server setup
When setting up the server, the are a few things you need to keep in mind.
For FreeBSD (version 9.1/8.3 and earlier):
Both OpenBSD and NetBSD supports Virtio out-of-box. FreeBSD 9.1 however, doesn’t (but FreeBSD 9.2/8.4 does). As a result, during the installation, you will need to attach both your installation medium and hard drive using IDE.
You also need to detach the network interface that is attached to the server (since it is using Virtio) and replace it with something else, such as an Intel Pro/1000.
All:
The next thing you need to change is the CPU passthrough. As of this writing, none of the BSD systems play well with the host CPUs we are using which are pretty new. As a result, you will need to go to ‘Advanced’ -> ‘CPU Model’ and set it to ‘KVM64’ (see ‘Kernel trap 12 with interrupts disabled’ below).
With these settings, you should be able to boot up and run the installer.
FreeBSD: Installing the Virtio driver (version 9.1/8.3 and earlier)
On FreeBSD, installing the Virtio drivers are simple. Assuming you have your ports-tree installed:
[bash] $ cd /usr/ports/emulators/virtio-kmod$ make clean install
[/bash]
With that installed, simply follow the post-installation instructions.
After you’ve followed the instructions, power off the machine, and detach the network and system disk, and re-attach them with the same disk using Virtio.
You’re done!
That’s it. You should now have your own installation of you favorite BSD version up and running on our cloud.
Kernel trap 12 with interrupts disabled
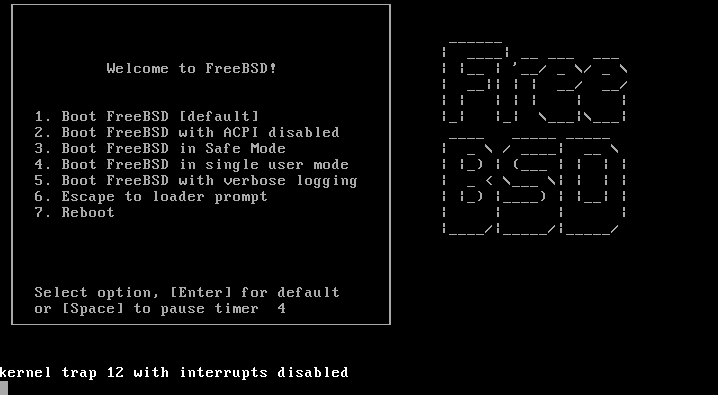
If you receive the above error when booting up your system, don’t worry. This has to do with the CPUs used on our host systems. The solution is simple. Power off the server, go to ‘Advanced’ and change the ‘CPU Model’ to ‘KVM64.’
With that done, you should be able to boot up the server without any issues.
As always, if you’re having any issues or feedback, please leave a comment below.
Happy hacking!
Update: Thanks @freebsdhelp for pointing out that FreeBSD 8.4 comes with Virtio.
Update 2: FreeBSD 9.2 was released after this article was published, and it comes with Virtio built-in.
- Manage Docker resources with Cgroups - May 12, 2015
- Docker, Cgroups & More from ApacheCon 2015 - April 30, 2015
- How to setup & optimise MongoDB on public cloud servers - March 24, 2015
- Presentation deck from CloudExpo Europe - March 17, 2015
- CoreOS is now available on CloudSigma! - March 10, 2015