In Go programming, packages are one of the most powerful features. Packages help maintain a large number of programs by grouping them together into single units. This makes code maintenance much easier. This modular approach also allows better code sharing and reuse.
In this guide, we will learn about writing our own Go packages and implementing them in our projects.
Prerequisites
This tutorial assumes that you have the following preconditions fulfilled:
- A properly-configured Linux system (Ubuntu server, in this case). Learn more about setting up your personal Ubuntu server on CloudSigma.
- A properly-configured Go programming environment (installing the latest Go, configuring the environment variables, etc.). Learn more about installing Go on Ubuntu 20.04.
- A modern text editor with quality-of-life features like code highlighting. For example, Atom, VS Code, Brackets, Sublime Text, Vim, etc. For this guide, VS Code will be our text editor of choice.
Step 1 – Creating a New Go Project
For demonstration, a dummy project is the best option. It allows testing out our codes without jeopardizing any important code.
First, create a new dedicated directory for our dummy Go project:
|
1 |
mkdir -pv sample-go-project && cd sample-go-project/ |
Inside the project directory, run the following Go command:
|
1 |
go mod init example.com/dummy |
Here,
- The go mod init part of the command is responsible for establishing a Go project inside the current directory ( sample-go-project, in this case).
- The example.com/dummy part of the command describes the virtual path of the project. This path does not exist physically. However, it’s going to be important when referring to the location of packages within the project.
Note that it’s generally expected to create your Go projects under the location $GOPATH/src.
From the command line, launch VS Code:
|
1 |
code . |
VS Code will treat the current directory as a project and act as such. Note that the Go project contains a file go.mod. It incorporates the virtual path example.com/dummy we described earlier. This file will tell the Go project location at the virtual path instead of using its physical path in the filesystem.
Step 2 – Creating a Simple Go Program
Next, we are going to populate the project with a simple Go program. Create a new file main.go.
Enter the following code:
|
1 2 3 4 5 6 7 8 9 |
package main import ( "fmt" ) func main() { fmt.Println("hello world") } |
Here,
- The file
main.go will be treated as the entry point for our project:
- It incorporates the main package.
- It hosts the main() function.
When run, the expected result is a text output on the console screen (
"hello world"). From the project directory, run the following command:
|
1 |
go run . |
Go will find the entry point to the project (the main package hosting the main() function) and run the project.
Step 3 – Package Directory
Create another file
another.go under the same project directory and enter the following code:
|
1 2 |
package names var Name = "Jordan" |
Then, try to run the project:
|
1 |
go run . |
The Go interpreter throws an error describing that there are two packages ( names in another.go and main in main.go) within the same directory. It’s because there can be only one package under the same directory:
Let’s fix this! Change the package name for
another.go to
main:
|
1 2 |
package main var Name = "Jordan" |
Check if the project runs properly now:
|
1 |
go run . |
Note that we didn’t implement the global variable
Name anywhere in our project. Modify the
fmt.Println() function in
main.go to print the variable value:
|
1 2 3 4 5 6 7 |
import ( "fmt" ) func main() { fmt.Println("hello", Name) } |
Run the project:
|
1 |
go run . |
What have we learned so far?
- There can be only a single package in the same directory.
- Variables, functions, structs, etc. declared in one file of a package are available to other files in the package.
- Go does not have the concept of scope modifiers like public, private, protected, etc. Instead, it’s described by the capitalization of the variables, functions, structs, etc. The variable Name is capitalized, indicating that it is allowed to be accessible globally.
Step 4 – Creating a Sub-package
Having multiple packages in a Go project (especially bigger and complex ones) are common and expected. However, there can be only a single package in the same directory. In our demonstration, the main package spans over the project root directory. How do you implement multiple packages under the same project?
We can achieve this by creating new sub-directories within the project. Each sub-directory can serve as an additional package to the project. Even those sub-directories can have sub-directories (and packages, of course) of their own.
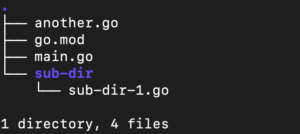
To demonstrate this, we are going to create a new sub-directory named sub-dir under the project directory sample-go-project. The hierarchy would look like this:
Within the directory, create a new Go file
sub-dir-1.go:
|
1 2 |
package subdir var TypingPractice = "the quick brown fox jumps over the lazy dog" |
Here, we have named the new package
subdir. Run the project:
|
1 |
go run . |
Step 5 – Implementing the New Package to the Main Project
Now, we need to learn how to incorporate the newly-created package ( subdir) into the main project ( main.go). It requires using the import statement to list all the packages we want to import to the project.
Update
main.go with the following code:
|
1 2 3 4 5 6 7 8 9 10 11 12 13 14 15 16 17 |
package main import ( "fmt" "example.com/dummy/sub-dir" ) func main() { fmt.Println("hello", Name) fmt.Println(subdir.TypingPractice) } |
Run the project:
|
1 |
go run . |
Here,
- We imported the package subdir and called the value of the variable TypingPractice ( subdir.TypingPractice).
- The package path is the most interesting:
- The portion example.com/dummy is the virtual path for the project root directory (defined in the go.mod file).
- However, the rest of the path sub-dir is the physical path of the package’s location. It’s not the package name but the directory name that hosts the subdir package.
- The package path consists of both virtual and physical locations of the desired package.
Step 6 – Changing Package Name
The directory sub-dir is currently hosting the package subdir with a single file ( sub-dir-1.go). What if we wanted to change the package name from subdir to something else?
To change a package name, the package name must be changed from every single Go file under the package. In our example, we simply have to modify sub-dir-1.go to change the package name. If there were more files, however, then the package name must be updated in all of them. Otherwise, the project won’t execute properly.
To change the package name from
subdir to typing, update
sub-dir-1.go as follows:
|
1 2 3 |
package typing var TypingPractice = "the quick brown fox jumps over the lazy dog" |
Update
main.go to reflect this change:
|
1 2 3 4 5 6 7 8 9 10 11 12 13 14 15 16 17 |
package main import ( "fmt" typing "example.com/dummy/sub-dir" ) func main() { fmt.Println("hello", Name) fmt.Println(typing.TypingPractice) } |
Note that the extra alias typing is auto-generated by VS Code. The code will also work without it (if you choose to omit it).
Time to test the changes. Run the project to see if the changes were successful:
|
1 |
go run . |
Final Thoughts
Writing a Go package is a simple task. A package consists of all the Go files inside the same directory. However, it can have sub-directories hosting additional packages. This guide successfully showcases how to write your own Go packages and implement them in your project. It also briefly demonstrates the scope control of variables, functions, etc. capitalization of their labels.
Are you a Go developer? The CloudSigma API is now available to implement in Go programming. You can learn more about the CloudSigma API from this link.
Happy Computing!
- Removing Spaces in Python - March 24, 2023
- Is Kubernetes Right for Me? Choosing the Best Deployment Platform for your Business - March 10, 2023
- Cloud Provider of tomorrow - March 6, 2023
- SOLID: The First 5 Principles of Object-Oriented Design? - March 3, 2023
- Setting Up CSS and HTML for Your Website: A Tutorial - October 28, 2022


