
Introduction
There are many situations where you may need a new disk on your Linux system. For the most part, creating a new disk is a straightforward process. However, things can become complicated if you are trying to tinker with partitioning schemes and filesystem formats. To help simplify the process, this tutorial will give you a step by step outline on how to do the following:
-
How to identify the new disk on the system.
-
How to create a partition on the drive.
-
How to format the partition using the Ext4 filesystem.
-
How to mount and configure auto-mounting of the filesystem.
If you would first like to get acquainted with Linux better you can read about how to install Linux on CentOS 7, how to locate files on your Linux system, as well as how to configure authentication on your Linux server.
Installation
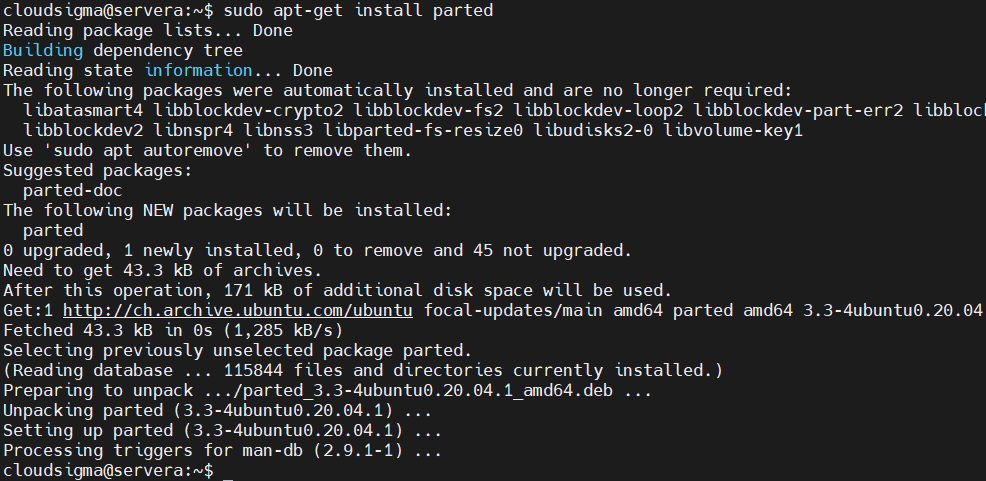
Before we begin, you need to make sure you have the right tools installed. The parted utility is used for partitioning the drive. It usually comes preinstalled on the server. If you are using Debian or Ubuntu, you can install it as follows:
|
1 |
sudo apt-get update |
|
1 |
sudo apt-get install parted |
If you are using CentOS or Fedora, type in the following to install it:
|
1 |
sudo yum install parted |
Identification of the New Disk
The first thing you need to do is identify the new disk on the server. You can find a completely new drive by looking for the absence of a partitioning scheme. For example, you could use the parted command to obtain a list of the partition layouts of all of your disks. The disks that do not have a valid partition scheme will show an error that you can use to identify a new disk. Here is what you will type:
|
1 |
sudo parted -l | grep Error |
The unpartitioned disk will show an unrecognized disk label error like so:
|
1 2 3 |
Output Error: /dev/sda: unrecognised disk label |
Another way to identify the new disk is by using the lsblk command. This will show you a list of disks on the system and you have to identify the one with the right size and no partitions:
|
1 |
lsblk |
|
1 2 3 4 5 6 |
Output NAME MAJ:MIN RM SIZE RO TYPE MOUNTPOINT sda 8:0 0 100G 0 disk vda 253:0 0 20G 0 disk └─vda1 253:1 0 20G 0 part / |
Here, we identified the first disk in the list as our new disk. Before you make any changes, make sure you check lsblk in every session. Without verifying the disk identifier, it is possible for you to format or partition the wrong disk. This is because identifiers like /dev/sd* and /dev/hd* may not necessarily be the same between boots. Hence, it is better to use identifiers like /dev/disk/by-uuid, /dev/disk/by-label, or /dev/disk/by-id.
How to Partition the New Drive
To partition the drive, you need to know the name of the kernel assigned to your new disk. The partition will run through the entire disk. Let’s begin!
-
Select a standard
First, you must choose the partitioning standard. The MBR standard is supported by a wide variety of operating systems. However, GPT is the more modern solution that is recommended in most cases, considering you do not have any special requirements. Select the GPT standard as follows:
|
1 |
sudo parted /dev/sda mklabel gpt |
In case you want to use the MBR standard, type in the following:
|
1 |
sudo parted /dev/sda mklabel msdos |
-
Create a new partition
Next, we will create the partition using the following command:
|
1 |
sudo parted -a opt /dev/sda mkpart primary ext4 0% 100% |
You can check the partition by running lsblk:
|
1 |
lsblk |
|
1 2 3 4 5 6 7 |
Output NAME MAJ:MIN RM SIZE RO TYPE MOUNTPOINT sda 8:0 0 100G 0 disk └─sda1 8:1 0 100G 0 part vda 253:0 0 20G 0 disk └─vda1 253:1 0 20G 0 part / |
How to Make a Filesystem on a Partition
Next, we will learn how to format the partition as an Ext4 Filesystem. For this purpose, we need to pass the partition to the mkfs.ext4 utility as follows:
|
1 |
sudo mkfs.ext4 -L datapartition /dev/sda1 |
As you can see, we added a partition label by passing the -L flag. Subsequently, we added a name using which we can identify our target drive. It is important to ensure that you are only passing in the partition and not the whole disk. For example, where sda would be the disk name, the partition would usually have a number at the end like sda1.
To change the label of the partition at any time, use the e2label command like this:
|
1 |
sudo e2label /dev/sda1 newlabel |
If you want to know more options to identify your partition, then run the lsblk command. Some versions of this command will show you all information including the name, label, and UUID of the partition:
|
1 |
sudo lsblk --fs |
In case this command does not show all the fields, you can find them manually with this command:
|
1 |
sudo lsblk -o NAME,FSTYPE,LABEL,UUID,MOUNTPOINT |
The output will look something like this:
|
1 2 3 4 5 6 7 |
Output NAME FSTYPE LABEL UUID MOUNTPOINT sda └─sda1 ext4 datapartition 4b313333-a7b5-48c1-a957-d77d637e4fda vda └─vda1 ext4 DOROOT 050e1e34-39e6-4072-a03e-ae0bf90ba13a / |
You can use any of the highlighted information to indicate the new filesystem.
How to Mount the New Filesystem
Finally, it is time to mount the filesystem so you can start using it. Typically, as per the recommendations of the Filesystem Hierarchy Standard, you should use /mnt or one of its subdirectories to mount filesystems temporarily. For permanent storage, we do not have any particular recommendations. Therefore, we can decide which scheme to use to mount.
For the purposes of this tutorial, we will mount the new filesystem under /mnt/data. Start by making a directory:
|
1 |
sudo mkdir -p /mnt/data |
-
Mounting temporarily
Let’s say you want to mount a filesystem temporarily. You can do this with this command:
|
1 |
sudo mount -o defaults /dev/sda1 /mnt/data |
-
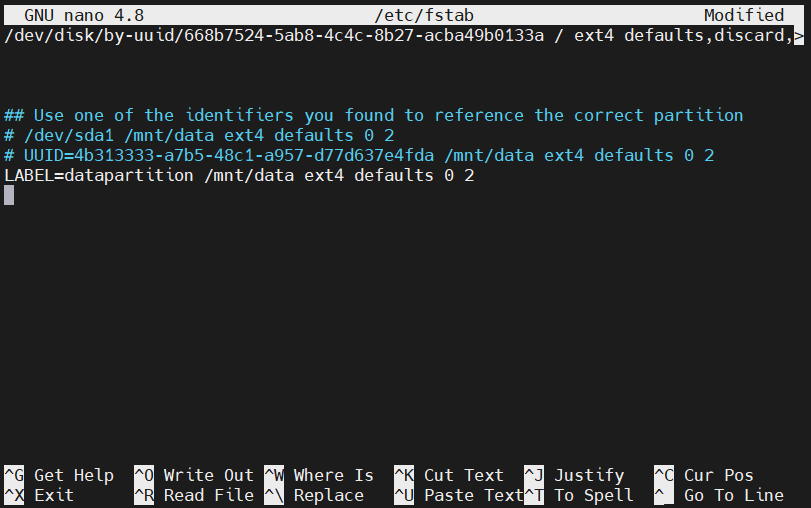
Mounting automatically at boot
You can use the following command to mount the drive automatically every time the server boots:
|
1 |
sudo nano /etc/fstab |
As you can see, we have made changes in the /etc/fstab file. In this file, you can use any of the different identifiers for our filesystem we acknowledged by running sudo lsblk --fs earlier in the tutorial. In the following example, we inserted the label of the partition. The subsequent lines also show you what it would look like if we had used either of the other identifiers:
Once you are done editing, save and close the file. If not already done, you can mount the filesystem by typing:
|
1 |
sudo mount -a |
-
Testing the mount
A good habit is to ensure your filesystem is accessible after you have mounted the volume. You can confirm this by using the df command to check if the disk is available in the output:
|
1 |
df -h -x tmpfs -x devtmpfs |
|
1 2 3 4 5 |
Output Filesystem Size Used Avail Use% Mounted on /dev/vda1 20G 1.3G 18G 7% / /dev/sda1 99G 60M 94G 1% /mnt/data |
Under the /mnt/data directory, you will also locate the lost+found directory. This indicates the root of an Ext* filesystem:
|
1 |
ls -l /mnt/data |
|
1 2 3 4 |
Output total 16 drwx------ 2 root root 16384 Mar 2 11:10 lost+found |
If you want to check that the mounted file has read and write capabilities, try writing to a test file like so:
|
1 |
echo "success" | sudo tee /mnt/data/test_file |
Simply go over the file once to ensure that the write was executed correctly:
|
1 |
cat /mnt/data/test_file |
|
1 2 3 |
Output success |
The output shows that the filesystem is functioning as it should. Now, you can safely remove this file:
|
1 |
sudo rm /mnt/data/test_file |
Conclusion
By the end of this guide, you will know how to partition, format, mount, and test new filesystems or drives on your server. This tutorial addresses the general process of using a raw disk as a filesystem for storage in Linux. In specific cases, more complex methods may be required to partition, format, and mount. However, this tutorial will equip you with the basic knowledge and skills you need to begin with.
Happy Computing!
- How to Deploy WordPress with Persistent Volume on Kubernetes Cluster - March 17, 2023
- Deploying Applications on Kubernetes Using Argo CD and GitOps - October 26, 2022
- Using Node.js Modules with npm and package.json: A Tutorial - October 6, 2022
- Using Ansible to Install and Configure WordPress with LAMP on Ubuntu - September 23, 2022
- Creating Views in the Django Web Application Framework - September 22, 2022