Introduction
Date and time are not only critical components of routine life but also a part of computer programming. Whether you need them to book appointments or display a calendar, there are many reasons why you would require a date and time. The applications of date and time features are extensive and extremely versatile. The versatility comes from the fact that you can configure the time and date based on the user. Every user in a different geographical location will get a different result based on their time zone. These features are used for websites with appointment interfaces and booking systems like restaurants.
Programmers often use JavaScript to add the date and time features to their website. This is because JavaScript already has a built-in feature for these aspects. In this tutorial, we will explore the Date object in further detail. We will talk about the methods you can use to configure the ideal settings for the date and time on your website. We will also cover how you can change the format and more.
What is the Date Object?
As we just mentioned, JavaScript has a built-in feature for the date and time. It is called the Date object. This object lets you change and manage associated data for date and time. When you create an instance for the Date, a new object is created. This object corresponds to the date and time settings of your computer as of that moment.
To better understand the workings of this object, let’s consider an example. We will make a variable first. Then we will assign it a given date. Let’s assume the day is Wednesday and the date is 18 October in the London (GMT) timezone. Take a look at this configuration:
|
1 2 3 4 |
// Set variable to current date and time const now = new Date(); // View the output Now; |
|
1 2 3 |
Output Wed Oct 18 2017 12:41:34 GMT+0000 (UTC) |
Our output is showing a date string. It consists of the following data:
| Day of the Week | Month | Day | Year | Hour | Minute | Second | Timezone |
| Wed | Oct | 18 | 2017 | 12 | 41 | 34 | GMT+0000 (UTC) |
JavaScript receives the data through a timestamp. This timestamp comes from Unix time. This is a value that shows the number of milliseconds passed since January 1st, 1970 at midnight. To the user, the date appears in an understandable format. If you want to get this timestamp, you have to use the getTime() method like this:
|
1 2 3 |
// Get the current timestamp now.getTime(); |
|
1 2 3 |
Output 1508330494000 |
While this value looks confusing, it represents the same thing as the date string. It is simply October 18th, 2017.
What is Epoch Time?
The next concept to learn is epoch time. It is also called zero time. You can better understand it as the data string
01 January, 1970 00:00:00 Universal Time (UTC) and the 0 timestamp. To test it, make a new variable. Then assign it to a new
Date instance on a 0 timestamp:
|
1 2 3 4 5 |
// Assign the timestamp 0 to a new variable const epochTime = new Date(0); epochTime; |
|
1 2 3 |
Output 01 January, 1970 00:00:00 Universal Time (UTC) |
Epoch time used to be the standard for programmers. It is also the method that JavaScript uses to measure time.
Formats for Date Creation in JavaScript
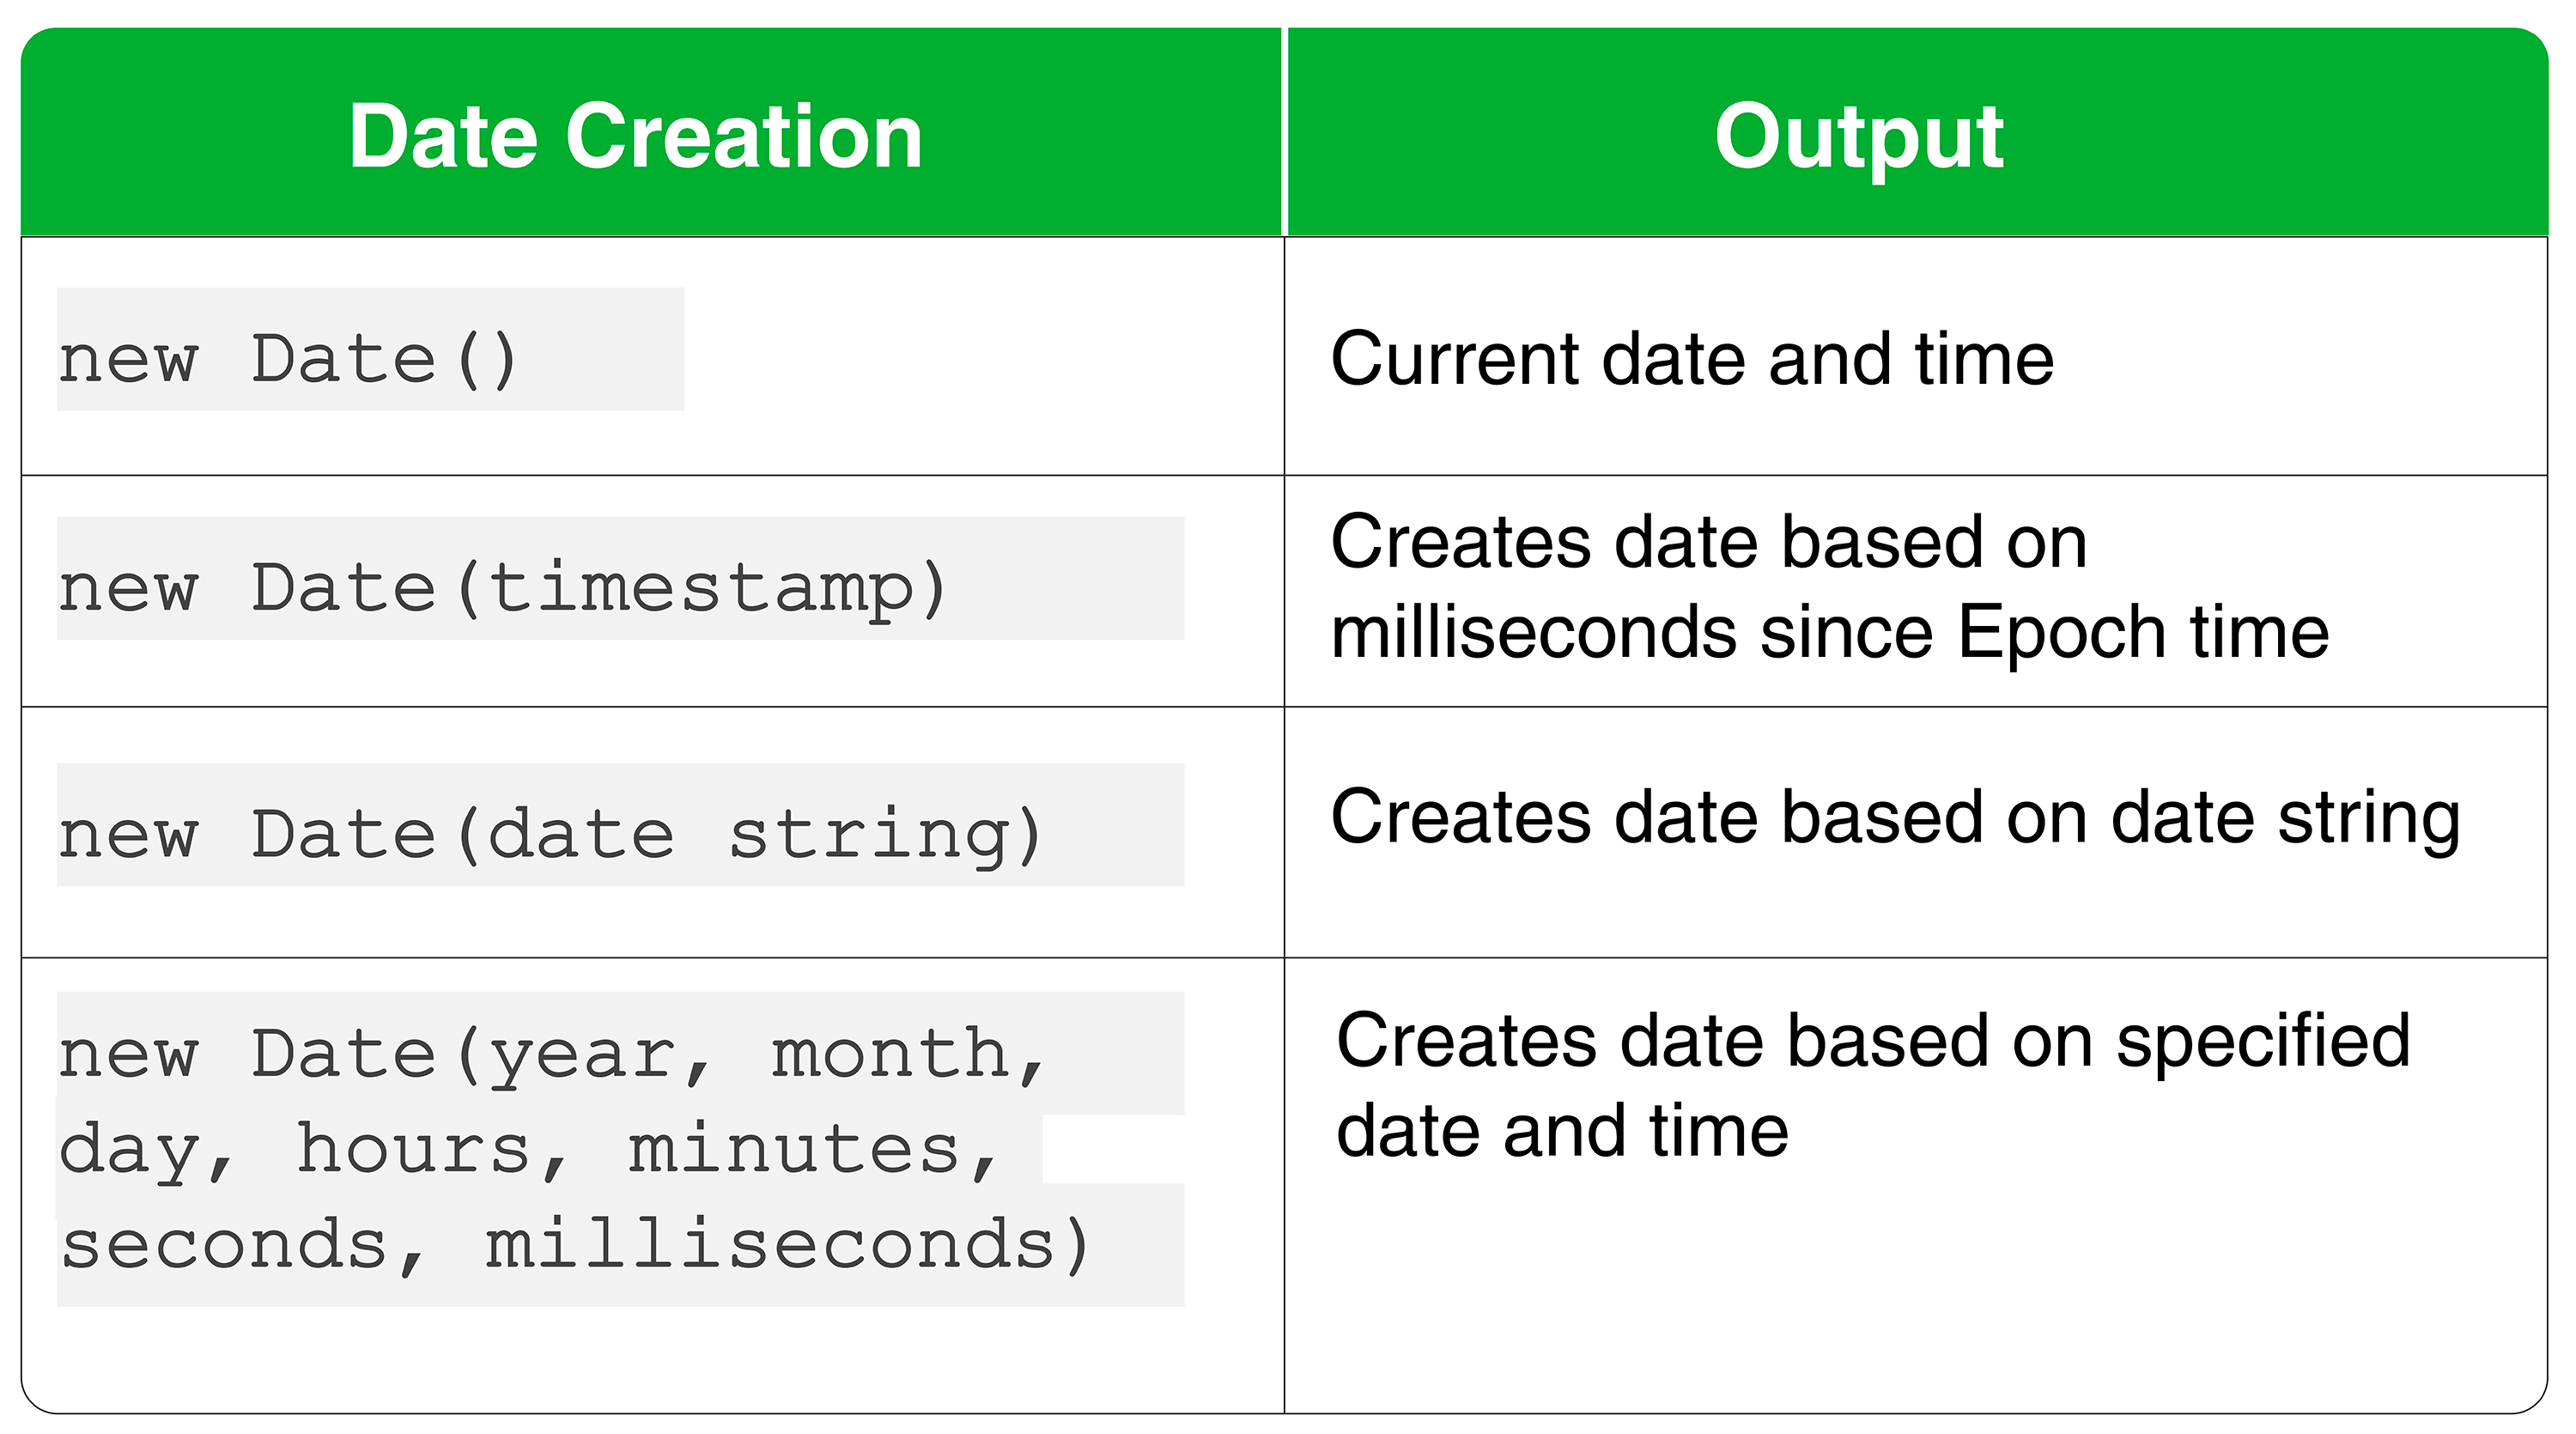
Now that we know how to make a new Date instance with a string and timestamp, we can talk about the different formats. There are four formats which are detailed as follows:
This means that it is possible for you to mention specific dates and times as needed. You can also simply use a data string or timestamp as we discussed before. For your understanding, we will observe how to make new
Date objects in three different ways. Assuming our date and time is July 4th, 1776 at 12:30 pm GMT:
|
1 2 3 4 5 6 7 8 |
// Timestamp method new Date(-6106015800000); // Date string method new Date("July 4 1776 12:30"); // Date and time method new Date(1776, 6, 4, 12, 30, 0, 0); |
As you can see, all three methods give the same date as the output. One difference is that if you are using a time before Epoch time, the timestamp will show with a negative number. Additionally, the seconds and milliseconds are 0 by default in the date and time method. If you forget to enter a number, then it will be set to 0 as default as well.
Another confusing aspect is that July is represented by 6 instead of 7. This is because the numbering begins with 0. Keep these things in mind when you are creating the instances.
Using the get Command to Retrieve the Date
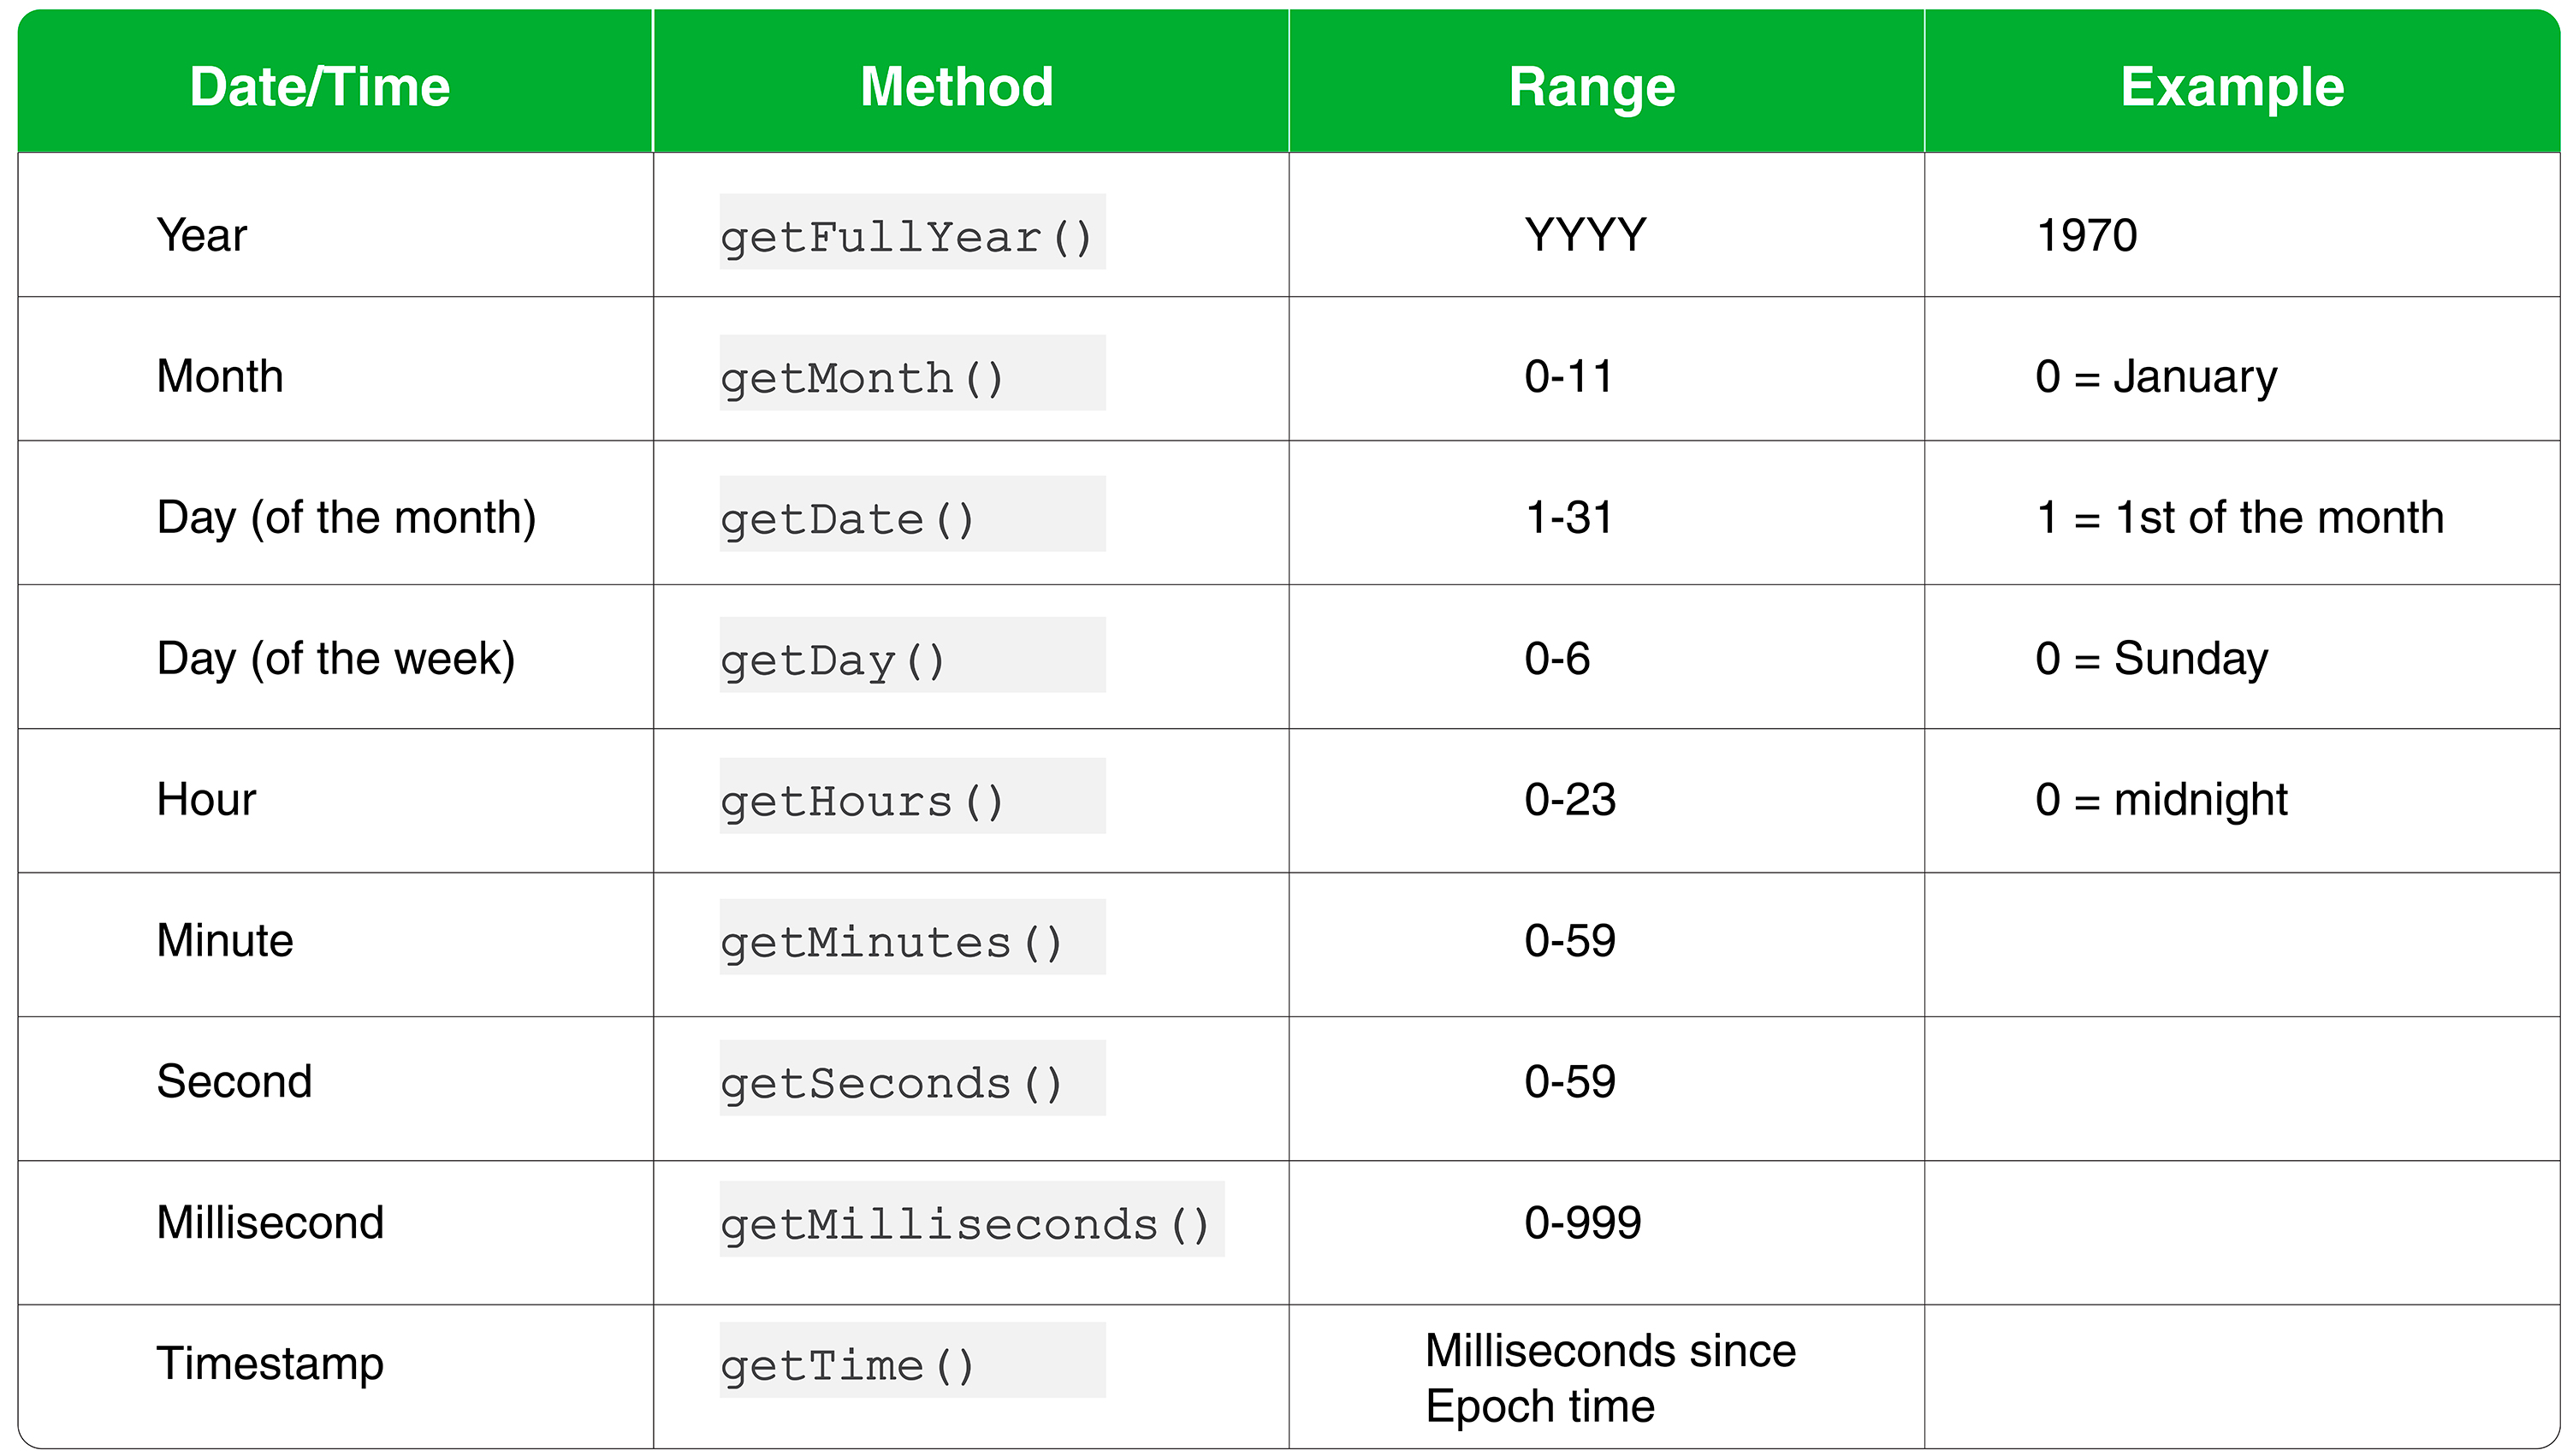
Now that the date is set, let’s see how you can access its components. One way is to use the get command. This table shows all the get methods for the Date object:
In this example, we will assign a new date to a new variable, July 31, 1980:
|
1 2 |
// Initialize a new birthday instance const birthday = new Date(1980, 6, 31); |
This is what it would look like if you were to get all individual date components using this method:
|
1 2 3 4 5 6 7 8 9 |
birthday.getFullYear(); // 1980 birthday.getMonth(); // 6 birthday.getDate(); // 31 birthday.getDay(); // 4 birthday.getHours(); // 0 birthday.getMinutes(); // 0 birthday.getSeconds(); // 0 birthday.getMilliseconds(); // 0 birthday.getTime(); // 333849600000 (for GMT) |
In some situations, you may need only a certain part of the date. You can use these methods to do that. Here’s how you can test to confirm if its October 3rd:
|
1 2 3 4 5 6 7 8 |
// Get today's date const today = new Date(); // Compare today with October 3rd if (today.getDate() === 3 && today.getMonth() === 9) { console.log("It's October 3rd."); } else { console.log("It's not October 3rd."); } |
|
1 2 3 |
Output It's not October 3rd. |
That is the output you would get if the date was not October 3rd and you tested against it.
Using the set Command to Modify the Date
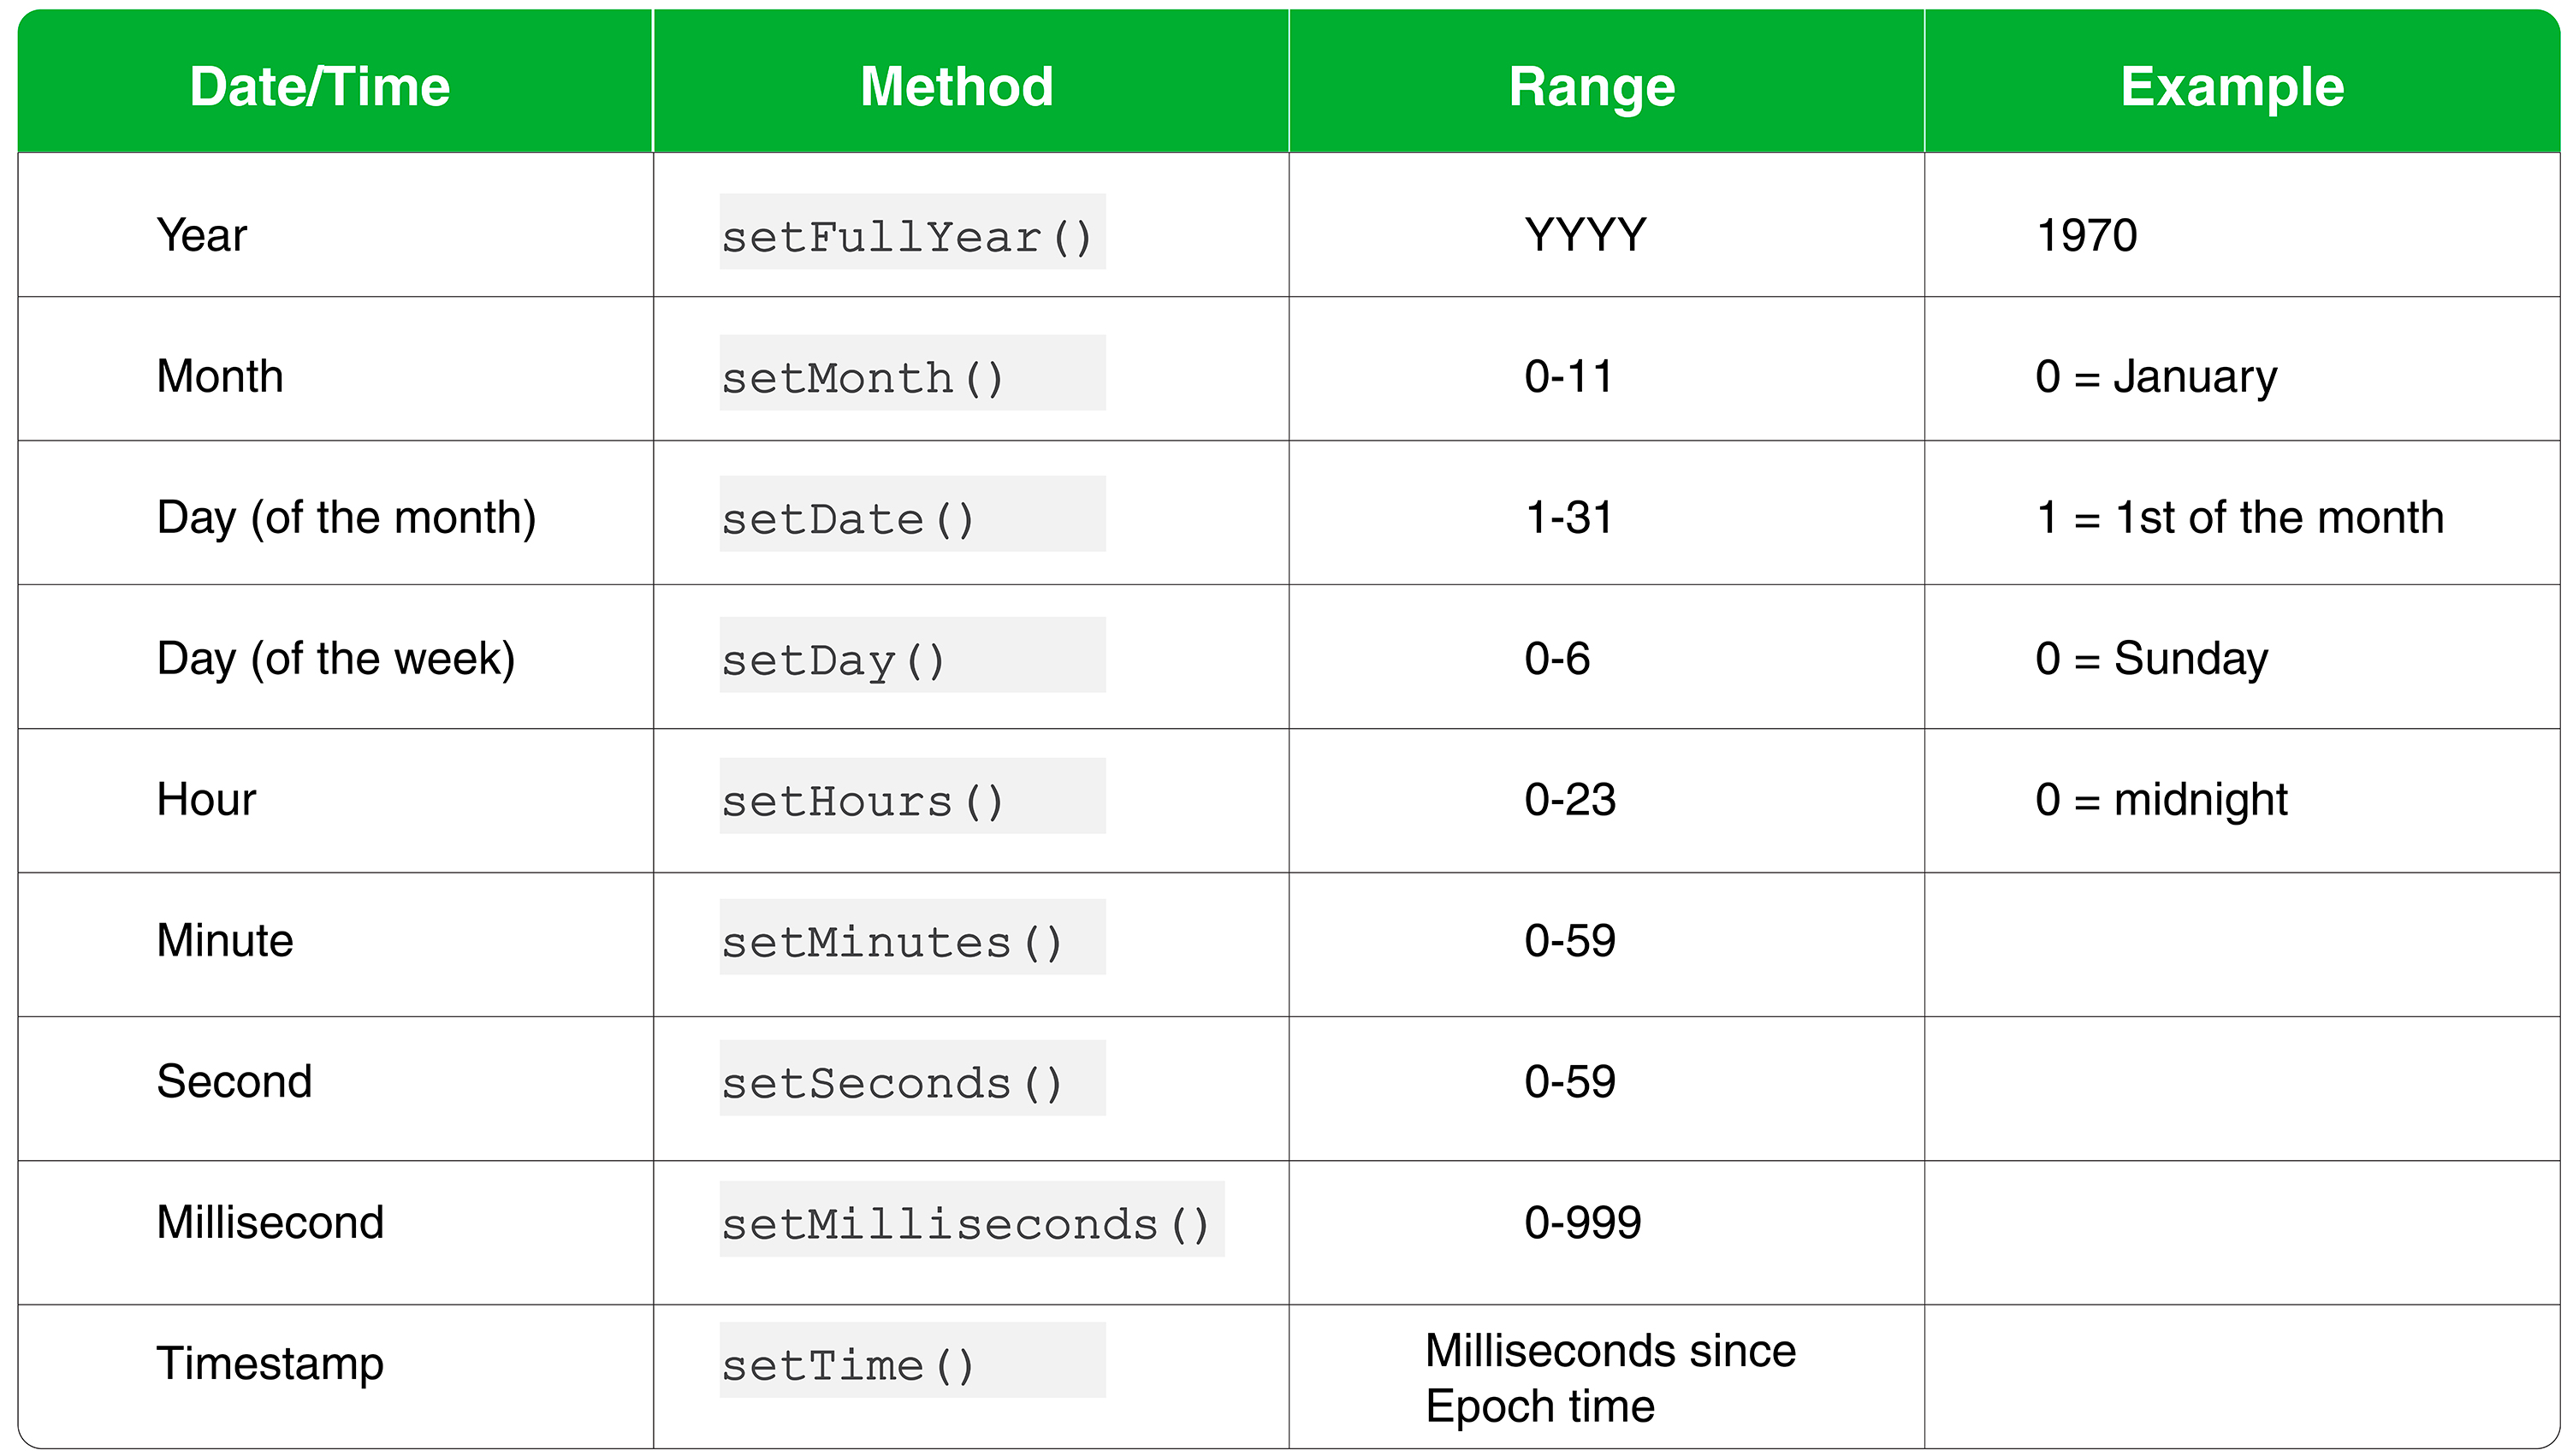
Similar to the get commands, you have the set command counterparts. This command lets you modify the date components. This table shows all of the methods:
Let’s say we want to change the variable birthday from 1997 to 1980:
|
1 2 3 |
// Change year of birthday date birthday.setFullYear(1997); birthday; |
|
1 2 3 |
Output Thu Jul 31 1997 00:00:00 GMT+0000 (UTC) |
Now our output shows the new year. You can similarly modify other components of the date as well.
UTC Date Methods in JavaScript
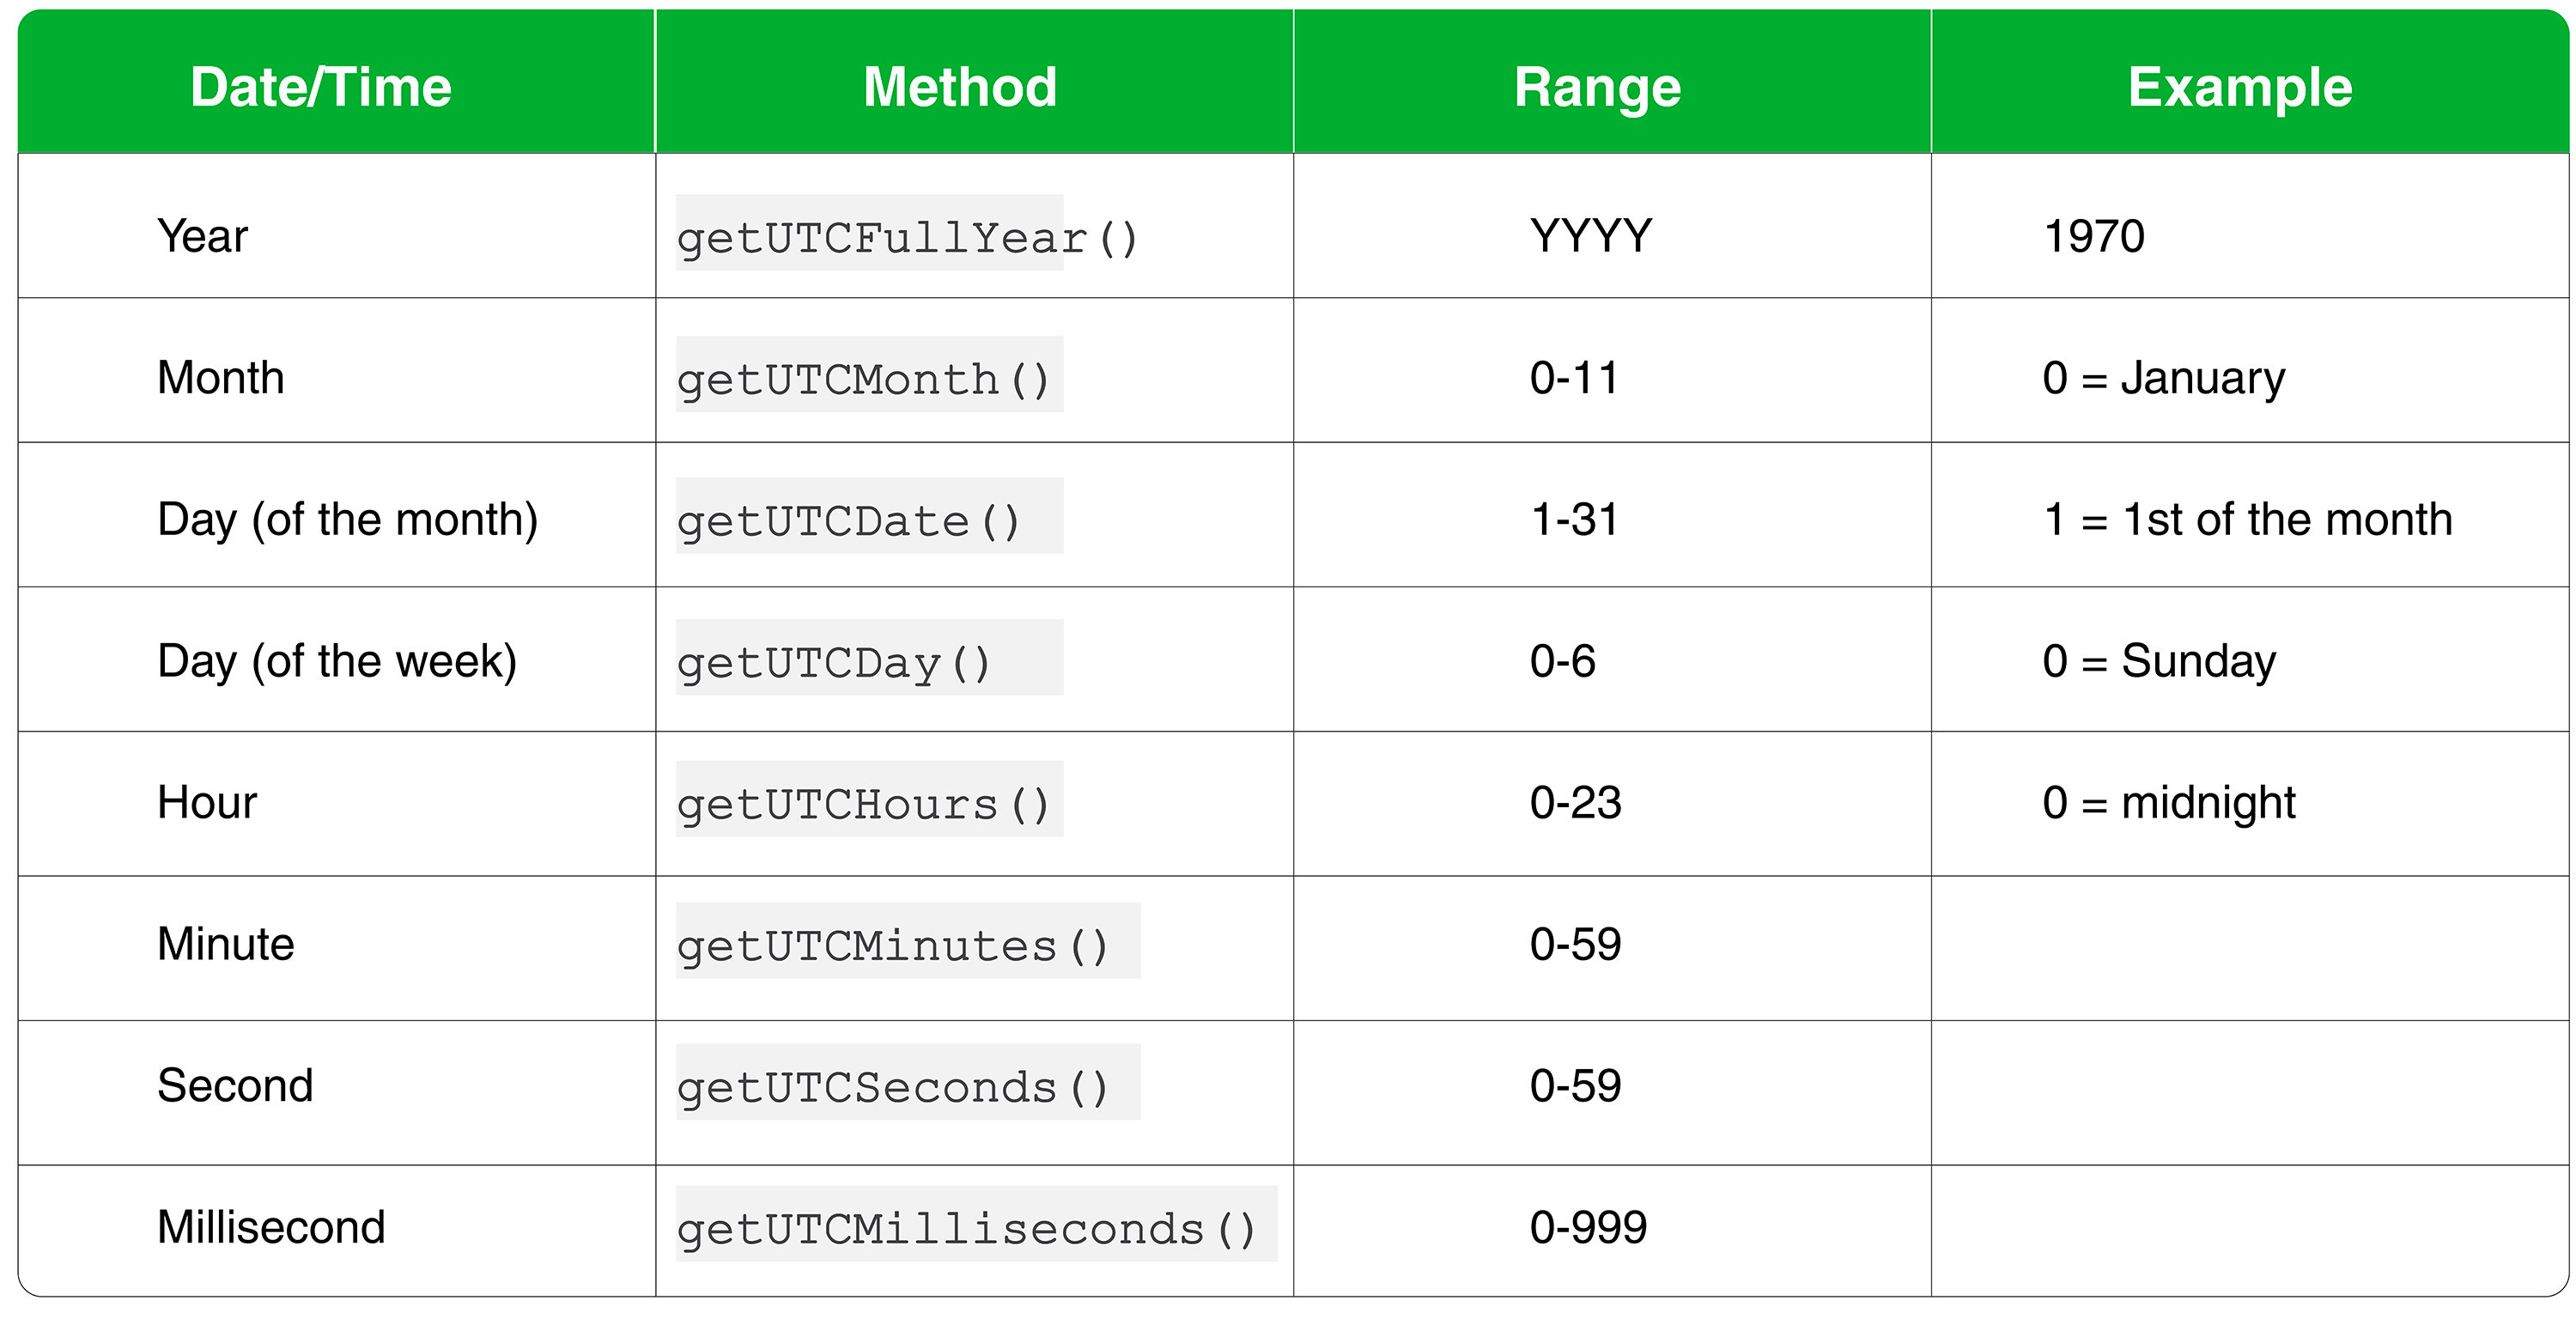
If you extract the date components using the get method, you will receive them based on the local system settings of the user’s timezone. Alternatively, you can configure it to calculate the time based on the UTC standard. UTC stands for Coordinated Universal Time. You can do this using the getUTC method. This table shows all the UTC methods for the Date object in JavaScript:
As you can see, all the methods are similar to the get commands. However, outputs would be different. You can test the difference with this code:
|
1 2 3 4 5 6 |
// Assign current time to a variable const now = new Date(); // Print local and UTC timezones console.log(now.getHours()); console.log(now.getUTCHours()); |
This code will show you the current hour as well as the hour in the UTC time zone. The numbers will be the same if you are already in the UTC time zone. The reason why you would use UTC is that it allows for consistency across international zones and regions.
Conclusion
We covered the various methods for the Date object in this tutorial. This included how to retrieve the date components with get and how to modify them with set. We also explored the UTC time zones and how to use them in JavaScript.
Ultimately, JavaScript has a tonne of built-in features for date and time. This makes programming complex websites quite straightforward. You can read more about the JavaScript date and time features on the Mozilla Developer Network. However, this tutorial should help you cover your bases regarding the fundamentals.
Here are more resources from our blog that will make programming with JavaScript easier:
- JavaScript: a Tutorial on How to Index, Split, and Manipulate Strings
- Working with JavaScript: How Prototypes and Inheritances Operate
- A Guide on Adding JavaScript to HTML
- An Overview of the JSON Data Sharing Format
Happy Computing!
- How to Deploy WordPress with Persistent Volume on Kubernetes Cluster - March 17, 2023
- Deploying Applications on Kubernetes Using Argo CD and GitOps - October 26, 2022
- Using Node.js Modules with npm and package.json: A Tutorial - October 6, 2022
- Using Ansible to Install and Configure WordPress with LAMP on Ubuntu - September 23, 2022
- Creating Views in the Django Web Application Framework - September 22, 2022


